Written by Allen Wyatt (last updated February 10, 2024)
This tip applies to Excel 2007, 2010, 2013, 2016, 2019, Excel in Microsoft 365, and 2021
Kris has a worksheet where there are a large number of blank rows in the data. He's looking for a simple macro that will delete all the rows that are totally blank.
There are a number of ways to accomplish this task. The following sections examine all the various ideas for getting rid of those troublesome rows.
Selecting Blanks
One quick way you can check where blanks are is to just select blanks in your data. Follow these steps:
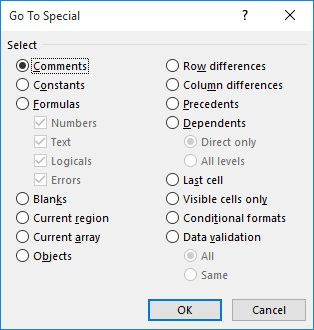
Figure 1. The Go To Special dialog box.
There is a huge caveat in taking this approach: It will delete any rows in which any cell is blank. In other words, this approach is best if the only blanks in your data are in rows that you actually want to delete. If there are some empty cells interspersed among data you really want to keep, don't use this method, as it will delete those rows, as well.
Sorting
If your data doesn't consist of very many rows (say, only ten columns or fewer), you might consider just sorting the data. If you include each column in your sort specification, then you'll end up with the blank rows all right next to each other and you can easily delete them.
If there are lots of columns in your data and you don't mind adding a helper column, you can get rid of blank rows in a variation on the sorting method. Let's say that your data is in column A through P. In column Q, enter either one of these formulas:
=COUNTA(A1:P1)
=IF(COUNTBLANK(A1:P1)=16,"DELETE","")
It doesn't matter which one you use; they will both give you information you can work with. In the case of the COUNTA formula, you simply need to sort on the basis of column Q and delete anything with a 0 in that column.
In the case of the COUNTBLANK formula, you'll want to change the equated value (16) to however many columns you are having the COUNTBLANK function consider. (In this case, 16 is the number of columns in the range A:P, inclusive.) After the formula is in place you can sort by column Q, then simply delete all the rows that have the word "DELETE" in that column.
Another variation on the sorting approach is to simply use the filtering capabilities of Excel to filter your list to contain only blanks in one of the data columns. (For instance, you might filter for blanks in column A.) You can then sort the remaining columns so you have entire blank rows in one place and then delete those rows.
Macros
If you need to delete blank rows quite often, then you'll want to seriously consider using a macro to do the hard work. Your macro could easily be added to the ribbon or assigned to a shortcut key so you can invoke it very easily.
Earlier in this tip I mentioned that you could, if desired, use the Go To Special dialog box to select blank cells in the range of your data and then delete the rows on which those blank cells occur. You can do the same thing in a ver simple macro:
Sub DeleteBlanks()
    Dim R As Range

    Set R = Range("A1:" & ActiveCell.SpecialCells(xlLastCell).Address)
    R.SpecialCells(xlCellTypeBlanks).EntireRow.Delete
End Sub
Remember, though, that this macro will delete any rows on which there are any blanks, even if you want to keep other data that may be on that row.
A better approach would be to do a more comprehensive check on each row in the worksheet:
Sub DeleteBlankRows()
    Dim lRows As Long
    Dim J As Long

    lRows = ActiveCell.SpecialCells(xlLastCell).Row
    Application.ScreenUpdating = False
    For J = lRows To 1 Step -1
        If WorksheetFunction.CountA(Rows(J)) = 0 Then Rows(J).Delete
    Next J
    Application.ScreenUpdating = True
End Sub
Note that the macro determines the last cell used in the workbook and sets the lRows value equal to the row on which that cell occurs. A For...Next loop then steps through each row (from the last to the first) and uses the COUNTA function to determine if there is anything on that row. If not, the row is deleted.
Note:
ExcelTips is your source for cost-effective Microsoft Excel training. This tip (254) applies to Microsoft Excel 2007, 2010, 2013, 2016, 2019, Excel in Microsoft 365, and 2021.
Excel Smarts for Beginners! Featuring the friendly and trusted For Dummies style, this popular guide shows beginners how to get up and running with Excel while also helping more experienced users get comfortable with the newest features. Check out Excel 2013 For Dummies today!
If you are getting an error when you try to create an event handler, it could be related to a long-known bug in Excel. ...
Discover MoreWant to replace all commas in a formatted number with periods, and vice-versa? There are a couple of approaches you can ...
Discover MoreNeed to use a macro to select a specific cell in a different workbook? It's not as straightforward of a proposition as ...
Discover MoreFREE SERVICE: Get tips like this every week in ExcelTips, a free productivity newsletter. Enter your address and click "Subscribe."
2024-02-11 12:00:23
J. Woolley
The Tip's 2nd formula under Sorting is
=IF(COUNTBLANK(A1:P1)=16,"DELETE","")
Either of the following versions might be better:
=IF(COUNTBLANK(A1:P1)=COLUMN(P1),"DELETE","")
=IF(COUNTBLANK(A1:P1)=COLUMNS(A1:P1),"DELETE","")
Notice COUNTBLANK counts cells that are either empty or contain blank text (""); therefore, a row containing formulas that return blank text could be marked DELETE, which might be undesirable. In this case, the following version might be preferred:
=IF(COUNTA(A1:P1)=0,"DELETE","")
See Alex Blakenburg's comment below.
2024-02-10 07:08:32
Alex Blakenburg
A watch out is that most users consider a formula that returns an empty string ie "" to be blank. However, Goto Blank and Special Cells blanks do not consider "" to be blank nor does CountA which will count it as a non-empty cell.
Got a version of Excel that uses the ribbon interface (Excel 2007 or later)? This site is for you! If you use an earlier version of Excel, visit our ExcelTips site focusing on the menu interface.
FREE SERVICE: Get tips like this every week in ExcelTips, a free productivity newsletter. Enter your address and click "Subscribe."
Copyright © 2024 Sharon Parq Associates, Inc.
Comments