Please Note: This article is written for users of the following Microsoft Excel versions: 2007, 2010, 2013, 2016, 2019, and Excel in Microsoft 365. If you are using an earlier version (Excel 2003 or earlier), this tip may not work for you. For a version of this tip written specifically for earlier versions of Excel, click here: Rows in a PivotTable.
Written by Allen Wyatt (last updated June 22, 2019)
This tip applies to Excel 2007, 2010, 2013, 2016, 2019, and Excel in Microsoft 365
When working with PivotTables, you may have a need to determine how many rows the PivotTable contains. There are a couple of ways you can go about this. If you want to use a worksheet formula, you can create a formula that will return the count of cells.
The first thing you need to do is to determine which column of your PivotTable you want to count. For the sake of this example, let's say that you want to count column C. Display the New Name dialog box and specify a name for your data in the Name field. In the Refers To field enter the following formula:
=OFFSET($C$1,0,0,COUNTA($C:$C,1))
Click OK, and you have given a name to a range of data defined by the formula. Assuming that the name you used was PTRows, you could then use the following formula in a regular cell:
=ROWS(PTRows)
What is returned is the count of the rows in the data range, which represents your PivotTable.
If you want to determine the row count in a macro, the following line will assign the value to the lRowCount variable:
lRowCount = ActiveSheet.PivotTables("Pivottable1").TableRange2.Rows.Count
This code returns a count of all the rows in the PivotTable, including the page fields. If you want to omit the page fields and just return the count of the rows in the main PivotTable, you can use this code instead:
lRowCount = ActiveSheet.PivotTables("Pivottable1").TableRange1.Rows.Count
Note:
ExcelTips is your source for cost-effective Microsoft Excel training. This tip (8563) applies to Microsoft Excel 2007, 2010, 2013, 2016, 2019, and Excel in Microsoft 365. You can find a version of this tip for the older menu interface of Excel here: Rows in a PivotTable.

Save Time and Supercharge Excel! Automate virtually any routine task and save yourself hours, days, maybe even weeks. Then, learn how to make Excel do things you thought were simply impossible! Mastering advanced Excel macros has never been easier. Check out Excel 2010 VBA and Macros today!
PivotTables are a great way to work with large quantities of data in an intelligent manner. Sometimes, however, you just ...
Discover MoreIf you modify the data on which a PivotTable is based, you'll need to refresh the table so it reflects the modified data. ...
Discover MoreWhen you update a PivotTable, Excel can take liberties with any formatting you previously applied to the PivotTable. ...
Discover MoreFREE SERVICE: Get tips like this every week in ExcelTips, a free productivity newsletter. Enter your address and click "Subscribe."
2020-04-13 11:53:30
Hi,
I just discovered your site and this is the closest thing I've found to a solution plaguing me for months! Our company is in transition and until we move toward a singular SQL database we are using Excel to perform that function.
Long story short, I have been trying to count the number of values in a pivot table that have values to those that do not to come up with a "percent complete" total.
I used your formula for both rows and columns to get a grand total (still working on generating a count of the values in the value field).
My question is this: the total of rows and columns using this OFFSET formula include the label headers. In other words, it's an adding an extra two rows and one extra column in the total generated by the OFFSET function.
Really tough to explain but in essence I'm trying to create a donut chart that shows complete chart dynamically based on slicer fields set up for the finished pivot (e.g. filter by employee name, course name, etc.).
(see Figure 1 below)
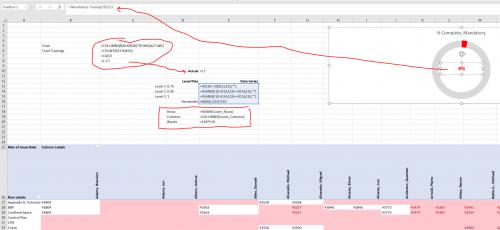
Figure 1. Pivot Table, Formula View
Got a version of Excel that uses the ribbon interface (Excel 2007 or later)? This site is for you! If you use an earlier version of Excel, visit our ExcelTips site focusing on the menu interface.
FREE SERVICE: Get tips like this every week in ExcelTips, a free productivity newsletter. Enter your address and click "Subscribe."
Copyright © 2024 Sharon Parq Associates, Inc.
 Please Note:
This article is written for users of the following Microsoft Excel versions: 2007, 2010, 2013, 2016, 2019, and Excel in Microsoft 365. If you are using an earlier version (Excel 2003 or earlier), this tip may not work for you. For a version of this tip written specifically for earlier versions of Excel, click here:
Please Note:
This article is written for users of the following Microsoft Excel versions: 2007, 2010, 2013, 2016, 2019, and Excel in Microsoft 365. If you are using an earlier version (Excel 2003 or earlier), this tip may not work for you. For a version of this tip written specifically for earlier versions of Excel, click here:
Comments