Pasting Excel Data within Word's Page Margins

Written by Allen Wyatt (last updated January 2, 2021)
This tip applies to Excel 2007, 2010, 2013, 2016, 2019, and Excel in Microsoft 365


1

Jerald uses Excel quite a bit in conjunction with Word. He creates his financial models in Excel and then pastes the Excel data into a Word document before printing. Every time he pastes the data, the "table" in Word extends beyond the right margin. Jerald wonders if there is something he can do, in Excel, to ensure that the data will stay within the page margins in Word.

There are a few ways you can approach this, with most of the solutions occurring on the Word side of the process. One option is to, in Word and before pasting, create a single-cell table that is the full width of the margins on the page. You can then paste the Excel data into that single cell, which results in Word creating a table within a table. Since the table is bounded by the outer single-cell table, it won't extend beyond the margins of the page.

You can also, within Word, choose from different available pasting options for the table. When you copy the table in Excel and switch to Word, click where you want the data inserted. Then, display the Home tab of the ribbon and, in the Clipboard group, click the down arrow under the Paste tool. From the resulting options you should notice six options in the Paste Options area:

  • To keep the data as an Excel table object, click either Keep Source Formatting or Link & Keep Source Formatting. (Note that linking is the only difference between these two options.)
  • To have the data adapt to the styles available in Word, click Use Destination Styles or Link & Use Destination Styles. (Again, note that linking is the only difference between these two options.) This option should fit the data within the margins as a Word table, with data wrapped within cells as necessary.
  • To paste the data as a static picture, click Picture. This option is very similar to pasting any other picture in Word, which means that it will not overrun the margins of the page. Instead, the "picture" is resized to fit within the margins.
  • To paste the data as unlinked text, click Keep Text Only. This results in each row of your Excel data as an individual paragraph with tabs between each column in each row. You can then select this pasted data and covert it to a Word table that extends from margin to margin.

A third option is to try modifying a deeply buried setting in Word. Follow these steps, again within Word:

  1. Display the Word Options dialog box. (In Word 2007 click the Office button and then click Word Options. In Word 2010 or later versions display the File tab of the ribbon and then click Options.)
  2. At the left side of the dialog box choose Advanced.
  3. Scroll through the options until you see the Cut, Copy, and Paste section.
  4. Make sure the Use Smart Cut and Paste option is selected.
  5. Click the Settings button, next to the Use Smart Cut and Paste option. Word displays the Settings dialog box. (See Figure 1.)
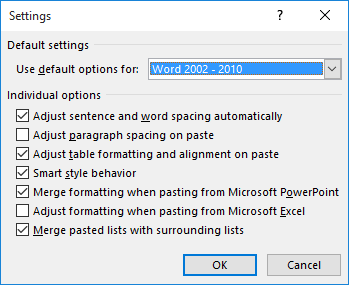
  6. Figure 1. The Settings dialog box in Word.

  7. Make sure the Adjust Formatting when Pasting from Microsoft Excel option is selected.
  8. Click OK to dismiss the Settings dialog box.
  9. Click OK to dismiss the Word Options dialog box.

If your table extends beyond the right margin after you paste it, you could also follow these steps after the pasting:

  1. Right-click the table handle to display a Context menu. (The table handle is at the top-left corner of the table; it looks like a small box containing a four-headed arrow.)
  2. Choose AutoFit | AutoFit to Contents. Word adjusts the columns widths, as necessary, to fit the data within the margins of the page.
  3. Manually adjust column widths, as desired.

ExcelTips is your source for cost-effective Microsoft Excel training. This tip (13288) applies to Microsoft Excel 2007, 2010, 2013, 2016, 2019, and Excel in Microsoft 365.

Author Bio

Allen Wyatt

With more than 50 non-fiction books and numerous magazine articles to his credit, Allen Wyatt is an internationally recognized author. He is president of Sharon Parq Associates, a computer and publishing services company. ...

MORE FROM ALLEN

Stepping Through a Macro with a Worksheet Visible

When developing a macro, it is often necessary to step through the various code lines so you can see what is happening on ...

Discover More

Changing Fonts in Multiple Workbooks

If you need to change fonts used in a lot of different workbooks, the task can be daunting, if you need to do it ...

Discover More

Adding a Macro to the Quick Access Toolbar

The Quick Access Toolbar is a great place to put anything for which you want quick access. (Duh!) Here's how you can add ...

Discover More

Professional Development Guidance! Four world-class developers offer start-to-finish guidance for building powerful, robust, and secure applications with Excel. The authors show how to consistently make the right design decisions and make the most of Excel's powerful features. Check out Professional Excel Development today!

More ExcelTips (ribbon)

Getting Rid of Spaces in Cells

Importing data into Excel that was generated in other programs can have some interesting side effects. For instance, you ...

Discover More

Easily Dividing Values by 1000

Sometimes the data in a worksheet isn't in the exact format desired. If you want to divide your values by 1,000, there ...

Discover More

Adding Spaces in Front of Capital Letters

Got some text that is "run together" and needs spaces inserted to improve readability? There are a variety of approaches ...

Discover More
Subscribe

FREE SERVICE: Get tips like this every week in ExcelTips, a free productivity newsletter. Enter your address and click "Subscribe."

View most recent newsletter.

Comments

If you would like to add an image to your comment (not an avatar, but an image to help in making the point of your comment), include the characters [{fig}] (all 7 characters, in the sequence shown) in your comment text. You’ll be prompted to upload your image when you submit the comment. Maximum image size is 6Mpixels. Images larger than 600px wide or 1000px tall will be reduced. Up to three images may be included in a comment. All images are subject to review. Commenting privileges may be curtailed if inappropriate images are posted.

What is 1 + 1?

2021-01-02 10:47:50

Philip Andrew

After copying the Excel range to print and pasting it into Word, the Excel values appear in Word as a Table. I simply select the Table in Word (the table's crossed arrows handle, top left), which causes the "Layout" tab to appear in blue text at the right end of the Word Ribbon, which in turn causes the "Convert to Text" tab to appear near the right end of the ribbon dropdown, which, when clicked, all is perfect!
I find Excel's printing capability incredibly crude, at least partly due to the quirky function AutoFit Row Height.


This Site

Got a version of Excel that uses the ribbon interface (Excel 2007 or later)? This site is for you! If you use an earlier version of Excel, visit our ExcelTips site focusing on the menu interface.

Newest Tips
Subscribe

FREE SERVICE: Get tips like this every week in ExcelTips, a free productivity newsletter. Enter your address and click "Subscribe."

(Your e-mail address is not shared with anyone, ever.)

View the most recent newsletter.