Please Note: This article is written for users of the following Microsoft Excel versions: 2007, 2010, 2013, 2016, 2019, and Excel in Microsoft 365. If you are using an earlier version (Excel 2003 or earlier), this tip may not work for you. For a version of this tip written specifically for earlier versions of Excel, click here: AutoFill with Random Numbers.
Written by Allen Wyatt (last updated September 19, 2020)
This tip applies to Excel 2007, 2010, 2013, 2016, 2019, and Excel in Microsoft 365
Excel includes a feature that allows you to automatically fill a range of cells with information you have placed in just a few cells. For instance, you could enter the value 1 in a cell, and then 2 in the cell just beneath it. If you then select the two cells and drag the small black handle at the bottom right corner of the selection, you can fill any number of cells with incrementing numbers. This AutoFill feature sure beats having to type in all the values!
You may wonder if there is a similar way to use the AutoFill feature to place random numbers in a range. Unfortunately, the AutoFill feature was never meant for random numbers. Why? Because AutoFill uses predictive calculations to determine what to enter into a range of cells. For example, if you entered 1 into one cell and 5 into the next, highlighted the cells and then used AutoFill, the next number entered in the cell below would be 9 because Excel can deduce that the increment is 4. It is a constant increment that can be predicted.
Random numbers on the other hand are, well, random. By nature, they cannot be predicted, else they wouldn't be random. Therefore, the predictive nature of AutoFill cannot be applied to random numbers.
However, there are ways around this. One is to simply use the various formulas (using RAND and RANDBETWEEN) that have already been adequately covered in other issues of ExcelTips. These formulas can quickly and easily be copied over a range of cells, using a variety of copying techniques.
Another approach is to use a feature of the Analysis ToolPak which makes putting random numbers into a range of cells pretty easy. Just follow these steps:
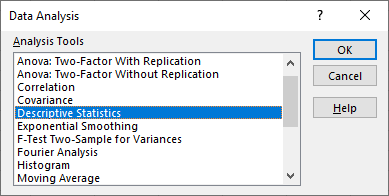
Figure 1. The Data Analysis dialog box.
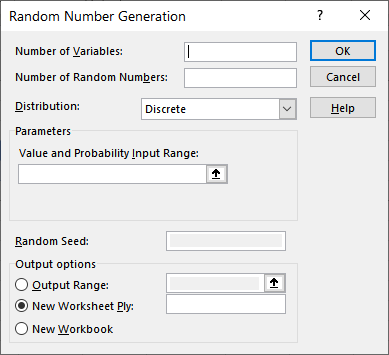
Figure 2. The Random Number Generation dialog box.
You can find a good explanation of all the dialog box options (step 5) at this website:
https://www.bettersolutions.com/excel/EUN147/YI231420881.htm
If you don't see the Analysis group on the Data tab of the ribbon (step 2), it means that you don't have the Analysis ToolPak enabled. Follow these steps to enable it:
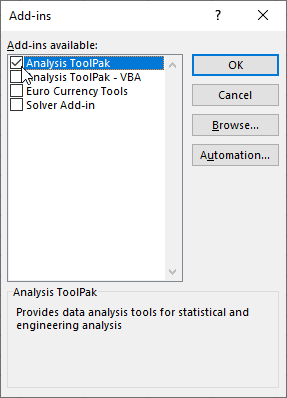
Figure 3. The Add-Ins dialog box.
The Analysis group should now appear on the Data tab of the ribbon. When you use the Random Number Generation tool, you might be a bit overwhelmed by all the options it provides you.
ExcelTips is your source for cost-effective Microsoft Excel training. This tip (8810) applies to Microsoft Excel 2007, 2010, 2013, 2016, 2019, and Excel in Microsoft 365. You can find a version of this tip for the older menu interface of Excel here: AutoFill with Random Numbers.

Solve Real Business Problems Master business modeling and analysis techniques with Excel and transform data into bottom-line results. This hands-on, scenario-focused guide shows you how to use the latest Excel tools to integrate data from multiple tables. Check out Microsoft Excel 2013 Data Analysis and Business Modeling today!
AutoFill is a great tool for filling cells with data. What do you do when it doesn't work like you expect, however? ...
Discover MoreAutoFill is a great editing tool that comes in particularly handy when you are first creating a worksheet. You may, at ...
Discover MoreWant to fill a long column with predictive data? It's easy to do by using AutoFill and a double-click of the mouse.
Discover MoreFREE SERVICE: Get tips like this every week in ExcelTips, a free productivity newsletter. Enter your address and click "Subscribe."
There are currently no comments for this tip. (Be the first to leave your comment—just use the simple form above!)
Got a version of Excel that uses the ribbon interface (Excel 2007 or later)? This site is for you! If you use an earlier version of Excel, visit our ExcelTips site focusing on the menu interface.
FREE SERVICE: Get tips like this every week in ExcelTips, a free productivity newsletter. Enter your address and click "Subscribe."
Copyright © 2024 Sharon Parq Associates, Inc.
 Please Note:
This article is written for users of the following Microsoft Excel versions: 2007, 2010, 2013, 2016, 2019, and Excel in Microsoft 365. If you are using an earlier version (Excel 2003 or earlier), this tip may not work for you. For a version of this tip written specifically for earlier versions of Excel, click here:
Please Note:
This article is written for users of the following Microsoft Excel versions: 2007, 2010, 2013, 2016, 2019, and Excel in Microsoft 365. If you are using an earlier version (Excel 2003 or earlier), this tip may not work for you. For a version of this tip written specifically for earlier versions of Excel, click here:
Comments