Written by Allen Wyatt (last updated March 23, 2024)
This tip applies to Excel 2007, 2010, 2013, 2016, 2019, 2021, and Excel in Microsoft 365
Excel includes the ability to save automatic backups of your workbooks, and this can be controlled on a workbook-by-workbook basis. If your system is configured to create backups automatically, you may want to modify whether a backup is created for a particular workbook. In order to turn it off for a specific workbook you need to follow these steps:
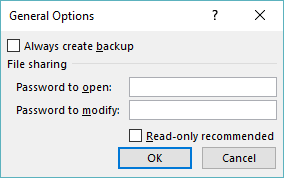
Figure 1. The General Options dialog box.
Following these steps affects only the current workbook; other workbooks remain unchanged in their behavior.
The first thing to realize about this particular setting in Excel is that it is fairly esoteric and, therefore, easy to miss. Normally you change settings in Excel by going to the Excel Options dialog box—not so with this setting. Note it is only accessed through the Save As dialog box.
Another thing that should be noted—it is easy to confuse automatic backups with AutoRecover. These are not the same. AutoRecover is a way to save temporary information, between "hard saves," so that you can recover a workbook on which you are working if the power goes out. Automatic backups are copies of your workbook saved whenever you save the workbook itself. (These backups are stored in the same folder as the original workbook being backed up.) Since AutoRecover and automatic backups are two different features of Excel, changing the settings of one feature doesn't affect the other at all.
ExcelTips is your source for cost-effective Microsoft Excel training. This tip (3884) applies to Microsoft Excel 2007, 2010, 2013, 2016, 2019, 2021, and Excel in Microsoft 365.

Best-Selling VBA Tutorial for Beginners Take your Excel knowledge to the next level. With a little background in VBA programming, you can go well beyond basic spreadsheets and functions. Use macros to reduce errors, save time, and integrate with other Microsoft applications. Fully updated for the latest version of Office 365. Check out Microsoft 365 Excel VBA Programming For Dummies today!
In Excel you can reference a cell in a formula by entering the coordinates for the cell you want to reference. This can ...
Discover MoreWhat do you do if pasting information into a worksheet brings Excel to its knees? This tip looks at just a few ideas you ...
Discover MoreIf your worksheet gets large enough, you may notice a severe slowdown when it is recalculated. This tip provides some ...
Discover MoreFREE SERVICE: Get tips like this every week in ExcelTips, a free productivity newsletter. Enter your address and click "Subscribe."
There are currently no comments for this tip. (Be the first to leave your comment—just use the simple form above!)
Got a version of Excel that uses the ribbon interface (Excel 2007 or later)? This site is for you! If you use an earlier version of Excel, visit our ExcelTips site focusing on the menu interface.
FREE SERVICE: Get tips like this every week in ExcelTips, a free productivity newsletter. Enter your address and click "Subscribe."
Copyright © 2025 Sharon Parq Associates, Inc.
Comments