Excel includes the ability to save automatic backups of your workbooks, and this can be controlled on a workbook-by-workbook basis. If your system is configured to create backups automatically, you may want to modify whether a backup is created for a particular workbook. In order to turn it off for a specific workbook you need to follow these steps:
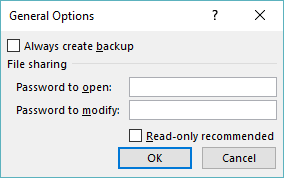
Figure 1. The General Options dialog box.
Following these steps affects only the current workbook; other workbooks remain unchanged in their behavior.
The first thing to realize about this particular setting in Excel is that it is fairly esoteric and, therefore, easy to miss. Normally you change settings in Excel by going to the Excel Options dialog box—not so with this setting. Note it is only accessed through the Save As dialog box.
Another thing that should be noted—it is easy to confuse automatic backups with AutoRecover. These are not the same. AutoRecover is a way to save temporary information, between "hard saves," so that you can recover a workbook on which you are working if the power goes out. Automatic backups are copies of your workbook saved whenever you save the workbook itself. (These backups are stored in the same folder as the original workbook being backed up.) Since AutoRecover and automatic backups are two different features of Excel, changing the settings of one feature doesn't affect the other at all.
ExcelTips is your source for cost-effective Microsoft Excel training. This tip (3884) applies to Microsoft Excel 2007, 2010, 2013, 2016, 2019, 2021, and Excel in Microsoft 365.

Program Successfully in Excel! This guide will provide you with all the information you need to automate any task in Excel and save time and effort. Learn how to extend Excel's functionality with VBA to create solutions not possible with the standard features. Includes latest information for Excel 2024 and Microsoft 365. Check out Mastering Excel VBA Programming today!
It makes sense that when Excel creates a blank workbook, it must figure out which font to use for that workbook. ...
Discover MoreAdd-ins for Excel, such as the Analysis ToolPak, are stored in files on your hard drive that can be deleted. If you ...
Discover MoreIf your arrow keys and the Enter key aren't working as you expect them to, the problem could have any number of causes. ...
Discover MoreFREE SERVICE: Get tips like this every week in ExcelTips, a free productivity newsletter. Enter your address and click "Subscribe."
There are currently no comments for this tip. (Be the first to leave your comment—just use the simple form above!)
Got a version of Excel that uses the ribbon interface (Excel 2007 or later)? This site is for you! If you use an earlier version of Excel, visit our ExcelTips site focusing on the menu interface.
FREE SERVICE: Get tips like this every week in ExcelTips, a free productivity newsletter. Enter your address and click "Subscribe."
Copyright © 2026 Sharon Parq Associates, Inc.
Comments