Please Note: This article is written for users of the following Microsoft Excel versions: 2007, 2010, 2013, 2016, 2019, and Excel in Microsoft 365. If you are using an earlier version (Excel 2003 or earlier), this tip may not work for you. For a version of this tip written specifically for earlier versions of Excel, click here: Understanding Cell Indenting.
Written by Allen Wyatt (last updated May 4, 2019)
This tip applies to Excel 2007, 2010, 2013, 2016, 2019, and Excel in Microsoft 365
When you think of indenting information, you normally think of a word processor. It is not unusual to indent paragraphs or specific lines of information on the screen. Excel, while definitely not a word processor, allows you to easily indent information within a cell.
To set the indent to be used in a cell, display the Home tab of the ribbon. Note that there are two indent tools in the Alignment group. Clicking these two tools will move the indent of the cell either to the right or back toward the left.
If you want even greater control over cell indenting, follow these steps:
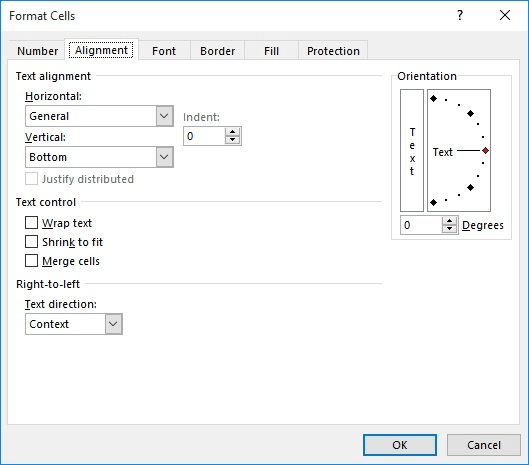
Figure 1. The Alignment tab of the Format Cells dialog box.
You should also know that Excel allows you to indent from either the left or right of the cell. If you use the Horizontal drop-down list (in the Format Cells dialog box), you can choose Left (Indent) or Right (Indent) alignment. The number you specify in the Indent control (step 4) applies to either left or right indenting, depending on your choice in the Horizontal drop-down list.
If you have set up a cell so that text wraps within the cell, then indentation affects all the lines of text within the cell—not just the first line.
ExcelTips is your source for cost-effective Microsoft Excel training. This tip (9425) applies to Microsoft Excel 2007, 2010, 2013, 2016, 2019, and Excel in Microsoft 365. You can find a version of this tip for the older menu interface of Excel here: Understanding Cell Indenting.

Create Custom Apps with VBA! Discover how to extend the capabilities of Office 2013 (Word, Excel, PowerPoint, Outlook, and Access) with VBA programming, using it for writing macros, automating Office applications, and creating custom applications. Check out Mastering VBA for Office 2013 today!
The formatting capabilities provided by Excel are quite diverse. This tip examines how you can use those capabilities to ...
Discover MoreWhen your macro is processing information in a worksheet, do you need to periodically make the contents of a cell bold? ...
Discover MoreIf you need to change the color with which a particular cell is filled, the easier method is to use the Fill Color tool, ...
Discover MoreFREE SERVICE: Get tips like this every week in ExcelTips, a free productivity newsletter. Enter your address and click "Subscribe."
2019-05-08 04:13:33
SteveJez
David,
If you can use VBA / macros then you could use this piece of code
Sub bulletlist()
Dim c As Range
For Each c In Selection
c.Value = Chr(149) & " " & c.Value
Next c
Selection.InsertIndent 2
End Sub
You can change the amount of indent by experimenting with changing the number on the end of Selection.InsertIndent 2
if you have to use this on a number of files, place this in your personal workbook or even create an addin.
If you have numeric data you can use Custom number format & styles to create whatever you want.
Hope this helps.
Steve
2019-05-07 11:52:43
Regarding indenting in cells, I frequently have to include lists within cells especially when I'm drawing up Action Plans. However there doesn't seem to be any way of including bulleted or numbered lists. I have to resort to putting a dot followed by spaces or indent, then the text. This doesn't really look right, especially as there doesn't seem to be any way to include a hanging indent. Any advice would be welcome.
Got a version of Excel that uses the ribbon interface (Excel 2007 or later)? This site is for you! If you use an earlier version of Excel, visit our ExcelTips site focusing on the menu interface.
FREE SERVICE: Get tips like this every week in ExcelTips, a free productivity newsletter. Enter your address and click "Subscribe."
Copyright © 2024 Sharon Parq Associates, Inc.
 Please Note:
This article is written for users of the following Microsoft Excel versions: 2007, 2010, 2013, 2016, 2019, and Excel in Microsoft 365. If you are using an earlier version (Excel 2003 or earlier), this tip may not work for you. For a version of this tip written specifically for earlier versions of Excel, click here:
Please Note:
This article is written for users of the following Microsoft Excel versions: 2007, 2010, 2013, 2016, 2019, and Excel in Microsoft 365. If you are using an earlier version (Excel 2003 or earlier), this tip may not work for you. For a version of this tip written specifically for earlier versions of Excel, click here:
Comments