Please Note: This article is written for users of the following Microsoft Excel versions: 2007, 2010, 2013, 2016, 2019, 2021, 2024, and Excel in Microsoft 365. If you are using an earlier version (Excel 2003 or earlier), this tip may not work for you. For a version of this tip written specifically for earlier versions of Excel, click here: Single-Use Drop-Down List.
Written by Allen Wyatt (last updated November 8, 2025)
This tip applies to Excel 2007, 2010, 2013, 2016, 2019, 2021, 2024, and Excel in Microsoft 365
One of the really cool uses for the data validation feature in Excel is the ability to create a single-use drop-down list. This list allows users to select the cell and then select from a list of pre-defined values for that cell. Once the user makes a selection and moves to a different cell, the arrow for the drop-down list disappears. (The drop-down arrow is visible only when the original cell is selected.)
Start by creating a list of the values that you want available in the drop-down list. You can create this list almost anywhere, but for design purposes it is a good idea to put the list on a different worksheet than the one where the data entry will be.
For example, let's say that you want a list of employee names. On a new worksheet, enter the employee names in any manner desired. (You probably will want to sort them in some manner.) Select the list and give it a name such as Employees. (To define a name, display the Formulas tab of the ribbon and click Define Name in the Defined Names group.) Now, back on the main worksheet, follow these steps:
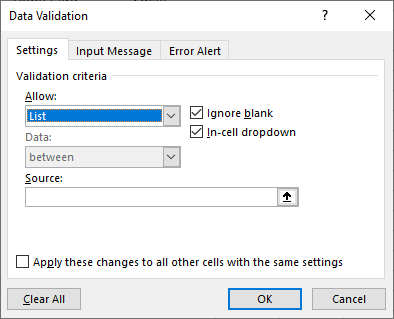
Figure 1. The Data Validation dialog box.
Now, whenever someone selects the cell you used in step 1, they'll see a drop-down list arrow to the right of the cell. Clicking on the arrow provides a drop-down listing all the employees. The user can select one of the employees in the list but cannot enter a different name. When they move to a different cell, the drop-down list disappears, but the selected value remains visible.
As a side note, if you don't want to place your data list in a worksheet, then you can enter the choices directly into the Data Validation dialog box. In step 6 (the Source box), leave out the equal sign and just enter the choices. Separate them by commas, and those are the choices that will be available to the user.
ExcelTips is your source for cost-effective Microsoft Excel training. This tip (6191) applies to Microsoft Excel 2007, 2010, 2013, 2016, 2019, 2021, 2024, and Excel in Microsoft 365. You can find a version of this tip for the older menu interface of Excel here: Single-Use Drop-Down List.

Program Successfully in Excel! This guide will provide you with all the information you need to automate any task in Excel and save time and effort. Learn how to extend Excel's functionality with VBA to create solutions not possible with the standard features. Includes latest information for Excel 2024 and Microsoft 365. Check out Mastering Excel VBA Programming today!
If you want to make sure that only unique values are entered in a particular column, you can use the data validation ...
Discover MoreIt is not unusual to use Excel to gather the answers to users' questions. If you want your users to answer your questions ...
Discover MoreData Validation is a great tool to make sure that data entered in a cell meets whatever criteria you decide. Its ...
Discover MoreFREE SERVICE: Get tips like this every week in ExcelTips, a free productivity newsletter. Enter your address and click "Subscribe."
There are currently no comments for this tip. (Be the first to leave your comment—just use the simple form above!)
Got a version of Excel that uses the ribbon interface (Excel 2007 or later)? This site is for you! If you use an earlier version of Excel, visit our ExcelTips site focusing on the menu interface.
FREE SERVICE: Get tips like this every week in ExcelTips, a free productivity newsletter. Enter your address and click "Subscribe."
Copyright © 2025 Sharon Parq Associates, Inc.
 Please Note:
This article is written for users of the following Microsoft Excel versions: 2007, 2010, 2013, 2016, 2019, 2021, 2024, and Excel in Microsoft 365. If you are using an earlier version (Excel 2003 or earlier), this tip may not work for you. For a version of this tip written specifically for earlier versions of Excel, click here:
Please Note:
This article is written for users of the following Microsoft Excel versions: 2007, 2010, 2013, 2016, 2019, 2021, 2024, and Excel in Microsoft 365. If you are using an earlier version (Excel 2003 or earlier), this tip may not work for you. For a version of this tip written specifically for earlier versions of Excel, click here:
Comments