Bill's solar inverter saves a daily file in which the fields are delimited by a semicolon (;). When he imports it into Excel using the Text Import Wizard, the default delimiter is a tab character. Bill has to uncheck Tab and check Semicolon each time he imports, so he is wondering if there is a way to change the default delimiter character.
There are several different ways you could approach this issue, as described in the following sections.
If you want to have Excel always recognize the semicolon as a delimiter, then you can make a change in the regional settings used by Windows. Follow these steps:
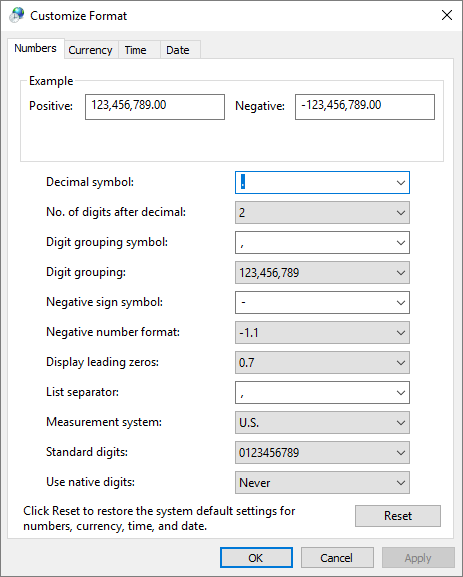
Figure 1. The Customize Format dialog box.
At this point you can restart Excel and use the Text Import Wizard to import your file. Excel should default to using the semicolon as a delimiter. And, interestingly enough, if you open a CSV file that uses commas as a delimiter, then the Text Import Wizard will default to using a comma.
Remember that any changes you make in your regional settings can affect the operation of other programs in addition to Excel. If you make a change like that above, you'll want to check those programs to make sure there are no adverse effects from the change.
Notice that the heading to this approach indicates you are changing the "Text to Column" settings, and Bill specifically asked about the "Text Import Wizard." Despite what may initially seem to be a conflation of the two tools, it is important to realize that the Text Import Wizard relies upon the Text to Column tool as part of the import process. Thus, if you can change the settings in the Text to Column tool, you'll also affect how the Text Import Wizard works.
The problem is that the Text to Column settings are not persistent from one session of Excel to another. They are persistent within the same session, however. Thus, you could write a quick little macro that would change the settings so that whenever you start using Excel, you are good to go. This is an example:
Private Sub Workbook_Open()
    Worksheets.Add
    Range("A1").Value = "TEST"

    Application.ScreenUpdating = False
    Range("A1").TextToColumns Destination:=Range("A1"), _
      DataType:=xlDelimited, TextQualifier:=xlDoubleQuote, _
      ConsecutiveDelimiter:=False, Tab:=False, Semicolon:=True, _
      Comma:=False, Space:=False, Other:=False, FieldInfo:=Array(1,1), _
      TrailingMinusNumbers:=True

    Application.DisplayAlerts = False
    ActiveSheet.Delete
    Application.DisplayAlerts = True
    Application.ScreenUpdating = True
End Sub
When stored in the ThisWorkbook module of a workbook, this event handler will fire every time the workbook is opened. It adds a new worksheet, puts some dummy text in cell A1 of that worksheet, and then does a Text to Columns operation on that dummy text. The worksheet is then deleted. Since the TextToColumns method sets the semicolon as the delimiter, that is remembered for the entire Excel session (unless it is later changed). This means that you can then use the Text Import Wizard to grab your data, and the desired delimiter is already set for you.
Of course, you could bypass the Text Import Wizard completely and use your own macro to do the importing. This is a particularly good approach if (1) you know how the incoming data is structured and (2) you need to do the import quite often. Here's an example of a macro that could be used to do the importing:
Sub ImportDailyFile()
    Dim R As Range
    Dim S As String

    Const F = "C:\Users\Your Name\Documents\DailyFile.txt"

    Worksheets.Add
    Open F For Input As #1
    Set R = ActiveCell
    Do Until EOF(1)
        Line Input #1, S
        R.Value = S
        Set R = R.Offset(1, 0)
    Loop
    Close #1

    Set R = R.Offset(-1, 0)
    Set R = Range(ActiveCell.Address, R.Address)
    R.TextToColumns Semicolon:=True
End Sub
In order to use the macro, you'll need to change the constant value to reflect the full path to your data file. The macro adds a new worksheet into which your data will be placed. It will then open the data file, read each line, and place those lines in column A of the new worksheet. Once all the data has been read and saved, the macro then selects all cells in column A and performs a Text To Columns operation on that data, using the semicolon as a delimiter.
Many people like to use Power Query to import data from external files. If you fall into this growing camp, then you can use Power Query to define how Excel should treat the information it imports. Here are the general steps:
Now you can work with the data as you desire.
Note:
ExcelTips is your source for cost-effective Microsoft Excel training. This tip (12708) applies to Microsoft Excel 2007, 2010, 2013, 2016, 2019, and 2021.

Solve Real Business Problems Master business modeling and analysis techniques with Excel and transform data into bottom-line results. This hands-on, scenario-focused guide shows you how to use the latest Excel tools to integrate data from multiple tables. Check out Microsoft Excel Data Analysis and Business Modeling today!
When you add subtotals to a worksheet, Excel typically places them in the same column that you are subtotaling. If you ...
Discover MoreCells that affect another cell are called precedent cells. If you need to know which cells affect a particular cell, ...
Discover MoreDo you have a worksheet from which you need to print only portions of the data available? There are two ways you can ...
Discover MoreFREE SERVICE: Get tips like this every week in ExcelTips, a free productivity newsletter. Enter your address and click "Subscribe."
2021-12-20 12:01:59
Alex Nejako
This was a good one!
Got a version of Excel that uses the ribbon interface (Excel 2007 or later)? This site is for you! If you use an earlier version of Excel, visit our ExcelTips site focusing on the menu interface.
FREE SERVICE: Get tips like this every week in ExcelTips, a free productivity newsletter. Enter your address and click "Subscribe."
Copyright © 2026 Sharon Parq Associates, Inc.
Comments