Gina often uses diagonal borders through a cell to mark off certain items on reports. Excel allows her to use solid lines for diagonal borders, but it won't allow her to create diagonal lines that use dots. Gina wonders why she cannot use diagonals.
In researching for this tip, I discovered that the world of cell borders can be quite confusing. I lay the blame for that at the feet of Microsoft, for reasons I hope will become clear—but you'll need to stay with me to the end of this tip.
When people want to apply borders to cells, they typically use the Border tab of the Format Cells dialog box. Yes, I know that borders can be applied using tools on the Home tab of the ribbon, but those tools are simply permutations of the borders available in the Format Cells dialog box. To display this dialog box, first select a cell and then press Ctrl+1. Then, make sure the Border tab is displayed. (See Figure 1.)
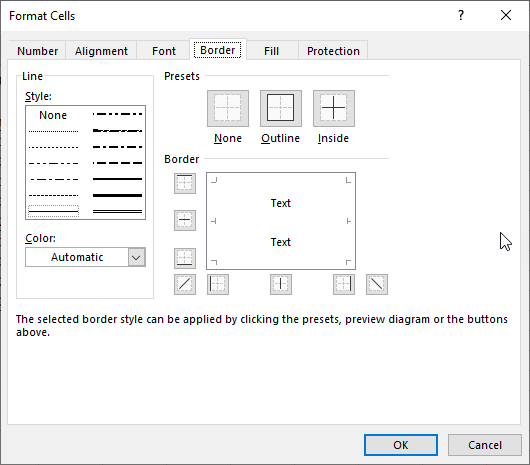
Figure 1. The Border tab of the Format Cells dialog box.
Notice the line style options at the upper-left corner of the dialog box. Select one of these and you can then choose a cell border to which you want that option applied. When you are done with your choices, Excel, behind the scenes, applies two things—a line style and a line weight to whatever borders you specified. There are 14 different options in this portion of the dialog box, if you count "None" as an option. In the rest of this tip I will refer to these using their position in this dialog box, L1 through L7 and R1 through R7. (You can probably figure out that L and R refer to left and right in this portion of the dialog box.) I'll increase the size of this portion of the dialog box so that you can see the options better. (See Figure 2.)
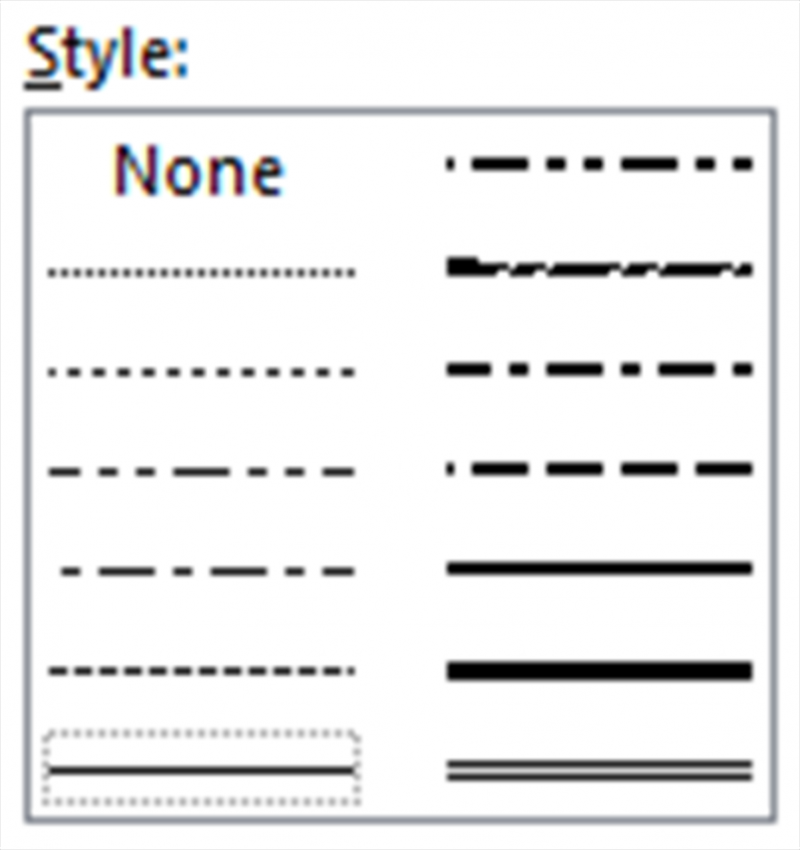
Figure 2. The line styles in the Border tab of the Format Cells dialog box.
I suspect that what is happening in Gina's situation is that she is looking at the options in the dialog box and thinking that those on the left side, from top to bottom, are None (L1), dots (L2), dashes (L3), two variations on dots and dashes (L4 and L5), a heaver dash (L6), and, finally, a solid line (L7).
Looks can be deceiving, however, as this is not what Excel is doing behind the scenes. To understand that, you need to start recording macros and see what line styles (and weights) Excel is really using.
When it comes to line styles for cell borders, there are 8 different options you can set in VBA. They are designated with the following enumerations:
If you are reading carefully, you'll see that I indicated there are 8 options, but there are actually 9 enumerations here. That is because there is no practical difference (when it comes to borders) between the xlNone and xlLineStyleNone enumerations. They represent different underlying values, but they have the same effect when it comes to the line style of borders.
In addition to this, you'll note that I mentioned you can have line weights for the line styles used for cell borders. These, too, are represented by enumerations:
So, with 7 visible line styles (not counting xlNone or xlLineStyleNone) and 4 possible line weights, that means you can have 28 combinations of styles and weights. How, then, do these line styles and weights relate to the 14 different options shown in the Border tab of the Format Cells dialog box? Rather jumbled, to tell you the truth. Here are the styles and weights of the left and right sides of the options, mapped to what VBA line styles they represent:
| Position | Left Style | Left Weight | Right Style | Right Weight | ||||
|---|---|---|---|---|---|---|---|---|
| 1 | xlLineStyleNone | xlHairline | xlDashDot | xlMedium | ||||
| 2 | xlContinuous | xlHairline | xlSlantDashDot | xlMedium | ||||
| 3 | xlDot | xlThin | xlDashDot | xlMedium | ||||
| 4 | xlDashDotDot | xlThin | xlDash | xlMedium | ||||
| 5 | xlDashDot | xlThin | xlContinuous | xlMedium | ||||
| 6 | xlDash | xlThin | xlContinuous | xlThick | ||||
| 7 | xlContinuous | xlThin | xlDouble | xlThick |
Remember I said, earlier, that Gina was probably thinking that the line styles she was seeing on the left side of the options were None, dots, dashes, two variations on dots and dashes, a heaver dash, and, finally, a solid line? Compare those thoughts with what is shown above, and you'll quickly discover that the one you thought was "dots" is actually a continuous line—which is what Gina is seeing printed when she does a diagonal format using that line style option. In other words, there are two continuous lines in the left column, at positions L2 and L7.
To illustrate how the 14 line styles (and weights) actually look when applied to cells, I wrote a brute-force macro that applies exactly what each of those style/weight choices represents:
Sub DoLines()
    Dim J As Integer
    Dim iLinesL(7) As Integer
    Dim iLinesR(7) As Integer
    Dim iWeightL(7) As Integer
    Dim iWeightR(7) As Integer

    iLinesL(1) = xlLineStyleNone
    iLinesL(2) = xlContinuous
    iLinesL(3) = xlDot
    iLinesL(4) = xlDashDotDot
    iLinesL(5) = xlDashDot
    iLinesL(6) = xlDash
    iLinesL(7) = xlContinuous
    iLinesR(1) = xlDashDot
    iLinesR(2) = xlSlantDashDot
    iLinesR(3) = xlDashDot
    iLinesR(4) = xlDash
    iLinesR(5) = xlContinuous
    iLinesR(6) = xlContinuous
    iLinesR(7) = xlDouble

    iWeightL(1) = xlHairline
    iWeightL(2) = xlHairline
    iWeightL(3) = xlThin
    iWeightL(4) = xlThin
    iWeightL(5) = xlThin
    iWeightL(6) = xlThin
    iWeightL(7) = xlThin
    iWeightR(1) = xlMedium
    iWeightR(2) = xlMedium
    iWeightR(3) = xlMedium
    iWeightR(4) = xlMedium
    iWeightR(5) = xlMedium
    iWeightR(6) = xlThick
    iWeightR(7) = xlThick

    ' Add a new worksheet
    Worksheets.Add

    ' Do left side
    For J = 1 To 7
        Cells(J * 2 - 1, 1) = "L" & J
        Cells(J * 2 - 1, 1).HorizontalAlignment = xlRight
        With Cells(J * 2 - 1, 2)
            .Borders(xlEdgeTop).Weight = iWeightL(J)
            .Borders(xlEdgeTop).LineStyle = iLinesL(J)
            .Borders(xlEdgeRight).Weight = iWeightL(J)
            .Borders(xlEdgeRight).LineStyle = iLinesL(J)
            .Borders(xlEdgeBottom).Weight = iWeightL(J)
            .Borders(xlEdgeBottom).LineStyle = iLinesL(J)
            .Borders(xlEdgeLeft).Weight = iWeightL(J)
            .Borders(xlEdgeLeft).LineStyle = iLinesL(J)
            .Borders(xlDiagonalUp).Weight = iWeightL(J)
            .Borders(xlDiagonalUp).LineStyle = iLinesL(J)
        End With
    Next J
    Columns("C:C").ColumnWidth = 2.5

    ' Do right side
    For J = 1 To 7
        With Cells(J * 2 - 1, 4)
            .Borders(xlEdgeTop).Weight = iWeightR(J)
            .Borders(xlEdgeTop).LineStyle = iLinesR(J)
            .Borders(xlEdgeRight).Weight = iWeightR(J)
            .Borders(xlEdgeRight).LineStyle = iLinesR(J)
            .Borders(xlEdgeBottom).Weight = iWeightR(J)
            .Borders(xlEdgeBottom).LineStyle = iLinesR(J)
            .Borders(xlEdgeLeft).Weight = iWeightR(J)
            .Borders(xlEdgeLeft).LineStyle = iLinesR(J)
            .Borders(xlDiagonalUp).Weight = iWeightR(J)
            .Borders(xlDiagonalUp).LineStyle = iLinesR(J)
        End With
        Cells(J * 2 - 1, 5) = "R" & J
    Next J
End Sub
Run the macro, and you will get the following output in a brand-new worksheet. (See Figure 3.) This was captured on a monitor with a resolution of 1920x1080, and zoomed to 150% within Excel.
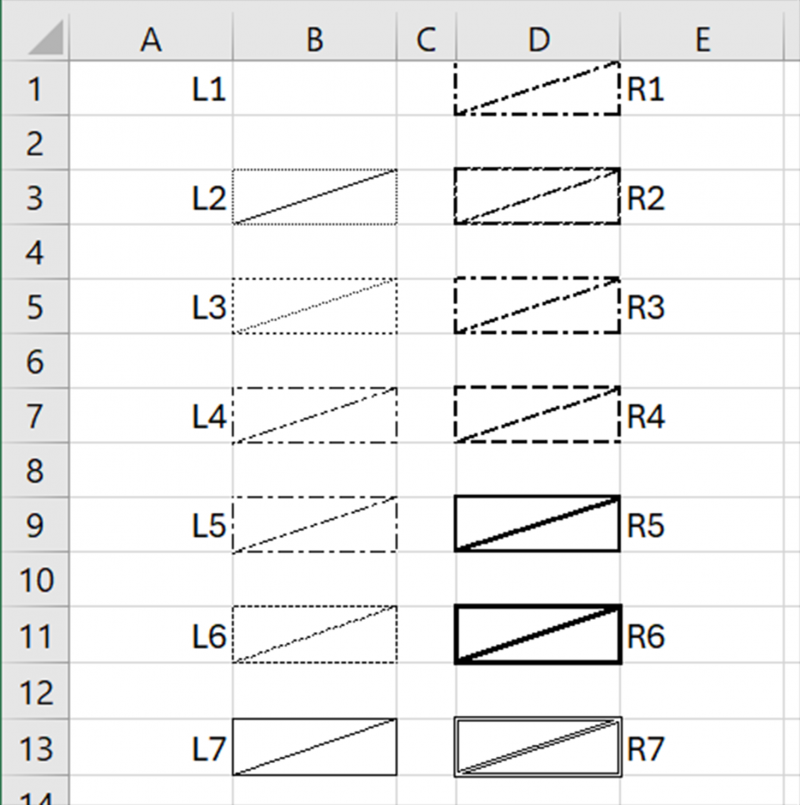
Figure 3. Recreating the effects of line styles and weights from the dialog box.
Notice the effects of the line weights and styles. It appears that for L2, that there are dots around the cell but a solid line diagonally through the cell. (This is probably what Gina is seeing.) However, all of the cell borders are xlContinuous with a line weight of xlHairline. The xlDot setting is in L3 with a xlThin weight, though the dots look different around the cell border when compared to the diagonal.
This is the case for all the line styles and weights—they look different on a monitor when they are horizontal or vertical, compared to diagonal. And, the line weight plays a huge factor in how the line appears.
Now, earlier I mentioned that the confusion in how a user expects a line style to look should be laid at the feet of Microsoft—and it should. They could clear up a lot of the confusion by using drop-down lists to choose both line style and line weight instead of showing the 14 options in the Format Cells dialog box. This is because the quality of the "showing" is affected by several factors, not the least of which is the resolution and quality of the monitor and/or printer being used.
Want another indication that Microsoft has introduced confusion in this area? Check out the following on one of the Microsoft sites:
https://support.microsoft.com/en-us/office/dotted-borders-are-printed-as-solid-lines-in-excel-e66c8f55-8d29-44c3-935b-815ec811ed1f
Here Microsoft clearly states that printing dotted borders as solid lines (which is what Gina is experiencing, at least when it comes to diagonal borders) is a program design choice. Yet, a continuous hairline (L2) isn't displayed in horizontal or vertical as continuous, which goes against the stated design choice. Plus, in my testing, I could find no indication that dotted borders were printed as solid when one used the VBA enumerations to set borders, as described earlier. (Like I said, confusion.)
The bottom line is that you cannot make your border decisions solely based on what you see in the Format Cells dialog box. You need to test what looks best on-screen and in-printout, based on your needs. Hopefully the above testing and results will help in this regard.
Note:
ExcelTips is your source for cost-effective Microsoft Excel training. This tip (13919) applies to Microsoft Excel 2007, 2010, 2013, 2016, 2019, 2021, and Excel in Microsoft 365.

Program Successfully in Excel! This guide will provide you with all the information you need to automate any task in Excel and save time and effort. Learn how to extend Excel's functionality with VBA to create solutions not possible with the standard features. Includes latest information for Excel 2024 and Microsoft 365. Check out Mastering Excel VBA Programming today!
Excel allows you to apply all sorts of formatting to the data in your worksheets. If you want to get rid of all that ...
Discover MoreGetting rid of formatting from a cell or group of cells can be done using several different techniques. This tip ...
Discover MoreProfessional typesetting has, in many ways, spoiled us. One way this is evident is in the preference we show for making ...
Discover MoreFREE SERVICE: Get tips like this every week in ExcelTips, a free productivity newsletter. Enter your address and click "Subscribe."
2024-04-30 07:43:16
Peter
On my laptop (MS 365, Win 10) I recently discovered that I could not get an an xlDouble style to work with xlMedium weight. I needed to use xlThick, otherwise the border was single.
I don't know if this is true on other computers or not.
2024-04-29 13:34:22
J-M J
Thank you Allen, for this in-depth exploration of the mysteries of Microsoft "logic"!
2024-04-27 15:41:15
Erik
You can specify borders in conditional formatting, but the options are limited. For example, there are no line thickness options.
(see Figure 1 below)
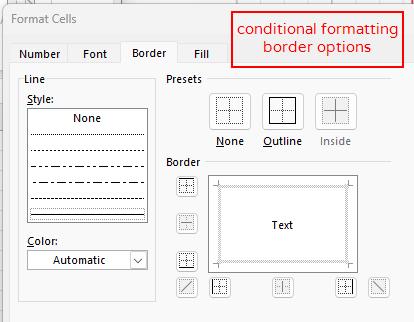
Figure 1. Ex: conditional formatting options, border tab
Got a version of Excel that uses the ribbon interface (Excel 2007 or later)? This site is for you! If you use an earlier version of Excel, visit our ExcelTips site focusing on the menu interface.
FREE SERVICE: Get tips like this every week in ExcelTips, a free productivity newsletter. Enter your address and click "Subscribe."
Copyright © 2026 Sharon Parq Associates, Inc.
Comments