Written by Allen Wyatt (last updated November 12, 2022)
This tip applies to Excel 2007, 2010, 2013, 2016, 2019, 2021, and Excel in Microsoft 365
On Jim's system, the selected cell within a worksheet is outlined in green. With his eyesight dimming, this is difficult for Jim to see. He wonders if it is possible to change the outline of the selected cell to red.
There is no way to set the outline color within Excel. The program, does, however, allow you to set the color of the on-screen grid that is used to delineate cells. So, one approach might be to change the grid color, which would allow the existing cell outline to "stand out" in contrast to the grid color. For instance, you might want to change the grid color to red. You can do that by following these steps:
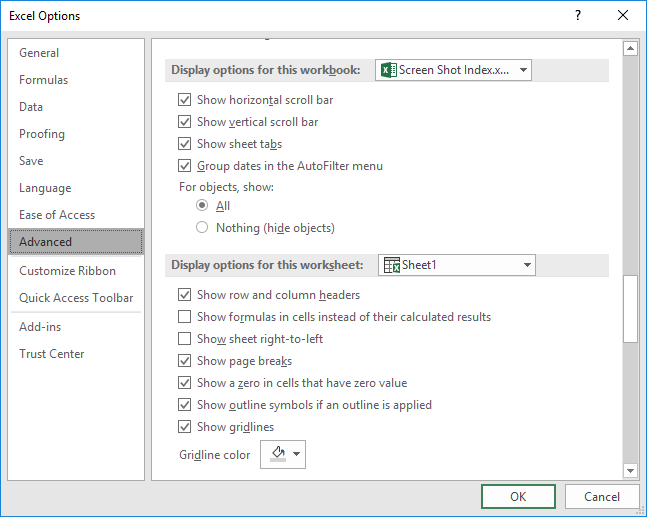
Figure 1. The Advanced options of the Excel Options dialog box.
If that approach doesn't work for your needs, then you might try setting up a macro to automatically change the background color of whatever cell is selected. (This doesn't change the selection border—remember that cannot be changed in Excel.) Here's one macro that can be used:
Dim cPrev As Range
Dim nPrev As Long

Private Sub Worksheet_SelectionChange(ByVal Target As Range)
    If cPrev Is Nothing Then
        Set cPrev = ActiveCell
        nPrev = xlNone
    End If

    cPrev.Interior.Color = nPrev                ' Reset previously active cell

    Set cPrev = ActiveCell                      ' Remember
    nPrev = ActiveCell.Interior.Color
    If nPrev = vbWhite Then nPrev = xlNone      ' Color vbWhite erases borders

    ActiveCell.Interior.Color = vbYellow        ' Set highlight
End Sub
This macro is an event handler, and it needs to be placed in the worksheet's code window. (Right-click the worksheet you want to affect, then choose View Code from the resulting Context menu.) The event handler run every time you select a different cell.
You can also look to the Windows accessibility options to modify how information is displayed onscreen, or you can try third-party software such as ZoomText:
https://www.freedomscientific.com/products/software/zoomtext/
ExcelTips is your source for cost-effective Microsoft Excel training. This tip (10343) applies to Microsoft Excel 2007, 2010, 2013, 2016, 2019, 2021, and Excel in Microsoft 365.

Program Successfully in Excel! This guide will provide you with all the information you need to automate any task in Excel and save time and effort. Learn how to extend Excel's functionality with VBA to create solutions not possible with the standard features. Includes latest information for Excel 2024 and Microsoft 365. Check out Mastering Excel VBA Programming today!
Hate to take your fingers off the keyboard? Here's how you can move from worksheet to worksheet without touching the mouse.
Discover MoreWhen you use Excel with multiple workbooks open at the same time, you can use the ribbon tools to switch between ...
Discover MoreWant to be notified whenever your worksheet needs to be recalculated? Excel may already have you covered, as described in ...
Discover MoreFREE SERVICE: Get tips like this every week in ExcelTips, a free productivity newsletter. Enter your address and click "Subscribe."
2024-06-22 13:31:38
Kiwerry
@ Steve J:
thanks for your tip. I use it sparingly because of the loss of the undo functionality, but when I do I use a slightly modified version: Instead of using a cell on the spreadsheet to keep track of the active row I use a Name added to the Names collection using this code in the Selectionchange routine instead of your "Range("I1") = ActiveCell.Row":
Row_Number = ActiveCell.Row
ActiveWorkbook.Names.Add Name:="My_Row", RefersToR1C1:="=" & Row_Number
' Overwrites existing names with no comment
The Conditional formatting formula becomes
=ROW()=My_Row
2023-12-21 10:03:58
J. Woolley
If you are interested in the ToggleRowLiner macro discussed below, see https://sites.google.com/view/MyExcelToolbox/
2023-12-20 18:28:21
J. Woolley
Re. my comment dated 2022-11-17 below, the VBA code requires two corrections:
1. Find the following statement
Dim FC As FormatCondition, B As Boolean
and replace it with this statement
Dim FC As Object, B As Boolean
2. Find the following statement
B = (.Formula1 = S)
and replace it with this statement
If .Type = xlExpression Then B = (.Formula1 = S)
The reason for these corrections is that the FormatConditions collection is not restricted to FormatCondition objects; it can also contain AboveAverage, ColorScale, Databar, IconSetCondition, Top10, and UniqueValues objects.
My most recent comment below discussed the ToggleRowLiner macro, which has been corrected for FormatConditions (as described here) and for hidden worksheets (now ignored).
2023-12-18 12:24:04
J. Woolley
I discovered how to process a workbook's worksheet events using VBA in another workbook like Personal.xlsb or an add-in like MyToolbox.xlam. My Excel Toolbox now includes the ToggleRowLiner macro to highlight the active cell and its row using conditional formatting. The result is similar to the description in my most recent comment below, but you don't need to add code to the active workbook. It is not the same as Chip Pearson's RowLiner mentioned previously.
2022-11-17 15:41:27
J. Woolley
Steve J's initial comment inspired the following code to highlight the active cell and its row using conditional formatting. (see Figure 1 below)
Private Sub Worksheet_SelectionChange(ByVal Target As Range)
Dim S As String, C As Long, P As Integer, R As Range
Dim FC As FormatCondition, B As Boolean
' this code applies fill to active cell
S = "=N(""FILL ACTIVE CELL"")+TRUE"
C = &HCCF2FF ' pale gold color
P = 1
Set R = ActiveCell
GoSub UpdateFC
' this code applies fill to active cell's row
S = "=N(""FILL ACTIVE ROW"")+TRUE"
C = &HDAEFE2 ' pale green color
P = 2
Set R = Rows(ActiveCell.Row)
GoSub UpdateFC
Exit Sub
UpdateFC:
' this code is a common subroutine
For Each FC In Me.Cells.FormatConditions
With FC
B = (.Formula1 = S)
If B Then
.ModifyAppliesToRange R
.Priority = P
Exit For
End If
End With
Next FC
If Not B Then
With R.FormatConditions.Add(xlExpression, , S)
.Interior.Color = C
.Priority = P
.StopIfTrue = False
End With
End If
Return
End Sub
Notes:
1. The code has two parts. Part 1 fills the active cell with pale gold. Part 2 fills the active cell's row with pale green. (The colors are arbitrary.) Either part can be deleted; in this case, make P = 1 and delete the following 6 individual lines:
GoSub UpdateFC
GoSub UpdateFC
Exit Sub
UpdateFC:
' this code is a common subroutine
Return
2. The code uses Excel's N function to add text identifying the conditional formats.
3. The code must be placed in a Sheet module (like Sheet1). It will activate each time the selection is changed on that worksheet.
4. A worksheet with the code will lose the ability to Undo (Ctrl+Z) or Redo (Ctrl+Y) any action.
5. The code is best with a worksheet displaying a large number of used cells in Excel's window (reduced font size or Zoom factor, for example).
6. To apply the code to all worksheets in a workbook, remove it from all Sheet modules and add it to ThisWorkbook module as
Private Sub Workbook_SheetSelectionChange(ByVal Sh As Object, ByVal Target As Range)
then replace this line
For Each FC In Me.Cells.FormatConditions
with this line
For Each FC In Sh.Cells.FormatConditions
In this case, all worksheets in the workbook will lose Undo/Redo capability.
7. Conditional formats are dynamic (modified by user or code); therefore, they are reevaluated each time this code is activated.
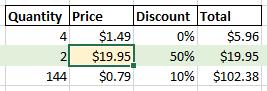
Figure 1.
2022-11-16 04:16:13
Steve J
@Peter I use this setup in sheets containing 40 columns & about 200 rows & it's pretty much instantaneous.
I only apply the conditional formatting to the used range & not the entire row (although applying to entire row only has a marginal effect on speed).
For disclosure my system is a modest Lenovo Thinkpad with i5 processor with 8GB ram so not excessive.
The UDF just enters the current row No in to "F1" (or where ever you want to put it. The second formula goes into the conditional formatting to compare the current row with "F1" which will produce a TRUE and thus trigger the conditional formatting to be applied.
2022-11-16 00:27:35
Peter
Steve J. I found that putting the UDF in condition formatting cause quite a lag and that the direct change of the region's colour was much quicker
2022-11-14 18:02:23
Kiwerry
Thanks for a lot of interesting comments. I will be trying the suggestions out.
2022-11-13 08:23:38
Steve J
I have some worksheets that are quite wide & it's easy to lose track when reading across the sheet. I use the following to highlight the current row.
First some vba code placed in the sheet module.
Private Sub Worksheet_SelectionChange(ByVal Target As Range)
crow = ActiveCell.Row
Range("F1") = crow
End Sub
Secondly the following formula in conditional formatting
=ROW()=$F$1
& pick a fill colour of your choice & set the "applies to" area to the the useable part of the worksheet.
I make the text colour of F1 very light grey so as not to detract from the sheet contents. Obviously F1 could be changed to any cell that suits.
As ever when using vba code you will lose the undo facility.
2022-11-12 09:35:47
J. Woolley
See Chip Pearson's RowLiner: http://www.cpearson.com/excel/RowLiner.htm
2022-11-12 05:50:44
MICHAEL (Micky) AVIDAN
To my opinion, the simplest way would be to use a very bright color for the overall grid - so that the selected Cell/Range will get emphasized.
(see attached Pic.)
(see Figure 1 below)
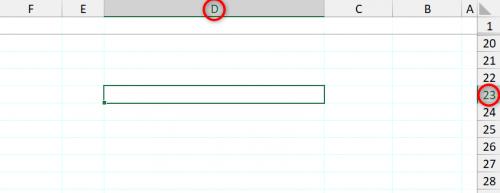
Figure 1.
2022-11-12 05:49:53
Phil
I've been used to pre-ribbon XL where I'd highlight cells with e.g. blue borders and when selected this would turn bright red (Inverting the colour, perhaps). Has this definitely been lost in ribbon versions? - Like Jim I can't find any way to do it now.
2022-11-12 05:39:25
Kiwerry
Spreadsheets I use prior to Excel (SuperCalc, PlanPerfect) used to highlight the background colour of the row and of the column of which the selected cell was the intersection. This made it very easy to look at values in a particular row in a large table, something which can be difficult and error-prone in Excel. Why the Excel developers have not made this useful feature a display option is beyond me. I have certainly suggested it.
I will look into using Allen's code - thank you, Allen - to see if I can make something similar; the problem is doing so without destroying existing background colour settings in the respective row and column.
Got a version of Excel that uses the ribbon interface (Excel 2007 or later)? This site is for you! If you use an earlier version of Excel, visit our ExcelTips site focusing on the menu interface.
FREE SERVICE: Get tips like this every week in ExcelTips, a free productivity newsletter. Enter your address and click "Subscribe."
Copyright © 2025 Sharon Parq Associates, Inc.
Comments