Andy hates to use the mouse any more than he needs to, as he finds it much more productive when he relies only on keyboard shortcuts. He wonders if there is a keyboard shortcut for sizing columns or rows in a worksheet.
If you are using the mouse, there are quite a few ways you can adjust row height and column width. Andy, however, wants to use only the keyboard, which involves displaying the Row Height dialog box (to set the row height) or the Column Width dialog box (to set column width). There are actually three approaches you can use to display these dialog boxes relying solely on the keyboard.
The first method is to depend on the tool-access keyboard method built into Excel. You can see this spring into action if you simply press the Alt key. Note that when you do, Excel places small letters near each of the areas of the ribbon. (See Figure 1.)

Figure 1. The keyboard shortcuts for accessing the ribbon areas.
At this point you can release the Alt key and just start pressing whatever keys will get you to the commands you want to use. For the commands to size columns and rows, then, the entire sequence to get to the right area of the ribbon is Alt, H, O. You can then see what keys you can press to display the desired dialog boxes. (See Figure 2.)
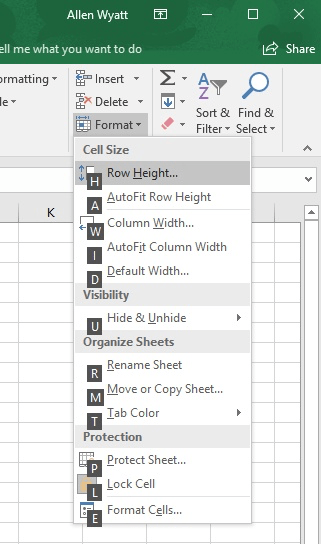
Figure 2. Keyboard shortcuts for formatting cells.
You can, at this point, press whatever key that will accomplish what you want. So, the full sequence of keys for sizing columns and rows are as follow:
Those who have been using Excel for some time know that you can often use the shortcut keys that worked in earlier versions of the program. You can initiate this approach by pressing Alt+O and Excel displays the Office Access Key dialog box. (See Figure 3.)
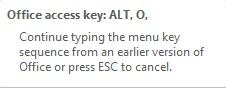
Figure 3. The Office Access Key dialog box.
At this point you can press C and then W to display the Column Width dialog box or press R and then E to display the Row Height dialog box.
A third way to use the keyboard to set the row height and column width is to use the keyboard to access the Context menu. Here's how you would get to the Row Height dialog box:
Getting to the Column Width dialog box is just as easy:
ExcelTips is your source for cost-effective Microsoft Excel training. This tip (4635) applies to Microsoft Excel 2007, 2010, 2013, 2016, 2019, 2021, and Excel in Microsoft 365.

Professional Development Guidance! Four world-class developers offer start-to-finish guidance for building powerful, robust, and secure applications with Excel. The authors show how to consistently make the right design decisions and make the most of Excel's powerful features. Check out Professional Excel Development today!
Want to automatically hide some columns that don't meet a date criterion that you set? You can't do it automatically, but ...
Discover MoreIn a worksheet with lots of hidden columns it is a real pain to try to unhide just one or two columns. The best solution ...
Discover MoreIf you have a bunch of hidden columns in your worksheet, you might want to unhide only a portion of those columns. This ...
Discover MoreFREE SERVICE: Get tips like this every week in ExcelTips, a free productivity newsletter. Enter your address and click "Subscribe."
There are currently no comments for this tip. (Be the first to leave your comment—just use the simple form above!)
Got a version of Excel that uses the ribbon interface (Excel 2007 or later)? This site is for you! If you use an earlier version of Excel, visit our ExcelTips site focusing on the menu interface.
FREE SERVICE: Get tips like this every week in ExcelTips, a free productivity newsletter. Enter your address and click "Subscribe."
Copyright © 2026 Sharon Parq Associates, Inc.
Comments