Please Note: This article is written for users of the following Microsoft Excel versions: 2007, 2010, 2013, 2016, 2019, 2021, 2024, and Excel in Microsoft 365. If you are using an earlier version (Excel 2003 or earlier), this tip may not work for you. For a version of this tip written specifically for earlier versions of Excel, click here: Locking All Non-Empty Cells.
Written by Allen Wyatt (last updated May 17, 2025)
This tip applies to Excel 2007, 2010, 2013, 2016, 2019, 2021, 2024, and Excel in Microsoft 365
Sandeep has a worksheet that has hundreds of rows and columns. Some of the cells have information in them and some are empty. The empty cells are used for data entry. He would like a way to easily lock all the non-empty cells in a selected range and then lock the worksheet.
This is rather easy to do manually. There is an important item to keep in mind, however: All the cells in the worksheet are "locked," by default. In other words, you don't need to look for a way to lock the non-empty cells; you only need to look for a way to unlock the empty ones. (There is one exception to this, addressed shortly.)
With this in mind, you can follow these steps to get your empty cells unlocked:

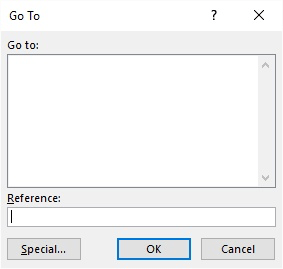
Figure 1. The Go To dialog box.

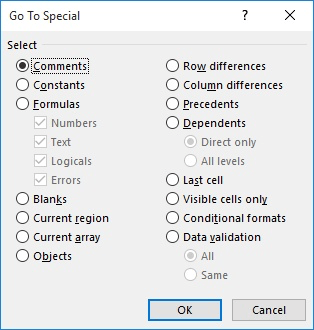
Figure 2. The Go To Special dialog box.

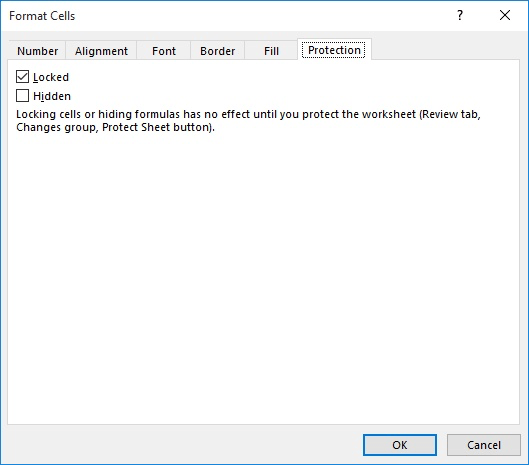
Figure 3. The Protection tab of the Format Cells dialog box.
That's it. You can now lock your worksheet and only those blank cells that were selected at the end of step 5 will be accessible.
One interesting thing to note is that you don't really have to select a range in step 1. If, instead, you select a cell within the main body of your worksheet's entries, Excel assumes that you want to operate on the used area of your worksheet. In other words, when you get to step 5 what will be selected are all the empty cells in the used area of your worksheet.
One more thing to be aware of is that once you set the locking status of a cell (step 8), the cell retains that status until you specifically change it. This means that if you've previously made changes to the locking status of the cells, it may be beneficial to explicitly lock the cells prior to unlocking the empty ones. You can do this by following these modified steps:
In this case you must perform step 1—you have to select a range to affect. Excel won't assume which range you want to affect as in the earlier comment.
If you prefer, you can use a macro to protect your cells and your worksheet:
Sub UnlockEmptyCells()
    Dim myCell As Range

    Set myCell = Selection
    Cells.Select
    Selection.Locked = True
    myCell.Select
    Selection.SpecialCells(xlCellTypeBlanks).Select
    Selection.Locked = False

    ActiveSheet.Protect DrawingObjects:=True, _
      Contents:=True, Scenarios:=True
    myCell.Select
End Sub
This macro makes sure that all the cells in the worksheet are locked, then it unlocks the blank cells in the used range, and finally it protects the worksheet.
Note:
ExcelTips is your source for cost-effective Microsoft Excel training. This tip (8485) applies to Microsoft Excel 2007, 2010, 2013, 2016, 2019, 2021, 2024, and Excel in Microsoft 365. You can find a version of this tip for the older menu interface of Excel here: Locking All Non-Empty Cells.

Professional Development Guidance! Four world-class developers offer start-to-finish guidance for building powerful, robust, and secure applications with Excel. The authors show how to consistently make the right design decisions and make the most of Excel's powerful features. Check out Professional Excel Development today!
When you share a protected workbook with other people, you may not want them to get around the protection by creating a ...
Discover MoreExcel provides some great tools that allow you to limit what is entered into a worksheet. This tip looks at how those ...
Discover MoreIf you share a workbook with others in your office, you will probably want to make sure that some of the worksheets don't ...
Discover MoreFREE SERVICE: Get tips like this every week in ExcelTips, a free productivity newsletter. Enter your address and click "Subscribe."
There are currently no comments for this tip. (Be the first to leave your comment—just use the simple form above!)
Got a version of Excel that uses the ribbon interface (Excel 2007 or later)? This site is for you! If you use an earlier version of Excel, visit our ExcelTips site focusing on the menu interface.
FREE SERVICE: Get tips like this every week in ExcelTips, a free productivity newsletter. Enter your address and click "Subscribe."
Copyright © 2026 Sharon Parq Associates, Inc.
Comments