Please Note: This article is written for users of the following Microsoft Excel versions: 2007, 2010, 2013, 2016, 2019, 2021, and Excel in Microsoft 365. If you are using an earlier version (Excel 2003 or earlier), this tip may not work for you. For a version of this tip written specifically for earlier versions of Excel, click here: Embedding Your Phone Number in a Workbook.
Written by Allen Wyatt (last updated October 5, 2024)
This tip applies to Excel 2007, 2010, 2013, 2016, 2019, 2021, and Excel in Microsoft 365
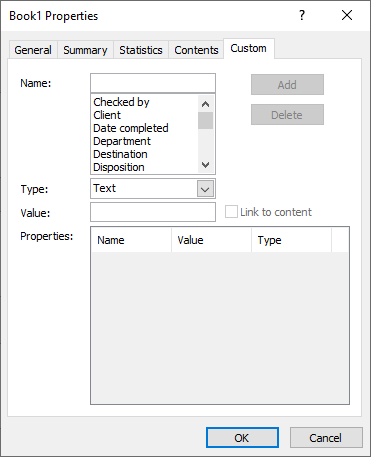
Excel is used quite extensively in corporate environments. It is often desirable to know exactly who created a workbook, particularly if it has been months since a workbook was last reviewed. Excel keeps track of non-workbook data that can be used to help identify an author. One piece of data that could be very helpful is the phone number of the workbook's author. To specify a phone number, follow these steps if you are using Excel 2010 or a later version:

Figure 1. The Custom tab of the Properties dialog box.
If you are using Excel 2007, the steps are slightly different, with the biggest difference being in how you display the Properties dialog box:
ExcelTips is your source for cost-effective Microsoft Excel training. This tip (9727) applies to Microsoft Excel 2007, 2010, 2013, 2016, 2019, 2021, and Excel in Microsoft 365. You can find a version of this tip for the older menu interface of Excel here: Embedding Your Phone Number in a Workbook.

Solve Real Business Problems Master business modeling and analysis techniques with Excel and transform data into bottom-line results. This hands-on, scenario-focused guide shows you how to use the latest Excel tools to integrate data from multiple tables. Check out Microsoft Excel Data Analysis and Business Modeling today!
The number of formats used in a workbook can become a problem if you run up against the limit Microsoft hard-coded into ...
Discover MoreWant to keep track of various rows in a data table through the use of record numbers? Here are some options and ...
Discover MoreTwo very common programs that are used together are Excel and Word. If you want to copy multiple worksheets from an Excel ...
Discover MoreFREE SERVICE: Get tips like this every week in ExcelTips, a free productivity newsletter. Enter your address and click "Subscribe."
2024-10-07 10:16:43
J. Woolley
My Excel Toolbox includes the following function to set the text, numeric, logical, date/time, or error value of a workbook's document property and return confirmation:
=SetDocProperty(Name, Value, [AsDate], [Delete])
Name's case is ignored if built-in or custom document property Name exists; in this case it will be set to Value. Otherwise, a new custom document property Name/Value pair are added; in this case Name's case is retained.
If AsDate is TRUE, Value is treated as date/time; default is FALSE.
If Delete is TRUE, custom document property Name will be deleted; default is FALSE. A built-in document property cannot be deleted.
For example, this formula will set the "Telephone number" custom document property as text:
=SetDocProperty("Telephone number", "123-456-7890")
The following function returns the value of a workbook's built-in or custom document property:
=GetDocProperty(Name, [Approx])
Name's case is ignored. If optional Approx is FALSE (default), then Name is considered explicit; otherwise, the value of the first document property containing Name is returned. Text values are returned directly. A logical, date/time, or error value will be returned as equivalent text; any other number is returned as a number.
For example, this formula will return the first document property containing "telephone" in its Name (case ignored):
=GetDocProperty("telephone", TRUE)
The following dynamic array function lists the workbook's built-in and custom (if any) document properties with 2 columns and N rows:
=ListDocProperties([SkipNull], [SkipCustom], [SkipHeader])
There are currently 34 built-in document properties in an Excel workbook; many of these normally have a null value. Custom document properties do not exist until set; the Names in the Tip's Figure 1 are merely suggestions.
Each worksheet can have custom properties independent of a workbook's custom properties. The following functions set or return the value of a custom worksheet property:
=SetCustomWSProperty(Name, Value, [Sheet], [Delete])
=GetCustomWSProperty(Name, [Sheet])
Name's case is ignored if custom worksheet property Name exists; otherwise, its case is retained when the new Name/Value pair are added.
Value is always converted to equivalent logical, date/time, numeric, error, or other text and returned as text.
If optional Sheet is omitted, the custom property applies to the formula cell's worksheet; otherwise, it applies to the specified Sheet (case ignored) in that cell's workbook.
If Delete is TRUE, custom worksheet property Name will be deleted; default is FALSE.
The following dynamic array function lists any custom worksheet properties:
=ListCustomWSProperties([AllSheets], [SkipHeader])
If AllSheets is FALSE (default), only the formula cell's worksheet will be evaluated; otherwise, all worksheets in the workbook are included.
The SpillArray function (described in UseSpillArray.pdf) simulates a dynamic array in older versions of Excel.
See https://sites.google.com/view/MyExcelToolbox
Got a version of Excel that uses the ribbon interface (Excel 2007 or later)? This site is for you! If you use an earlier version of Excel, visit our ExcelTips site focusing on the menu interface.
FREE SERVICE: Get tips like this every week in ExcelTips, a free productivity newsletter. Enter your address and click "Subscribe."
Copyright © 2026 Sharon Parq Associates, Inc.
Comments