Please Note: This article is written for users of the following Microsoft Excel versions: 2007, 2010, 2013, 2016, 2019, and 2021. If you are using an earlier version (Excel 2003 or earlier), this tip may not work for you. For a version of this tip written specifically for earlier versions of Excel, click here: Limiting Scroll Area.
Written by Allen Wyatt (last updated June 26, 2021)
This tip applies to Excel 2007, 2010, 2013, 2016, 2019, and 2021
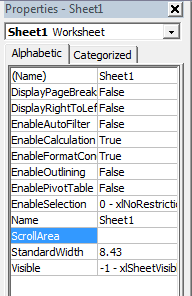
When putting together a worksheet for others to use, you may want to limit the cells that the user can access. One esoteric way to add limits is to use the following steps:

Figure 1. The Properties window in the VBA Editor.
That's it; you can no longer move to or select cells outside the range you specified in step 5. The range you enter must be a contiguous range; you cannot enter a non-contiguous group of cell addresses.
You should be aware that the ScrollArea property is reset each time you restart Excel. So, if you want the scroll area to be automatically set every time you use the worksheet, you may want to set up a macro to do the modification to the property. You can do that with a simple one, like this:
Private Sub Worksheet_Activate()
     ActiveSheet.ScrollArea = "A3:D15"
End Sub
The macro is automatically run whenever the worksheet is activated, so you are ensured that the scroll area is exactly what you want.
Note:
ExcelTips is your source for cost-effective Microsoft Excel training. This tip (10815) applies to Microsoft Excel 2007, 2010, 2013, 2016, 2019, and 2021. You can find a version of this tip for the older menu interface of Excel here: Limiting Scroll Area.

Best-Selling VBA Tutorial for Beginners Take your Excel knowledge to the next level. With a little background in VBA programming, you can go well beyond basic spreadsheets and functions. Use macros to reduce errors, save time, and integrate with other Microsoft applications. Fully updated for the latest version of Office 365. Check out Microsoft 365 Excel VBA Programming For Dummies today!
Need to know how many characters there are in a workbook? You can find out easily with the handy macro introduced in this ...
Discover MoreWhen creating a macro to work with the names of defined ranges, you may need to know whether the scope of the name is for ...
Discover MoreDo you have a macro that needs to read and write files? If so, then there is a good chance you need to specify the ...
Discover MoreFREE SERVICE: Get tips like this every week in ExcelTips, a free productivity newsletter. Enter your address and click "Subscribe."
2024-04-28 11:39:49
J. Woolley
Seb:
To limit the scroll area on a sheet:
1. Select the scroll area range on that sheet.
2. Pick Formulas > Defined Names > Define Name (Alt+M+M+D).
3. In the New Name dialog, enter
Name: ScrollArea
Scope: Workbook
Comment: Limited scroll area range
Refers to: ... (previously selected range)
4. Right-click the sheet's tab and pick View Code to open the VB Editor.
5. Copy the following code and paste it into the Sheet module (replacing the Tip's code):
Private Sub Worksheet_Activate()
Me.ScrollArea = Me.Parent.Names("ScrollArea").RefersTo
End Sub
6. Right-click the ThisWorkbook module in VB Editor and pick View Code.
7. Copy the following code and paste it into the ThisWorkbook module:
Private Sub Workbook_Open()
Range("ScrollArea").Parent.Activate
End Sub
8. Save and close your workbook.
Whenever your workbook is opened that sheet will be activated with limited scroll area. If you change the sheet's name or position, "ScrollArea" will automatically adjust. And you can edit the "Refers to:" range using the Name Manager (Alt+M+N) if necessary.
2024-04-27 17:41:10
Seb
Hi Allen,
This doesn't seem to work when opening my document, only after I navigate from that sheet and then back (perhaps with it being the first sheet of the doc?)
Sadly I am not a VBA Whizz so unsure on how to remedy this
Thanks,
Seb
2022-11-24 21:21:41
Tomek
The tip says:
"You should be aware that the ScrollArea property is reset each time you restart Excel. "
Actually, this setting will be reset if you just close and reopen the file, without closing Excel. (at least in MS365).
Also, be aware that if you set the ScrollArea many navigation shortcuts will be deactivated, e.g., End + Arrow key or Ctrl+End, if the navigation would bring you outside the ScrollArea. In other words it will not bring you to the edge of the scroll area, contrary to what you may expect.
Got a version of Excel that uses the ribbon interface (Excel 2007 or later)? This site is for you! If you use an earlier version of Excel, visit our ExcelTips site focusing on the menu interface.
FREE SERVICE: Get tips like this every week in ExcelTips, a free productivity newsletter. Enter your address and click "Subscribe."
Copyright © 2026 Sharon Parq Associates, Inc.
Comments