Hans is trying to change the active printer within a VBA macro, but everything he tries results in an error message when the code is executed. This makes him wonder if there is some sort of secret to changing the active printer.
In the past, Excel allowed you to change the active printer using a single line of macro code, such as this:
Application.ActivePrinter = "HP LaserJet"
However, this simple approach will no longer work in more recent versions of Excel. Instead, it needs to be something like this:
Application.ActivePrinter = "HP LaserJet on Ne00:"
The difference is that now you need to not only include the name of the printer, but also the port that should be used to communicate with that printer. It is unclear when the syntax change was made, but it was sometime before the arrival of Microsoft 365.
To show the confusion that this causes, within Excel, press Ctrl+P to display the print settings. You'll see that near the top of the settings there is a printer selected. The printer name is just that—a name for the printer to which Excel will print. Historically, you could take this printer name and use it in a macro to set the active printer. The name you use in the macro, however, now needs to include a port name. And, as you can see when you press Ctrl+P, the printer name shown doesn't indicate the port name.
You can determine the printer and port name very simply by using a single-line macro such as this:
Sub WhatPrinter()
    MsgBox Application.ActivePrinter
End Sub
Execute the macro, and you'll see a full specification for your active printer. (See Figure 1.)
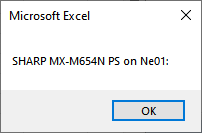
Figure 1. Output from running the WhatPrinter macro.
You could manually change printers in Excel, rerun this macro, and then write down the full name (including port designation) for each printer. Then you could use, within your macro, whatever full name is necessary to accomplish your output needs.
This is a viable approach if you are running the macro on just your system. What if your macro is intended for others in your office? For instance, let's say there are five people in your department, and all of you share three printers. Even though you may all use the same base printer names (which are, of course, based on the printer driver names on each system), each person's system could associate the printer with a different port. Thus, on your system the printer could be "HP LaserJet on Ne00:", but on a different person's system it could be "HP LaserJet on Ne03:". If you use hard-coded printer/port names based on what is on your system, your macro won't work on the different systems because of the port differences.
Things just got a lot more complex because you need to start dealing with Windows—it is at the operating system level that printer and port pairings are set. You can, if desired, use a macro such as the following to grab a list of printers and ports from the Windows Registry:
Sub GetPrinterList()
    Dim Arr As Variant
    Dim Device As Variant
    Dim Devices As Variant
    Dim RegObj As Object
    Dim RegValue As String
    Dim PList As String

    Const HKEY_CURRENT_USER = &H80000001
    Const REG_KEY As String = "Software\Microsoft\Windows NT\CurrentVersion\Devices\"

    Set RegObj = GetObject("winmgmts:{impersonationLevel=impersonate}!\\.\root\default:StdRegProv")
    RegObj.enumvalues HKEY_CURRENT_USER, REG_KEY, Devices, Arr

    PList = ""
    For Each Device In Devices
        RegObj.getstringvalue HKEY_CURRENT_USER, REG_KEY, Device, RegValue
        PList = PList & Device & " on " & Split(RegValue, ",")(1) & vbCrLf
    Next
    MsgBox PList
End Sub
The macro grabs a collection of devices from the registry key specified in the REG_KEY constant. This collection is stepped through and a message constructed based on those devices. Finally, the message is displayed.
A variation on this approach allows you to grab just the printer/port combination desired, based on a partial printer name:
Function FindPrinter(PrinterName As String) As String
    Dim Arr As Variant
    Dim Device As Variant
    Dim Devices As Variant
    Dim Printer As String
    Dim RegObj As Object
    Dim RegValue As String

    Const HKEY_CURRENT_USER = &H80000001
    Const REG_KEY As String = "Software\Microsoft\Windows NT\CurrentVersion\Devices\"

    Set RegObj = GetObject("winmgmts:{impersonationLevel=impersonate}!\\.\root\default:StdRegProv")
    RegObj.enumvalues HKEY_CURRENT_USER, REG_KEY, Devices, Arr

    For Each Device In Devices
        RegObj.getstringvalue HKEY_CURRENT_USER, REG_KEY, Device, RegValue
        Printer = Device & " on " & Split(RegValue, ",")(1)
        If InStr(1, Printer, PrinterName, vbTextCompare) > 0 Then
           FindPrinter = Printer
           Exit Function
        End If
    Next
End Function
In order to test the macro, all you need to do is to pass it the partial base printer name, as is done here:
Sub TestFindP()
    Dim sP As String

    sP = "MX-5070N"
    MsgBox FindPrinter(sP)
End Sub
The FindPrinter function, in this case, returns the first printer that has the text "MX-5070N" within it. You can use what FindPrinter returns in order to then set the active printer to be used by Excel.
Finally, if you know what the full base printer name but don't know the port, then you could utilize a much shorter Windows scripting shell to pull the port information from the Windows Registry, in this manner:
Function GetFullPrinter(sPtrName As String) As String
    Dim vPort As Variant
    Dim sSetting As String

    Const REG_KEY As String = "HKEY_CURRENT_USER\Software\Microsoft\Windows NT\CurrentVersion\Devices\"

    sSetting = CreateObject("WScript.Shell").RegRead(REG_KEY & sPtrName)
    vPort = Split(sSetting, ",")
    GetFullPrinter = sPtrName & " on " & vPort(1)
End Function
The function, when passed a base printer name, will return the fully formed printer name, including the port, that you can use to set the active printer. To test it out, try something like this macro:
Sub TestGFP()
    Dim sP As String

    sP = "MX-5070N (Color)"
    MsgBox GetFullPrinter(sP)
End Sub
Provided you have set the sP variable to a valid base printer name for the system on which the macro is being run, it will display a fully formed printer name, including the proper port for that system.
Note:
ExcelTips is your source for cost-effective Microsoft Excel training. This tip (13896) applies to Microsoft Excel 2007, 2010, 2013, 2016, 2019, 2021, and Excel in Microsoft 365.

Professional Development Guidance! Four world-class developers offer start-to-finish guidance for building powerful, robust, and secure applications with Excel. The authors show how to consistently make the right design decisions and make the most of Excel's powerful features. Check out Professional Excel Development today!
If you want to save paper on a printout, you might consider printing multiple pages on a single piece of paper. This can ...
Discover MoreIf you don't need to print an entire workbook, it can be confusing to figure out how to print just certain pages. This ...
Discover MoreIt is not uncommon to use Excel to print out regular reports. If your report needs to span multiple worksheets, here's ...
Discover MoreFREE SERVICE: Get tips like this every week in ExcelTips, a free productivity newsletter. Enter your address and click "Subscribe."
2023-09-19 14:49:54
J. Woolley
My previous two comments below mention the SortCaseSensitive function. That function has been removed from My Excel Toolbox and replaced by SortPlus, which is described in my comment dated 2023-09-19 here: https://excelribbon.tips.net/T004627_Forcing_Excel_to_Sort_Cells_as_Text.html
2023-07-25 14:15:36
J. Woolley
Re. my previous comment below, the description of SortCaseSensitive states, "Non-text values are NOT converted to text but are sorted as if they were." That is still true for older versions of Excel before Excel 2021, but the function has been updated so non-text values are sorted appropriately in newer versions of Excel. Note Excel 2021+ includes the SORT function, which is not case-sensitive and does not recognize an array's header (HasHeader).
See https://sites.google.com/view/MyExcelToolbox
2023-07-03 11:49:57
J. Woolley
My Excel Toolbox includes the following dynamic array function to return information about the computer's installed printers:
=ListPrinters([SkipHeader])
Expect 4 columns (Printer, On, Port, Status), where On is like Ne00:, Port is like USB001, and Status is ACTIVE or inactive. Using this function, here is an alternate version of the Tip's GetFullPrinter function:
Function GetFullPrinter2(sPrinter As String) As String
GetFullPrinter2 = sPrinter & " on " & _
WorksheetFunction.VLookup(sPrinter, ListPrinters(False), 2, False)
End Function
My Excel Toolbox also includes the following function that returns a case-sensitive sorted dynamic array:
=SortCaseSensitive(RangeArray,[SortIndex],[SortOrder],[LeftRight],[HasHeader])
RangeArray can be a cell range (like A1:E99) or an array constant (like {"Abraham","Martin","John"}) or an array function like ListPrinters(). Non-text values are NOT converted to text but are sorted as if they were. (Note ascending sort of numeric values as text: 1,-1,10,-10,2,-2,3,4,5,-5,....) SortIndex, SortOrder, and LeftRight correspond to similar parameters in Excel's SORT function, which is not case-sensitive and does not recognize an array's header (HasHeader). Default SortIndex is 1, SortOrder is 1 (ascending), LeftRight is FALSE (sort rows), and HasHeader is FALSE.
The following cell formula will return a list of printers sorted by the On column (2):
=SortCaseSensitive(ListPrinters(),2,,,TRUE)
The result for my computer is illustrated below (see Figure 1 below)
My Excel Toolbox's SpillArray function (described in UseSpillArray.pdf) simulates a dynamic array in older versions of Excel:
=SpillArray(...)
See https://sites.google.com/view/MyExcelToolbox
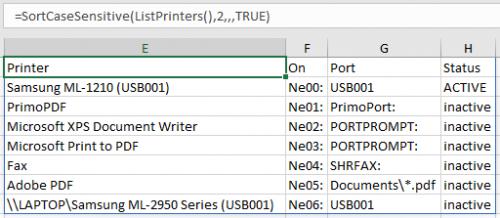
Figure 1.
2023-06-25 06:13:58
sandeep kothari
Very useful post.
Got a version of Excel that uses the ribbon interface (Excel 2007 or later)? This site is for you! If you use an earlier version of Excel, visit our ExcelTips site focusing on the menu interface.
FREE SERVICE: Get tips like this every week in ExcelTips, a free productivity newsletter. Enter your address and click "Subscribe."
Copyright © 2026 Sharon Parq Associates, Inc.
Comments