Please Note: This article is written for users of the following Microsoft Excel versions: 2007, 2010, 2013, 2016, 2019, and 2021. If you are using an earlier version (Excel 2003 or earlier), this tip may not work for you. For a version of this tip written specifically for earlier versions of Excel, click here: Using a Custom Format to Add Dashes.
Written by Allen Wyatt (last updated July 3, 2021)
This tip applies to Excel 2007, 2010, 2013, 2016, 2019, and 2021
Justin has part numbers that he routinely uses in a worksheet, such as 660501C016971. He would like to apply a custom format to the cell and have the part number automatically displayed with dashes at the proper location, such as 6605-01-C01-6971.
Unfortunately this cannot be done with a custom format. Why? Because custom formats are for the display of numbers, not text. There is one text format, designated by an "at sign" (@), but that is it; there are no others and no others can be defined.
Since custom formats cannot be used, one is left to figure out a workaround. One way to do it is to examine your part numbers and see if the text portion of the number can be removed and the part number still be usable. For instance, Justin's number is 660501C016971. If the format for the part number always calls for the letter C at the same point in the part number (and no other possible letters there), then you could simply delete the C and be left with the number 660501016971. Since it is a number, you can develop a custom format for it that includes dashes in the proper places and the letter C in the proper place. The custom format would look like this:
0000-00-C00-0000
With the format applied to a cell that contains the number 660501016971, you would end up with a correctly formatted part number displayed: 6605-01-C01-6971. This approach does have drawbacks, however. The biggest drawback is that if you ever want to export the part numbers to another program, perhaps as a CSV file, what ends up exporting is the original number without the formatting or the letter C.
Another workaround is to use a formula to display the part numbers in the format you desire. You could enter them into a cell without dashes, and then use the formula to add the dashes at the appropriate places. When creating reports, then, you would simply hide the column that contains the part numbers without the dashes. Here's a formula that will work, provided the part number without dashes is in cell A1:
=LEFT(A1,4) & "-" & MID(A1,5,2) & "-" & MID(A1,7,3) & "-" & RIGHT(A1,4)
If you work with the part numbers quite a bit, you might want a way to both add and remove the dashes easily. The best way to do this is with a macro. You can develop a macro that will allow you to add and remove the dashes from a part number in a selected range of cells. The following is an example of such a macro.
Sub DashesIn()
    DoDashes ("In")
End Sub
Sub DashesOut()
    DoDashes ("Out")
End Sub
Private Sub DoDashes(What As String)
    Dim c As Range
    Dim J As Integer

    For Each c In Selection.Cells
        If c.Value <> "" Then
            J = InStr(c.Value, "-")
            Select Case What
                Case "Out"
                    While J > 0
                        c.Value = Left(c.Value, J - 1) & _
                          Mid(c.Value, J + 1, Len(c.Value))
                        J = InStr(c.Value, "-")
                    Wend
                Case "In"
                    If J = 0 Then
                        c.Value = _
                          Left(c.Value, 4) & "-" & _
                          Mid(c.Value, 5, 2) & "-" & _
                          Mid(c.Value, 7, 3) & "-" & _
                          Right(c.Value, 4)
                    End If
            End Select
        End If
    Next c
End Sub
Note that there are actually three macros in this listing. The first (DashesIn) adds dashes to a part number, while the second (DashesOut) removes them. Simply select the cells containing the part numbers and then run the macro that will perform the operation you want done.
Both DashesIn and DashesOut call the common routine, DoDashes, to actually do the work. The macro examines all the cells in the selection and then performs whatever operation needs to be done on the contents of those cells.
Note:
ExcelTips is your source for cost-effective Microsoft Excel training. This tip (9394) applies to Microsoft Excel 2007, 2010, 2013, 2016, 2019, and 2021. You can find a version of this tip for the older menu interface of Excel here: Using a Custom Format to Add Dashes.

Dive Deep into Macros! Make Excel do things you thought were impossible, discover techniques you won't find anywhere else, and create powerful automated reports. Bill Jelen and Tracy Syrstad help you instantly visualize information to make it actionable. You�ll find step-by-step instructions, real-world case studies, and 50 workbooks packed with examples and solutions. Check out Microsoft Excel 2019 VBA and Macros today!
Want information in a worksheet to be formatted and displayed as rounded to a power of ten? You may be out of luck, ...
Discover MoreExcel, by default, displays numbers with a leading zero, if they are less than 1. Here's how you can get rid of those ...
Discover MoreIf you are familiar with decimal tabs in Word, you may wonder if you can set the same sort of alignment in Excel. The ...
Discover MoreFREE SERVICE: Get tips like this every week in ExcelTips, a free productivity newsletter. Enter your address and click "Subscribe."
2021-07-03 10:01:03
Willy Vanhaelen
Instead of the three macros in this tip you can do it with only one even simpler one:
Sub DoDashes2()
Dim c As Range, J As Integer
J = InStr(Selection(1), "-")
For Each c In Selection.Cells
If Len(c) Then
If J Then
c = Replace(c, "-", "")
Else
c = Left(c, 4) & "-" & Mid(c, 5, 2) & "-" & Mid(c, 7, 3) & "-" & Right(c, 4)
End If
End If
Next c
End Sub
The macro starts with testing the first cell in the selection. If it doesn't contain dashes means you want to add dashes to the whole selection. If it contains dashes, the macro will remove them from the whole selection.
(see Figure 1 below)
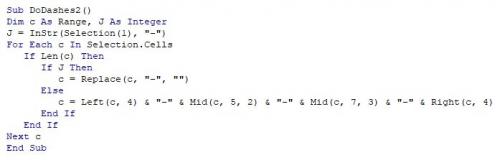
Figure 1. VBA screenshot
Got a version of Excel that uses the ribbon interface (Excel 2007 or later)? This site is for you! If you use an earlier version of Excel, visit our ExcelTips site focusing on the menu interface.
FREE SERVICE: Get tips like this every week in ExcelTips, a free productivity newsletter. Enter your address and click "Subscribe."
Copyright © 2026 Sharon Parq Associates, Inc.
 Please Note:
This article is written for users of the following Microsoft Excel versions: 2007, 2010, 2013, 2016, 2019, and 2021. If you are using an earlier version (Excel 2003 or earlier), this tip may not work for you. For a version of this tip written specifically for earlier versions of Excel, click here:
Please Note:
This article is written for users of the following Microsoft Excel versions: 2007, 2010, 2013, 2016, 2019, and 2021. If you are using an earlier version (Excel 2003 or earlier), this tip may not work for you. For a version of this tip written specifically for earlier versions of Excel, click here:
Comments