Written by Allen Wyatt (last updated September 6, 2024)
This tip applies to Excel 2007, 2010, 2013, 2016, 2019, and Excel in Microsoft 365
MRU is an acronym for Most Recently Used and indicates a list of the most recently opened workbooks within Excel. The purpose of the list is to make it easier to access the files you were recently working on. Ian noted that he can't get Excel to display the MRU list and is wondering if he is missing something.
It is possible that something could be being missed. There are a couple of things you should check in this regard. First, turn on the MRU list in this manner:
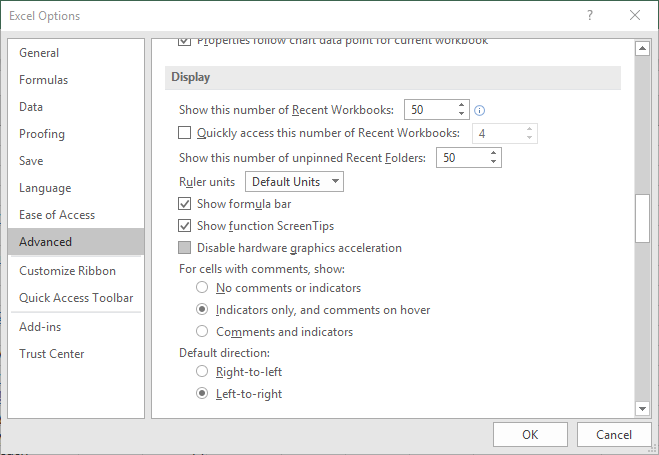
Figure 1. The Advanced section of the Excel Options dialog box.
This setting controls the number of listings shown in the Recent Documents list when you click the Office button (Excel 2007), display the File tab of the ribbon (Excel 2010), or display the File tab of the ribbon and click Open (later versions of Excel). This list of workbooks is unlike the older MRU list, in that you can display more of them.
Both Excel 2010 and Excel 2013 have a different place that you can display an MRU list: at the bottom of the left side of the File tab pane. This list of workbooks is entirely different than the MRU. You control how many files are listed there in different ways, depending on your version of Excel.
If you are using Excel 2010 and you display the File tab of the ribbon, you'll see an option at the very bottom of the tab. This check box is labeled "Quickly Access this Number of Recent Documents" and controls the number of files displayed.
If you are using Excel 2013 and later versions and display the Advanced options in the Excel Options dialog box (see the screen shot earlier in this tip), there is an option to "Quickly Access this Number of Recent Workbooks." This is the setting that controls the number of files listed on the File tab pane.
Once you've gotten your various MRU lists set up to display the number of workbooks you want, then you just need to start using Excel. As you do, the lists are "filled out" and provide a way to get to your most recently used workbooks. Remember, however, that if you move your Excel files to a different location, those files will no longer be accessible through the MRU.
ExcelTips is your source for cost-effective Microsoft Excel training. This tip (9509) applies to Microsoft Excel 2007, 2010, 2013, 2016, 2019, and Excel in Microsoft 365.
Program Successfully in Excel! John Walkenbach's name is synonymous with excellence in deciphering complex technical topics. With this comprehensive guide, "Mr. Spreadsheet" shows how to maximize your Excel experience using professional spreadsheet application development tips from his own personal bookshelf. Check out Excel 2013 Power Programming with VBA today!
When processing plain text files in a macro, it is often helpful to know how much data the file contains. The normal way ...
Discover MoreIt is often necessary to import information from other programs into Excel. Sometimes this can lead to challenges, such ...
Discover MoreKeeping tabs on the size of a workbook can be important when using Excel. You have a couple of options that will allow ...
Discover MoreFREE SERVICE: Get tips like this every week in ExcelTips, a free productivity newsletter. Enter your address and click "Subscribe."
There are currently no comments for this tip. (Be the first to leave your comment—just use the simple form above!)
Got a version of Excel that uses the ribbon interface (Excel 2007 or later)? This site is for you! If you use an earlier version of Excel, visit our ExcelTips site focusing on the menu interface.
FREE SERVICE: Get tips like this every week in ExcelTips, a free productivity newsletter. Enter your address and click "Subscribe."
Copyright © 2024 Sharon Parq Associates, Inc.
Comments