
David frequently needs to type letters that use diacritics. For instance, if he wants to enter an A with an umlaut (or diaresis) over it, he can do this in Word or Outlook using Ctrl+: (colon) followed by the letter A. This won't work in Excel, however. David wonders how he can enter the diacritics he needs, in Excel, using keyboard shortcuts.
Excel is, honestly, behind the times when it comes to altering the characters you enter in the way you can with Word and Outlook. If you strictly want a keyboard shortcut method, the best way is to use the Alt key followed by the numeric code for the letter you want to enter. You can best see these codes in the Symbol dialog box. (Display it by choosing Symbol from the Insert tab of the ribbon.) (See Figure 1.)
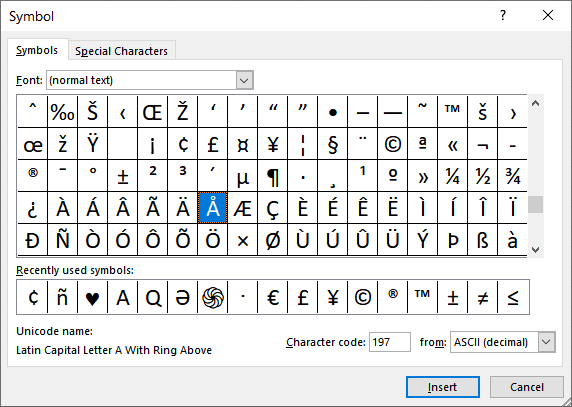
Figure 1. The Symbol dialog box.
Note that you need to have the ASCII (decimal) choice selected in the drop-down list at the very bottom-right of the dialog box. You can then select a character in those shown in the dialog box, and the numeric code for the character will then appear in the Character Code box at the lower-right of the dialog box. For instance, you'll note that the letter A with a ring above it has a character code of 197. This code can, in the future, be entered directly from the keyboard by holding down the Alt key and pressing 0197 on the numeric keypad. (The code has to be four numbers; you cannot leave off the leading 0.)
If you prefer, you can also find the numeric codes at various websites, such as https://www.alt-codes.net/. (You can search for similar sites in your favorite search engine.)
Of course, using this above procedure can get tedious if you need to do it all the time. The idea, though, is that once you find out the codes for those characters you use the most often, you can create your own "cheat sheet" (probably in Word) that shows the characters and their codes. You can then refer to the sheet as you work on memorizing the codes.
As an aside, there is another advantage to creating such a cheat sheet in Word—you can, if you desire, simply copy the diacritically enhanced characters from the cheat sheet and paste them into Excel as you need them.
If you use foreign-language characters quite a bit, you might actually want to look into procuring a foreign-language keyboard. These allow you to type the characters you need (including diacritics) the absolute fastest. And, speaking of keyboards, if you are using the latest version of Windows 10, you can rely on the Touch Keyboard. This is accessed through the Touch Keyboard button, which appears at the right side of the Taskbar. (If you cannot see it there, right-click on the Taskbar and choose the Show Touch Keyboard Button option.) Click the Touch Keyboard button and you see an on-screen keyboard. Use the mouse to click and hold a button on the keyboard (like the letters "a" or "e") and shortly you'll see alternative characters appear. Click the one that includes the diacritical mark you desire, and you are all set.
Finally, you may want to rethink how you are entering the characters. If they are routinely used as a part of common words, you could set up the words (including the diacritical marks) as AutoCorrect entries. You can set up these AutoCorrect entries in either Excel or Word as entries made in one Office program are available in the others. Here's how you would create one in Excel:

Figure 2. The AutoCorrect dialog box.
The advantage to setting up AutoCorrect entries (you can create just about as many as you'd like) is that they are fast, easy, and flawless to use. To use your new AutoCorrect entry, just type whatever you used in step 7 and then press Enter or some punctuation character. The name is replaced with the text that includes your diacritical marks.
ExcelTips is your source for cost-effective Microsoft Excel training. This tip (5230) applies to Microsoft Excel 2007, 2010, 2013, 2016, 2019, 2021, 2024, and Excel in Microsoft 365.

Excel Smarts for Beginners! Featuring the friendly and trusted For Dummies style, this popular guide shows beginners how to get up and running with Excel while also helping more experienced users get comfortable with the newest features. Check out Excel 2019 For Dummies today!
If you have a lot of text in your workbook, at some point you might want to split out sentences into individual cells. ...
Discover MoreIf you need to move down a row and then select that row, you may wonder if there is a shortcut to handle such a ...
Discover MoreAt the very heart of editing is the ability to move and copy cells in a worksheet. Understanding the differences between ...
Discover MoreFREE SERVICE: Get tips like this every week in ExcelTips, a free productivity newsletter. Enter your address and click "Subscribe."
2026-11-08 14:21:44
J. Woolley
Re. the ListAutoCorrectOptions function described in my first comment below I said, "The Math AutoCorrect option status cannot be determined using VBA." Recently I discovered where it was saved in the Windows registry, so here is a function that will return its status:
Function MathAutoCorrect_Option() As Integer
'return 0 if indeterminate, 1 if disabled, 2 if enabled
Const KEY1 As String = "HKEY_CURRENT_USER\Software\Microsoft\Office\"
Const KEY2 As String = ".0\Common\AutoCorrect\MathReplaceText"
MathAutoCorrect_Option = 0
On Error GoTo EH
MathAutoCorrect_Option = CreateObject("WScript.Shell").RegRead(KEY1 _
& Val(Application.Version) & KEY2) + 1
If MathAutoCorrect_Option < 1 Or MathAutoCorrect_Option > 2 Then _
MathAutoCorrect_Option = 0
EH: On Error GoTo 0
End Function
This can be used with the following cell formula:
=CHOOSE(MathAutoCorrect_Option() + 1, "indeterminate", "disabled", "enabled")
The ListAutoCorrectOptions function in My Excel Toolbox has been updated.
See https://sites.google.com/view/MyExcelToolbox/
2026-11-02 15:45:27
Further to my earlier comment, I found that there is no keyboard shortcut to enter Polish accented letters ąćęłńóśżź ĄĆĘŁŃÓŚŻŹ on keyboards other than Polish (Programmers), which use rightAlt or rightAlt+Shift with a corresponding letter acelnoszx.
You can insert these characters using Insert Symbol dialog box. To find these characters you need to select (normal text) as the font and make sure to select from Unicode (hex) set of characters. Still, using the code shown in the dialog box (for example 104 HEX which is 260 DEC) does not insert the letter Ą but ♦ (or nothing when you add leading zero). I guess it is because those Polish letters except óÓ are not in the first 255 characters of the Unicode, while German, Italian, Spanish, and Swedish specific letters are.
Please let me know if I am wrong Either by replying here or more privately by e-mail (unhidden in this post).
2026-11-02 13:04:40
Tomek
Which method is most efficient for you depends primarily on whether your main language of the spreadsheet is English with occasional need of foreign characters or your main language is other than English. In the latter case the best option is to set up and use that language keyboard. You do not have to buy another keyboard but may mark the keys accordingly. One of the easiest foreign keyboards to use is Polish Programmers on which all Polish accented characters can be entered by using right-Alt + one of the letters acelnoszx (z is for ż, x is for ź). Adding shift to the keys combination makes the letter capital. I wish other language keyboards were available applying similar principle. It would work for German, Italian, Spanish, and probably French and Swedish, without the need to learn that language-specific keyboard layout. Such original language-specific keyboards often move other characters like # " @ ; ; and others to accommodate accented characters.
Using four digit codes with Alt, is useful for entering other characters that do not exist on the keyboard, but are not actually accented characters or language specific. For example I have learned the codes for
¯ ° ± ² ³ µ
which I use often in technical writing, mostly related to chemistry. Their codes are relatively easy to memorize as they are 0175, 0176, 0177, 0178, 0179, and 0181, respectively. These codes work in other programs as well as in Excel.
2026-11-01 14:24:46
J. Woolley
After typing an AutoCorrect entry, press Space, Enter, or a punctuation character to substitute its replacement text.
My Excel Toolbox includes the following dynamic array function to list "Replace text as you type" AutoCorrect entries and replacement text in 2 columns:
=ListAutoCorrections([AddMath])
If optional AddMath is TRUE, the list will include Math AutoCorrect entries and replacement text; default is FALSE. Math AutoCorrect applies only when typing in a TextBox created with Insert > Symbols > Equation (Alt+N, ZS, E, I). My test resulted in about 900 rows without Math entries; they added almost 800 rows.
The following dynamic array function lists the status of all AutoCorrect and AutoFormat As You Type options indicated by tabs in the Tip's dialog box image:
=ListAutoCorrectOptions([AddExceptions])
(The Math AutoCorrect option status cannot be determined using VBA.) If optional AddExceptions is TRUE, the list will include items displayed when the Exceptions button in the Tip's dialog box image is clicked; default is FALSE for a result with 12 rows in 1 column. Exceptions added 280 rows in my test.
See https://sites.google.com/view/MyExcelToolbox/
Got a version of Excel that uses the ribbon interface (Excel 2007 or later)? This site is for you! If you use an earlier version of Excel, visit our ExcelTips site focusing on the menu interface.
FREE SERVICE: Get tips like this every week in ExcelTips, a free productivity newsletter. Enter your address and click "Subscribe."
Copyright © 2026 Sharon Parq Associates, Inc.

Comments