Please Note: This article is written for users of the following Microsoft Excel versions: 2007, 2010, and 2013. If you are using an earlier version (Excel 2003 or earlier), this tip may not work for you. For a version of this tip written specifically for earlier versions of Excel, click here: Saving a Workbook Using Passwords.
Excel includes a feature that allows you to save a workbook using a password so that only others who have the password can access the file. This form of protection can stop others from using a workbook unless they know your password. To save a workbook using password protection, follow these steps:
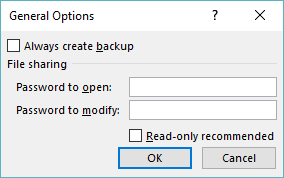
Figure 1. The General Options dialog box.
The General Options dialog box contains boxes where you can enter two passwords. Each password controls a different level of protection. If you fill in the first password field, you are specifying the password someone needs to know simply to open the workbook. If you fill in the second field, then someone needs to know that password to make any changes to the workbook. Understand that they can still save the open workbook under a new name, but they cannot make any changes and save them back into the same disk file.
You should set your passwords as desired, and then click on OK to dismiss the General Options dialog box. You are asked to confirm your password, and then you can continue to save your file (using the Save As dialog box) as you normally would.
As a final caveat, you should note that none of the native (built-in) password schemes in Excel are particularly robust. If you want the best protection possible, you should look to a third-party solution for encrypting and protecting your workbooks.
ExcelTips is your source for cost-effective Microsoft Excel training. This tip (6119) applies to Microsoft Excel 2007, 2010, and 2013. You can find a version of this tip for the older menu interface of Excel here: Saving a Workbook Using Passwords.

Create Custom Apps with VBA! Discover how to extend the capabilities of Office 365 applications with VBA programming. Written in clear terms and understandable language, the book includes systematic tutorials and contains both intermediate and advanced content for experienced VB developers. Designed to be comprehensive, the book addresses not just one Office application, but the entire Office suite. Check out Mastering VBA for Microsoft Office 365 today!
Want to stop other people from making unauthorized changes to your workbook? Excel provides a way that you can protect ...
Discover MoreExcel provides built-in capabilities to protect your workbook files. If you apply these capabilities, it is possible that ...
Discover MoreWhen you develop a workbook for others to use, you may want to make sure that those users cannot change the order in ...
Discover MoreFREE SERVICE: Get tips like this every week in ExcelTips, a free productivity newsletter. Enter your address and click "Subscribe."
2023-07-19 10:41:47
J. Woolley
@Gregory F Felts
To block access to sheet #5:
1. Update sheet #5.
2. Hide sheet #5.
See https://excelribbon.tips.net/T006713_Hiding_and_Unhiding_Worksheets.html
3. Protect the workbook structure; include a password.
See https://excelribbon.tips.net/T008530_Protecting_an_Entire_Workbook.html
4. You might want to protect the other four worksheets, too.
See https://excelribbon.tips.net/T010282_Using_a_Protected_Worksheet.html
5. Test your macros.
To view/update sheet #5, reverse steps 1-3 (only).
My Excel Toolbox includes the following function to return the protection status (TRUE/FALSE) of a Target cell's worksheet or workbook:
=IsProtected([Choice],[Target])
Choice for a worksheet is Contents (default), Shapes, Interface, or Scenarios
and Choice for a workbook is Sheets (structure) or Windows.
Target's default is the formula's cell.
My Excel Toolbox also includes the following dynamic array function to return the status of the 12 protection options for the formula cell's worksheet:
=ListProtectionOptions()
My Excel Toolbox's SpillArray function (described in UseSpillArray.pdf) simulates a dynamic array in older versions of Excel.
See https://sites.google.com/view/MyExcelToolbox
2023-07-16 16:02:30
Gregory F Felts
Is there a way to Block access to only one sheet in a workbook? 5 Sheets in a workbook, sheets 1-4 everyone has access to and all the information contained within, but sheet #5 has privy information that not everyone needs. Sheet #5 is UPDATED from a combination of two CVS file once a week and is used to update sheets 1-4. Would like to have to enter a Password to OPEN sheet #5.
As it is now, I update Sheet 5 with info from two CVS files then Update sheets 1-4 with a macro. THe BOSS needs all the info on Sheet #5 but not everyone else does.
Got a version of Excel that uses the ribbon interface (Excel 2007 or later)? This site is for you! If you use an earlier version of Excel, visit our ExcelTips site focusing on the menu interface.
FREE SERVICE: Get tips like this every week in ExcelTips, a free productivity newsletter. Enter your address and click "Subscribe."
Copyright © 2026 Sharon Parq Associates, Inc.
 Please Note:
This article is written for users of the following Microsoft Excel versions: 2007, 2010, and 2013. If you are using an earlier version (Excel 2003 or earlier), this tip may not work for you. For a version of this tip written specifically for earlier versions of Excel, click here:
Please Note:
This article is written for users of the following Microsoft Excel versions: 2007, 2010, and 2013. If you are using an earlier version (Excel 2003 or earlier), this tip may not work for you. For a version of this tip written specifically for earlier versions of Excel, click here:
Comments