Written by Allen Wyatt (last updated July 24, 2021)
This tip applies to Excel 2007, 2010, 2013, 2016, 2019, and 2021
Macros are often created to save time and energy, make Excel work the way we expect it to work, and to make repetitive, mind-numbing tasks somewhat more bearable. A good number of the macros I create for these reasons are ones I need to use over and over again, and I'll bet you are in the same boat.
Where, then, does one put a macro so it can be used over and over again?
The answer, of course, is to place it in a special place that is accessible regardless of the workbook on which you are working. This special place is, itself, a workbook, and it is normally hidden from prying eyes. (Actually it is hidden so it doesn't interfere with the work you are doing on other workbooks and so that you don't inadvertently make changes in it.) This special workbook is known as the Personal Macro Workbook, which is stored in a file named Personal.xlsb.
The Personal Macro Workbook isn't created by default on a system. If you want a quick way to see if one is available on your system, display the View tab of the ribbons. If the Unhide tool (in the Window group) is not available, then the Personal Macro Workbook has not been created on your system. (Remember—the Personal Macro Workbook is normally hidden, so if there is nothing to unhide, then that workbook doesn't exist.)
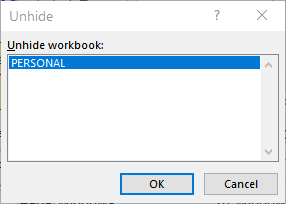
If the Unhide tool is available, that is not definitive proof that the Personal Macro Workbook exists, but you are a step closer to finding out. Click the tool, and you will see the Unhide dialog box. (See Figure 1.)

Figure 1. The Personal Macro Workbook exists on this system.
If the dialog box contains an entry for Personal.xlsb (depending on your version of Excel the dialog box may just show "Personal" as opposed to Personal.xlsb), then the Personal Macro Workbook exists on your system; you can skip the discussion, below, about how to create it.
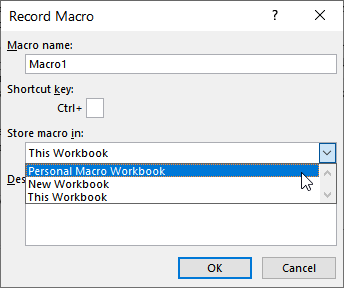
To create the Personal Macro Workbook so that you can start to store macros there, the easiest way is to record a dummy macro (one you won't really use for anything) and instruct Excel to store it there. Follow these steps:

Figure 2. Make sure you choose Personal Macro Workbook.
At this point you've created a dummy macro and Excel dutifully stores it in the Personal Macro Workbook. Since you previously had no such workbook, Excel created it for you. (You can see that it is there by again looking at the Unhide tool on the View tab of the ribbon.)
From this point on, you can easily add macros to the Personal Macro Workbook. All you need to do is follow the same steps, listed above, if you are recording a new macro. If you are writing a macro from scratch, then use the Macros dialog box (visible when you choose Macros from the Developer tab of the ribbon) and specify Personal Macro Workbook using the Macros In drop-down list.
Once a macro is stored in the Personal Macro Workbook, it is available whenever you are using Excel. The reason for this is that Excel opens the workbook whenever you start Excel. Thus, it is a great place to store the macros you want to use over and over again, regardless of where you are doing your work.
But, you ask, how does one get rid of the dummy macro you just created? Or, for that matter, how does one get rid of any other macro stored in the Personal Macro Workbook? The answer is simple: You delete the macros the same as you would delete any other macro. Excel allows you to delete the macros in the Personal Macro Workbook whether it is hidden or not.
ExcelTips is your source for cost-effective Microsoft Excel training. This tip (13097) applies to Microsoft Excel 2007, 2010, 2013, 2016, 2019, and 2021.

Create Custom Apps with VBA! Discover how to extend the capabilities of Office 365 applications with VBA programming. Written in clear terms and understandable language, the book includes systematic tutorials and contains both intermediate and advanced content for experienced VB developers. Designed to be comprehensive, the book addresses not just one Office application, but the entire Office suite. Check out Mastering VBA for Microsoft Office 365 today!
Need to run a macro at a given interval? It's easy to do when you learn how to use the .OnTime method, described in this tip.
Discover MoreGrab some info from a source other than Excel, and you may find the need to delete a certain pattern of rows from a ...
Discover MoreWant a quick way to speed up your macros? All you need to do is to stop Excel from updating the screen while the macro is ...
Discover MoreFREE SERVICE: Get tips like this every week in ExcelTips, a free productivity newsletter. Enter your address and click "Subscribe."
There are currently no comments for this tip. (Be the first to leave your comment—just use the simple form above!)
Got a version of Excel that uses the ribbon interface (Excel 2007 or later)? This site is for you! If you use an earlier version of Excel, visit our ExcelTips site focusing on the menu interface.
FREE SERVICE: Get tips like this every week in ExcelTips, a free productivity newsletter. Enter your address and click "Subscribe."
Copyright © 2026 Sharon Parq Associates, Inc.
Comments