Please Note: This article is written for users of the following Microsoft Excel versions: 2007, 2010, 2013, 2016, 2019, 2021, and Excel in Microsoft 365. If you are using an earlier version (Excel 2003 or earlier), this tip may not work for you. For a version of this tip written specifically for earlier versions of Excel, click here: Understanding AutoComplete.
Excel includes a handy timesaving feature called AutoComplete. This feature can save you time when you are entering lots of similar information in a column. You may already have noticed this feature before—when you start to type something in a cell, Excel tries to guess what you are typing and shows a "match" that you can accept simply by pressing Enter.
The "matches" that Excel uses in its "guess" are nothing but the contents of the cells in the column above where you are making your entry. For instance, if you have information in cells A1 through A6 and you are entering a value in cell A7, Excel looks at what you are typing. If the first few characters uniquely match something in any of the six cells previously entered in the column, then Excel offers to AutoComplete A7 with the contents of the cell that matched.
Excel only tries to match your new entry with immediately adjacent cells above the one in which you are entering the information. It stops trying to match entries when a blank cell is reached. For instance, suppose you have information in cells A1 through A14 and A16 through A23. When you start typing an entry in cell A24, Excel only tries to match it with values in A16 through A23; the blank cell at A15 halts the comparisons.
In addition, Excel does not try to match with cells that contain only numbers, dates, or times. The cells must contain either text or a combination of text and numbers.
For some people, AutoComplete can be annoying rather than timesaving. If you want to turn off the AutoComplete feature, follow these steps:
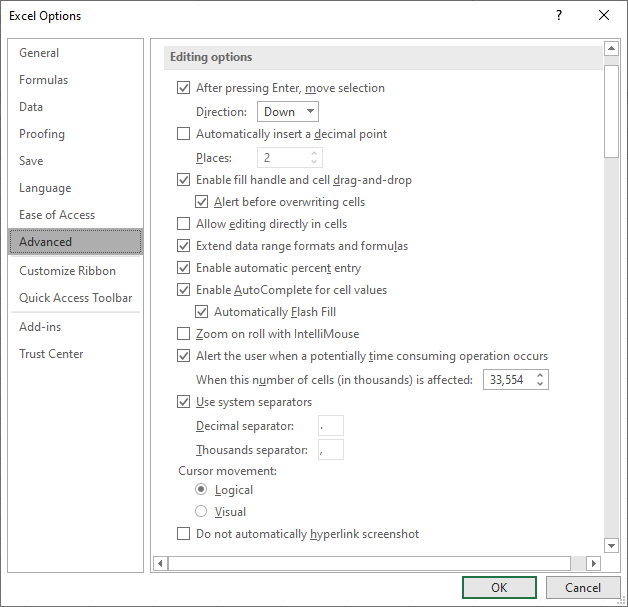
Figure 1. The advanced options of the Excel Options dialog box.
ExcelTips is your source for cost-effective Microsoft Excel training. This tip (6262) applies to Microsoft Excel 2007, 2010, 2013, 2016, 2019, 2021, and Excel in Microsoft 365. You can find a version of this tip for the older menu interface of Excel here: Understanding AutoComplete.

Program Successfully in Excel! This guide will provide you with all the information you need to automate any task in Excel and save time and effort. Learn how to extend Excel's functionality with VBA to create solutions not possible with the standard features. Includes latest information for Excel 2024 and Microsoft 365. Check out Mastering Excel VBA Programming today!
Want to get rid of most of the names defined in your workbook? You can either delete them one by one or use the handy ...
Discover MoreGot some numbers and letters mixed up in the same cell? You may need to get rid of those letters so you are left with ...
Discover MoreTo reduce the chances of confusion in presenting data, some people like to use zeroes with slashes through them. If you ...
Discover MoreFREE SERVICE: Get tips like this every week in ExcelTips, a free productivity newsletter. Enter your address and click "Subscribe."
2022-05-02 05:45:39
Willy Vanhaelen
When the cell at the right and/or the left of an empty cell in a column has data Excel considers this cell not as an empty cell for AutoComplete. Consequently this empty cell becomes part of the contiguous range in the column.
So, in this tip's example, A15 being empty, but B15 has data, AutoComplete will look for a match in the entire range A1 through A23 when you start typing an entry in cell A24.
Got a version of Excel that uses the ribbon interface (Excel 2007 or later)? This site is for you! If you use an earlier version of Excel, visit our ExcelTips site focusing on the menu interface.
FREE SERVICE: Get tips like this every week in ExcelTips, a free productivity newsletter. Enter your address and click "Subscribe."
Copyright © 2026 Sharon Parq Associates, Inc.
 Please Note:
This article is written for users of the following Microsoft Excel versions: 2007, 2010, 2013, 2016, 2019, 2021, and Excel in Microsoft 365. If you are using an earlier version (Excel 2003 or earlier), this tip may not work for you. For a version of this tip written specifically for earlier versions of Excel, click here:
Please Note:
This article is written for users of the following Microsoft Excel versions: 2007, 2010, 2013, 2016, 2019, 2021, and Excel in Microsoft 365. If you are using an earlier version (Excel 2003 or earlier), this tip may not work for you. For a version of this tip written specifically for earlier versions of Excel, click here:
Comments