Please Note: This article is written for users of the following Microsoft Excel versions: 2007, 2010, 2013, 2016, 2019, and 2021. If you are using an earlier version (Excel 2003 or earlier), this tip may not work for you. For a version of this tip written specifically for earlier versions of Excel, click here: Adding Diagonal Borders.
Written by Allen Wyatt (last updated October 17, 2020)
This tip applies to Excel 2007, 2010, 2013, 2016, 2019, and 2021
Excel allows you to add all sorts of borders to cells in a worksheet. You can place borders on the left, right, top, and bottom of a cell. If you select a range of cells, you can add borders to the left, right, top, bottom, and in between, meaning that the borders could be between cells within the selected range.
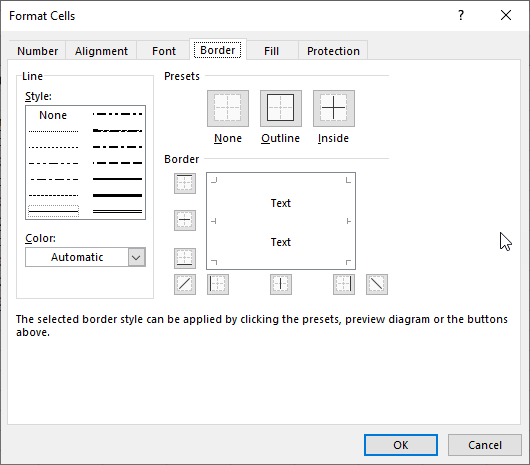
Many people don't realize that you can also place diagonal borders. This means that a border can appear from the top-left to the lower-right corners of a cell, or from the top-right to the lower-left. To take advantage of diagonal borders, follow these steps:

Figure 1. The Border tab of the Format Cells dialog box.
Diagonal borders can only be applied to cells, not to rectangular areas you select onscreen. For instance, if you choose cells A5:C12, the diagonal border won't go from the top-left corner of cell A5 to the bottom-right corner of cell C12. Instead, it is applied to the individual cells within the selected range.
ExcelTips is your source for cost-effective Microsoft Excel training. This tip (6152) applies to Microsoft Excel 2007, 2010, 2013, 2016, 2019, and 2021. You can find a version of this tip for the older menu interface of Excel here: Adding Diagonal Borders.

Professional Development Guidance! Four world-class developers offer start-to-finish guidance for building powerful, robust, and secure applications with Excel. The authors show how to consistently make the right design decisions and make the most of Excel's powerful features. Check out Professional Excel Development today!
When you are formatting your worksheet, Excel lets you easily merge adjacent cells together. If you want to wrap the text ...
Discover MoreThe ability to center text across a range of cells has long been a staple of experienced Excel users. Here's how to ...
Discover MoreOne of the most common cell alignment settings I use is the one to center across a selection. If you want to vary how ...
Discover MoreFREE SERVICE: Get tips like this every week in ExcelTips, a free productivity newsletter. Enter your address and click "Subscribe."
2020-10-19 07:27:38
Mike D.
Allen Quote "Diagonal borders can only be applied to cells, not to rectangular areas you select onscreen."
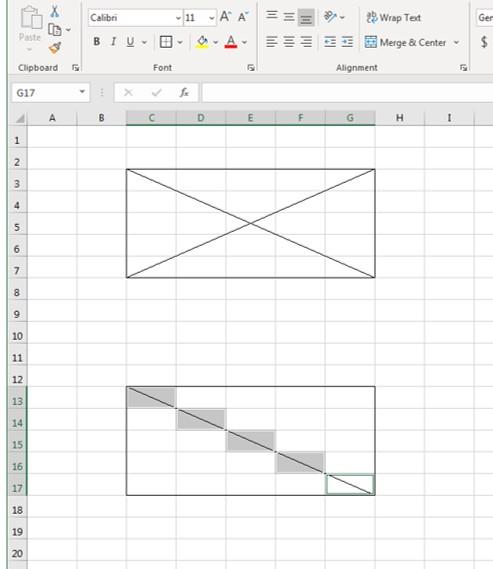
Actually you can draw a slanted line through an area with a little work. Simply select the diagonal cell using the control key and the left mouse button.
Then format the cell with the diagonal line of choice, voila!
If you want an 'X' than select the opposite diagonal cells and the opposite diagonal line and presto, you have an 'X'.
I highlighted all the cells and put a full border around it to highlight the 'Xed' out cells.
Of course it does have some limitations with the shape of the rectangle, but it will work for some.
(see Figure 1 below)

Figure 1.
2020-10-18 17:09:05
Allan
Roy, you win with 4 steps.
Michael 5 steps
Allan 6 steps
Note: In Roy's plan, Ctl-1 must be done with the numeric row at the top of keyboard. The numeric key pad did not work.
2020-10-17 23:14:12
Roy
@Allan: Um, I guess you mean simpler than the tip. Not "simple" but "simpler than (fill in the blank)"?
For "simple" select the cell, press Ctrl-1, borders, and click the diagonal control. Couple steps to the thing to click beats four steps and not using the Ribbon for anything buried in its sub-menus is absolutely simpler and less work. If it's in the top level of the Ribbon menuing (yeah, its a menu, not something unique MS), that still takes a pair of clicks if you hate having a menu that covers an eighth of the screen, or more.
By the way, of course one can have diagonals in a range, but you have to select the cells it goes in using Ctrl-click and format, or format one, then copy and paste to the others. Last is easiest, but hard to do if you have content and/or they are not uniformly formatted.
2020-10-17 18:25:13
Michael G Bennett
Not in excel 2007.
Right click --- Format Cells ---> Border tab ......... then the rest
2020-10-17 15:32:40
Allan
Here's a simpler way.
Rt clk cell>Borders down arrow>More Borders>Border tab>Select a diagonal border
Got a version of Excel that uses the ribbon interface (Excel 2007 or later)? This site is for you! If you use an earlier version of Excel, visit our ExcelTips site focusing on the menu interface.
FREE SERVICE: Get tips like this every week in ExcelTips, a free productivity newsletter. Enter your address and click "Subscribe."
Copyright © 2026 Sharon Parq Associates, Inc.
Comments