Please Note: This article is written for users of the following Microsoft Excel versions: 2007, 2010, 2013, 2016, 2019, and 2021. If you are using an earlier version (Excel 2003 or earlier), this tip may not work for you. For a version of this tip written specifically for earlier versions of Excel, click here: Setting the Print Area.
Written by Allen Wyatt (last updated September 27, 2024)
This tip applies to Excel 2007, 2010, 2013, 2016, 2019, and 2021
Excel allows you to easily define the portion of your worksheet that should be printed. To set the print area is, follow these steps:
This is the simplest way to set the print area. There is a more involved way, however, that gives you a bit more flexibility in specifying what you want included in the print area:
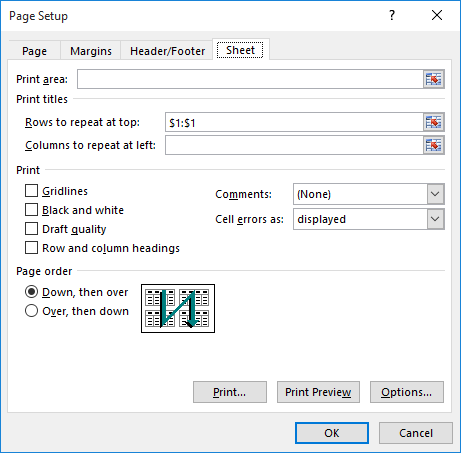
Figure 1. The Sheet tab of the Page Setup dialog box.
In step 5 you can enter either an actual cell range (such as A2:G35), or you can enter a name that has been assigned to a range. Excel even allows you to specify multiple parts of the same worksheet that should be printed. To do this, simply enter the ranges (or names) separated by commas, for example, B3:F14,B19:F30.
You can also use the mouse to select the print area. To do this, click first in the Print Area field (this causes the insertion point to appear in the field). Then use the mouse to select the cells that you want included. As you select a range of cells, the address of the range is automatically shown in the Print Area field.
Be warned, though, that using this method means that once the print area is defined, Excel will only print that selection until the option is changed or removed. You'll have to remember to change it if you need to print a different selection or the entire spreadsheet.
ExcelTips is your source for cost-effective Microsoft Excel training. This tip (6294) applies to Microsoft Excel 2007, 2010, 2013, 2016, 2019, and 2021. You can find a version of this tip for the older menu interface of Excel here: Setting the Print Area.

Excel Smarts for Beginners! Featuring the friendly and trusted For Dummies style, this popular guide shows beginners how to get up and running with Excel while also helping more experienced users get comfortable with the newest features. Check out Excel 2019 For Dummies today!
Want to print small, non-contiguous areas of your worksheet all on a single page? You might think that defining a ...
Discover MoreNeed the same print range set for different worksheets in the same workbook? It can't be done in one step manually, but ...
Discover MoreYou can define, in your worksheet, an area that you want printed. If you want this print area to be dynamic, based on the ...
Discover MoreFREE SERVICE: Get tips like this every week in ExcelTips, a free productivity newsletter. Enter your address and click "Subscribe."
There are currently no comments for this tip. (Be the first to leave your comment—just use the simple form above!)
Got a version of Excel that uses the ribbon interface (Excel 2007 or later)? This site is for you! If you use an earlier version of Excel, visit our ExcelTips site focusing on the menu interface.
FREE SERVICE: Get tips like this every week in ExcelTips, a free productivity newsletter. Enter your address and click "Subscribe."
Copyright © 2026 Sharon Parq Associates, Inc.
 Please Note:
This article is written for users of the following Microsoft Excel versions: 2007, 2010, 2013, 2016, 2019, and 2021. If you are using an earlier version (Excel 2003 or earlier), this tip may not work for you. For a version of this tip written specifically for earlier versions of Excel, click here:
Please Note:
This article is written for users of the following Microsoft Excel versions: 2007, 2010, 2013, 2016, 2019, and 2021. If you are using an earlier version (Excel 2003 or earlier), this tip may not work for you. For a version of this tip written specifically for earlier versions of Excel, click here:
Comments