When working with conditional formats, you'll often discover times when you need to apply multiple conditions to a single cell. How you define a single condition is described in other ExcelTips, but Excel allows you to define many conditions that can all apply to the same cell or range of cells.
Begin by selecting the cells for which you want to define conditional formatting rules. Then, with the Home tab of the ribbon displayed, click Conditional Formatting in the Styles group. From the resulting list of options, select Manage Rules. Excel displays the Conditional Formatting Rules Manager. (See Figure 1.)
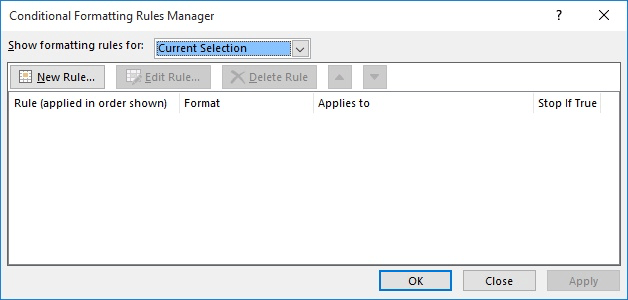
Figure 1. The Conditional Formatting Rules Manager.
The Conditional Formatting Rules Manager is nothing but a list of the rules which have been defined for the selected cells. Each rule is shown on a separate line, and you can work with the rules by clicking one of the available buttons:
Rules are always evaluated in the order in which they appear in the Conditional Formatting Rules Manager. You can modify the evaluation order by using the up and down arrow tools.
ExcelTips is your source for cost-effective Microsoft Excel training. This tip (6755) applies to Microsoft Excel 2007, 2010, 2013, 2016, 2019, 2021, and Excel in Microsoft 365.

Professional Development Guidance! Four world-class developers offer start-to-finish guidance for building powerful, robust, and secure applications with Excel. The authors show how to consistently make the right design decisions and make the most of Excel's powerful features. Check out Professional Excel Development today!
Conditional formatting is a powerful tool you can use to dynamically adjust the formatting of your worksheet. This tip ...
Discover MoreConditional formatting is a great tool. You may need to use this tool to tell the difference between cells that are empty ...
Discover MoreIf an error exists in a formula tucked inside a conditional format, you may never know it is there. There are ways to ...
Discover MoreFREE SERVICE: Get tips like this every week in ExcelTips, a free productivity newsletter. Enter your address and click "Subscribe."
2023-02-11 13:30:50
Tomek
Also important is understanding how the evaluation order really works, and how "Stop if True" setting interacts with the evaluation order.
While the rules are evaluated from top to bottom, it does not mean that the last rule will fully determine how the cell is formatted. If a particular formatting attribute is applied by one rule, any subsequent rule will not change that attribute. For example, if you have a rule setting the background to yellow for value in the cell >5, and the following rule to set the background to red if cell value >10, the cell background will be yellow whether the value is 6 or 100; this cell will never show red background, contrary to what you may expect. To get what you expect, you need to change the order of the rules, and if in doubt, use "Stop if True": the latter, if the condition for that rule is met, will cause the the formatting to ignore all of the rules below.
In short, not as simple as you may think.
Got a version of Excel that uses the ribbon interface (Excel 2007 or later)? This site is for you! If you use an earlier version of Excel, visit our ExcelTips site focusing on the menu interface.
FREE SERVICE: Get tips like this every week in ExcelTips, a free productivity newsletter. Enter your address and click "Subscribe."
Copyright © 2026 Sharon Parq Associates, Inc.
Comments