Please Note: This article is written for users of the following Microsoft Excel versions: 2007, 2010, 2013, 2016, 2019, and Excel in Microsoft 365. If you are using an earlier version (Excel 2003 or earlier), this tip may not work for you. For a version of this tip written specifically for earlier versions of Excel, click here: Hiding and Protecting Columns.

Hiding and Protecting Columns

Written by Allen Wyatt (last updated April 13, 2019)
This tip applies to Excel 2007, 2010, 2013, 2016, 2019, and Excel in Microsoft 365


5

Roger has a worksheet that he needs to distribute to different people so they can add and change some information. He wants to hide some of the columns in the worksheet, however, so that they cannot be viewed by users. He knows how to protect the worksheet and how to hide data in cells but noticed that info is still visible in the formula bar.

Since you already know how to protect a worksheet, you are already on your way to accomplishing your task. These are the steps you should follow:

  1. Select the column you want to protect.
  2. Press Ctrl+Shift+F. Excel displays the Format Cells dialog box.
  3. Make sure the Protection tab is displayed. (See Figure 1.)
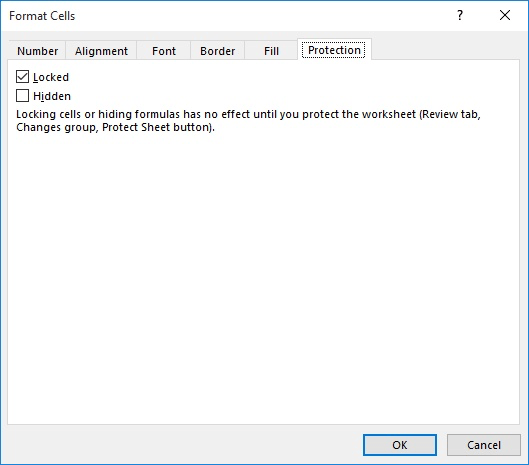
  4. Figure 1. The Protection tab of the Format Cells dialog box.

  5. Make sure both the Locked and Hidden check boxes are selected. (It is the Hidden check box that controls whether the cell contents are visible in the formula bar or not.)
  6. Click OK to dismiss the dialog box.
  7. With the column still selected, display the Home tab of the ribbon.
  8. Starting in the Cells group, click Format | Hide & Unhide | Hide Columns. Excel hides the column.
  9. Again, starting in the Cells group, click Format | Protect Sheet. Excel displays the Protect Sheet dialog box. (See Figure 2.)
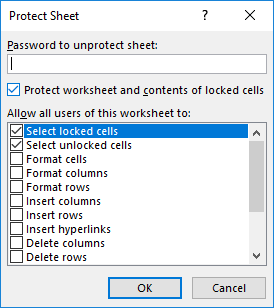
  10. Figure 2. The Protect Sheet dialog box.

  11. Enter a password to be used in protecting the worksheet.
  12. Using the check boxes, select what type of protection you want applied to the worksheet. At a minimum you should choose Select Locked Cells and Select Unlocked Cells. (These two options are selected by default in a worksheet.)
  13. Click OK to dismiss the dialog box. You are prompted to reenter your password (the one from step 9), which you should do.

At this point someone cannot view what is in the hidden column, even if they use F5 to jump to one of the cells in the column; it still won't appear in the formula bar. There is one caveat to all this: If you have some cells in the worksheet (or workbook) that are unlocked, so that the contents of the cell can be changed, it is still possible to see what is in individual cells of the column. How? Two methods, really:

  • In the unlocked cell, enter a formula that references a locked and hidden cell. For instance, if column E is locked and hidden, entering the formula =E3 will display, in the unlocked cell, the value in cell E3.
  • Copy the contents of the locked and hidden cell and paste it in the unlocked cell. Use F5 to jump to the locked and hidden cell, then press Ctrl+C, move to the unlocked cell, and press Ctrl+V. The contents of the locked and hidden cell are pasted in the unlocked cell.

The bottom line is that it is virtually impossible to 100% protect the contents of the column so that they cannot be viewed. Using the protection features of Excel makes it more difficult, but a determined user may be able to still view the contents in the described manner.

ExcelTips is your source for cost-effective Microsoft Excel training. This tip (8069) applies to Microsoft Excel 2007, 2010, 2013, 2016, 2019, and Excel in Microsoft 365. You can find a version of this tip for the older menu interface of Excel here: Hiding and Protecting Columns.

Author Bio

Allen Wyatt

With more than 50 non-fiction books and numerous magazine articles to his credit, Allen Wyatt is an internationally recognized author. He is president of Sharon Parq Associates, a computer and publishing services company. ...

MORE FROM ALLEN

Viewing Footnotes

Adding footnotes to a document is essential for some types of writing. How you view those footnotes depends on the ...

Discover More

Declaring Variables

Macros depend on the use of variables to do their work. This tip examines how variables are declared in a macro, using ...

Discover More

Hiding Table Rows on a Printout

When you work with tables in your document, you may want to hide some of rows in those tables so that they don't print ...

Discover More

Program Successfully in Excel! John Walkenbach's name is synonymous with excellence in deciphering complex technical topics. With this comprehensive guide, "Mr. Spreadsheet" shows how to maximize your Excel experience using professional spreadsheet application development tips from his own personal bookshelf. Check out Excel 2013 Power Programming with VBA today!

More ExcelTips (ribbon)

Forcing a Worksheet to be Protected Again

Excel allows you to protect your worksheets so they can only be changed as you want to have happen. If you unprotect a ...

Discover More

Stopping a Worksheet from being Moved or Copied

Want to stop a user from moving or copying a worksheet? This task (like many) can be more complex than one would hope. ...

Discover More

Inserting and Deleting Rows in a Protected Worksheet

You've protected and saved your worksheet with explicit instructions that you be allowed to insert and delete rows. But ...

Discover More
Subscribe

FREE SERVICE: Get tips like this every week in ExcelTips, a free productivity newsletter. Enter your address and click "Subscribe."

View most recent newsletter.

Comments

If you would like to add an image to your comment (not an avatar, but an image to help in making the point of your comment), include the characters [{fig}] (all 7 characters, in the sequence shown) in your comment text. You’ll be prompted to upload your image when you submit the comment. Maximum image size is 6Mpixels. Images larger than 600px wide or 1000px tall will be reduced. Up to three images may be included in a comment. All images are subject to review. Commenting privileges may be curtailed if inappropriate images are posted.

What is six more than 3?

2021-02-10 13:30:38

Rocio Katsanis

This was very helpful, but it locks all cells in my spreadsheet. I want to complete hide and lock **only** the hidden columns so that, if user changes the width of a column next to it, it will not expand by mistake the hidden one. With this procedure I cannot change the widths of all columns, not just the hidden ones. So what I am looking for is to lock the width of a hidden column, to always stay width=0 but I can modify the widths of all other columns.


2020-07-09 10:35:02

gh

this review is not good. After locking, the whole excel gets locked, not only the specified columns. Doesn't teach you how NOT to lock the whole excel but only the columns.


2020-05-16 05:53:02

Stephen Cobb

This was very helpful Allen. Thank you. As a security professional - who once wrote books about Excel - I was pleased to see that you warn people about the limitations of cell protection. My wife is also a security professional and pointed out that you can access the contents of even a well-protected XLS if you save it as a CSV and open that in a text editor. Stephen Cobb


2020-01-01 18:43:15

Taylor

Still after hidden, locked, and protected when sent to an apple device they can unhide and see everything. They cannot make changes but I need areas hidden completely!


2019-11-13 11:34:21

N/A

Should add more pictures. This was not helpful.


This Site

Got a version of Excel that uses the ribbon interface (Excel 2007 or later)? This site is for you! If you use an earlier version of Excel, visit our ExcelTips site focusing on the menu interface.

Newest Tips
Subscribe

FREE SERVICE: Get tips like this every week in ExcelTips, a free productivity newsletter. Enter your address and click "Subscribe."

(Your e-mail address is not shared with anyone, ever.)

View the most recent newsletter.