Please Note: This article is written for users of the following Microsoft Excel versions: 2007, 2010, 2013, 2016, 2019, and 2021. If you are using an earlier version (Excel 2003 or earlier), this tip may not work for you. For a version of this tip written specifically for earlier versions of Excel, click here: Using Check Boxes.
Written by Allen Wyatt (last updated July 14, 2023)
This tip applies to Excel 2007, 2010, 2013, 2016, 2019, and 2021
Many different dialog boxes and forms in the Windows world utilize check boxes. They are handy if you want to provide a way for a user to choose between two options, such as true or false; yes or no. Excel also allows you to use check boxes in your worksheets, if desired.
For instance, you may have developed a financial projection worksheet in which you can either account for a particular acquisition or not. In this case, you might want to place a check box at the top of the worksheet. You can then link the status of this check box to another cell, so that if the check box is selected, the value of the cell is True; if it is not selected, the value of the cell is False.
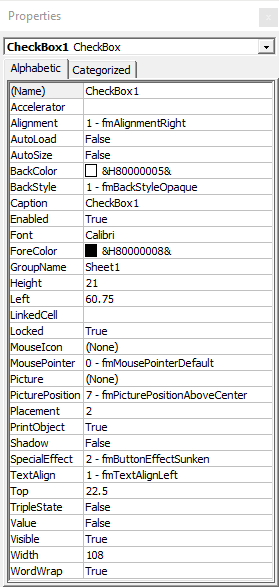
There are two types of check box controls you can insert in your worksheet: a forms control and an ActiveX control. Both do essentially the same thing; here's how you place an ActiveX check box control in your worksheet:

Figure 1. The Properties dialog box for the check box.
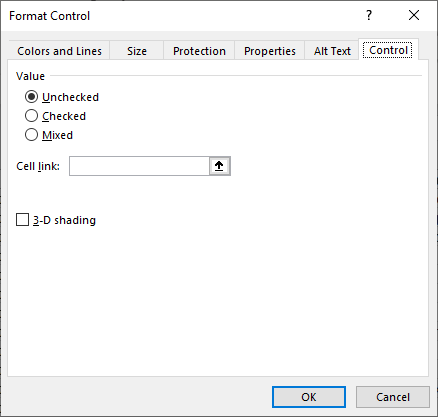
If your worksheet will be used with older versions of Excel (those before Excel 2007) you will want to use the forms control check box. Here's how you place them in your worksheet:

Figure 2. The Control tab of the Format Control dialog box.
As you are specifying cells for the check boxes to link to, it may be helpful to put those cells either on a different worksheet or size your check box so it completely covers the cell to which the check box is linked. That way the "True" and "False" values showing up in the linked cells won't mess up the layout design for the worksheet on which the check boxes appear.
ExcelTips is your source for cost-effective Microsoft Excel training. This tip (8392) applies to Microsoft Excel 2007, 2010, 2013, 2016, 2019, and 2021. You can find a version of this tip for the older menu interface of Excel here: Using Check Boxes.

Dive Deep into Macros! Make Excel do things you thought were impossible, discover techniques you won't find anywhere else, and create powerful automated reports. Bill Jelen and Tracy Syrstad help you instantly visualize information to make it actionable. You’ll find step-by-step instructions, real-world case studies, and 50 workbooks packed with examples and solutions. Check out Microsoft Excel 2019 VBA and Macros today!
Have you ever wanted to take a "picture" of a part of a worksheet and put it in another section? This tip explains how to ...
Discover MoreWant to know what is happening in certain cells in your worksheet? Using the Watch Window is a great way to keep an eye ...
Discover MoreYou can insert subtotals and totals in your worksheets by using either a formula or specialized tools. This tip explains ...
Discover MoreFREE SERVICE: Get tips like this every week in ExcelTips, a free productivity newsletter. Enter your address and click "Subscribe."
2023-02-24 18:03:27
Tomek
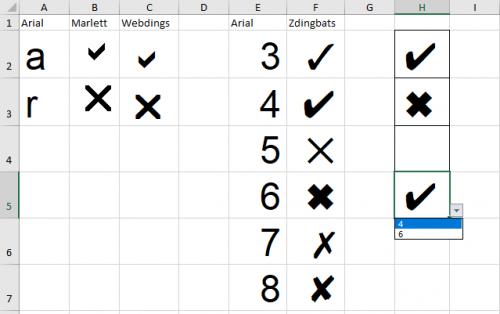
Similarly to J. Woolley's comment: you can use ZDingbats font and 3 or 4 for check mark and 5 or 6 for x-mark. (see Figure 1 below)
Admittedly, a and r mnemonics are easier to remember, but i like the shapes from ZDingbats better.
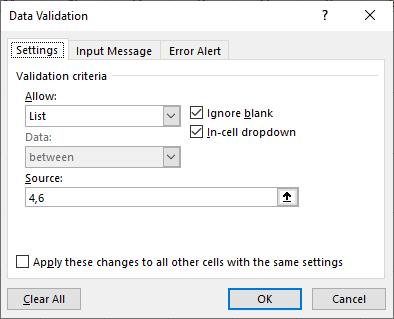
If you use data validation with in-cell dropdown ( see Figure 2 below) ) it will be relatively easy to select the desired mark, as you can see o the right in Figure 1.

Figure 1.

Figure 2.
2023-02-24 10:32:31
J. Woolley
@Bill
Typing Check Marks: Format the cell's font as Marlett (or Webdings if necessary) and type lower-case a for accept (a, displayed as a check-mark) or lower-case r for reject (r, displayed as a cross-mark). You can change the font's size.
See https://excelribbon.tips.net/T011474_Typing_Check_Marks_into_Excel.html
2023-02-24 00:47:33
@Bill,
Instead of using Excel check boxes, you can create a column of cells that will work like them, but can be easily sized. This can be done by macro, or by data validation.
Let me know if you need help doing this.
BTW, check boxes are movable objects, and it can be a daunting task to align them with the rest of the spreadsheet, and even harder if you insert/delete rows or columns, or adjust their sizes. So, for advanced spreadsheets you may want to avoid check boxes.
2023-02-23 15:08:19
Tomek
@Bill,
Unluckily, Excel does not seem to control this property. There may be a third party app to do that, but there seems to be no way the checkbox can be sized using standard Excel functionality. In case of ActiveX checkbox, you can resize the text but not the checkbox itself.
2023-02-22 14:43:46
Bill
Is there any way to make the check box it self bigger? Not the surrounding space or text area the visible box that gets the check.
Got a version of Excel that uses the ribbon interface (Excel 2007 or later)? This site is for you! If you use an earlier version of Excel, visit our ExcelTips site focusing on the menu interface.
FREE SERVICE: Get tips like this every week in ExcelTips, a free productivity newsletter. Enter your address and click "Subscribe."
Copyright © 2026 Sharon Parq Associates, Inc.
Comments