Please Note: This article is written for users of the following Microsoft Excel versions: 2007, 2010, 2013, 2016, 2019, and 2021. If you are using an earlier version (Excel 2003 or earlier), this tip may not work for you. For a version of this tip written specifically for earlier versions of Excel, click here: Automatically Copying Formatting.
One of the foundational features of Excel is to allow one cell to be equal to another cell. For instance, you could use the simplest of formulas in a cell:
=C7
This copies the contents from cell C7 to the current cell, and updates whenever the contents of cell C7 change. What if you are not just interested in copying cell values, but also want to copy formatting from one cell to another?
Unfortunately, there is no intrinsic way to do this in Excel. There are two workarounds you can try, however. First, you can create a macro that will find out whenever cell C7 changes, and if it does, the macro copies the contents of the cell (including formatting) to the target cell. For instance, the following event handler will run every time there are changes in the worksheet. (Provided, of course, that you place it in the VBA module for the worksheet—just right-click on the worksheet's tab, choose View Code, and add the macro there.) When the change is in cell C7, then the contents of C7 are copied to cell E3 on Sheet1.
Private Sub Worksheet_Change(ByVal Target As Range)
    If Not Intersect(Target, Range("C7")) Is Nothing Then
        Range("C7").Copy (Worksheets("Sheet1").Range("E3"))
    End If
End Sub
There are some downsides to this approach. First, it can be slow, particularly if you have quite a few cells that you want to copy in this manner. In addition, the macro only runs if the contents of cell C7 are actually changed, not if the formatting alone of C7 is changed. (There is no way to trigger an automatic event whenever formatting is changed.)
An alternative to the macro approach is to use the Camera tool in Excel. This has been covered in other issues of ExcelTips, but essentially the camera is a way to copy a dynamic image of a range of cells from one place to another. It is the image of the source cells that is shown, and it is shown as a graphic, not as the contents of any target cells. Since the graphic is dynamic, whenever the source cells are changed (including formatting), the image is also updated to reflect the change.
To use the Camera tool, you must customize the Quick Access Toolbar so that the tool is available; it is not available by default. When you are doing your customizing, the Camera tool is easiest to find if you choose to display all commands. The Camera tool has a small camera icon next to it.
With the Camera tool in place, follow these steps to use it:
Finally, you could also use conditional formatting on the cells. For instance, if you use conditional formatting to format cell C7 and you place the formula =C7 into cell T45, then you could apply the same conditional format to cell T45 that you used with cell C7. That way, whenever the value in T45 changes (which it will do if the value in C7 changes), then the formatting in T45 changes to match the formatting in cell C7. The only downside to this is that if you change the conditional formatting in one of the cells, you'll need to remember to change it in the other.
Note:
ExcelTips is your source for cost-effective Microsoft Excel training. This tip (8450) applies to Microsoft Excel 2007, 2010, 2013, 2016, 2019, and 2021. You can find a version of this tip for the older menu interface of Excel here: Automatically Copying Formatting.

Professional Development Guidance! Four world-class developers offer start-to-finish guidance for building powerful, robust, and secure applications with Excel. The authors show how to consistently make the right design decisions and make the most of Excel's powerful features. Check out Professional Excel Development today!
Adding borders around cells is a common formatting task. You can make the task more intuitive by actually drawing the ...
Discover MoreDo you want to specify your months and days differently when displaying dates in your worksheets? This tip looks at how ...
Discover MoreAs you are formatting a worksheet, Excel allows you to easily add borders to cells. Adding rounded corners to cells is a ...
Discover MoreFREE SERVICE: Get tips like this every week in ExcelTips, a free productivity newsletter. Enter your address and click "Subscribe."
2025-09-24 07:50:34
jamies
Additional problems just copying a cell -
that will include CF and Data validations
Also - that sort of VBA copy will copy many of the attributes of the source
and will - for the actual cell content to be processed as data -
use the ".VALUE" rather than the ".VALUE2" process - so performing some frequently unwanted conversion of the entry
As in - for a cell defined as currency you may get a value that is a text string -
starting with a "$" regardless of the set currency symbol,
and having had the value rounded to 2 decimal places - regardless of the possible need for more than that -
e.g. cost per unit, or a value that is to be, or is being converted to a different currency
And without the use of .VALUE2 values with date separators - such as fractional representations may be taken as dates, and converted to day number since 1900, or 1904
BUT - the set "format" of the receiving cell may still be set as currency, general, rather than the now appropriate "date" or "Text"
so doing weird things to tests and summation/arithmetic calculations .
And I haven't considered the effect on links - where the actual cell entry has 2 textual values -
the link itself to be used by a browser or other software, and the descriptive value displayed/printed !
( try setting up a link to a file on, the system in winword, then opening that file by clicking on the link - and then use "SaveAs" to save a revised version of the file -
the link gets modified, but the text shown in the cell does not !
Maybe better to, having used the copy for all attributes, then repeat using .VALUE, and then ensure that if the source is a formula, then the value is replaced with the formula !
Or just copy the aspects /attributes that you want to copy.
And .. the COPY as coded above avoids the use of the clipboard - where copy and paste can cause problems, as well as possibly having the copied entries replaced with something else before the PASTE gets actioned !
2025-09-24 07:46:16
Brian
Just a thought about the macro, isn't:
If Target.Address = "$C$7", Then
simpler and rather more intuitive than:
If Not Intersect(Target, Range("C7")) Is Nothing Then
2021-03-20 06:18:28
Tom
Here is a picture:
(see Figure 1 below)
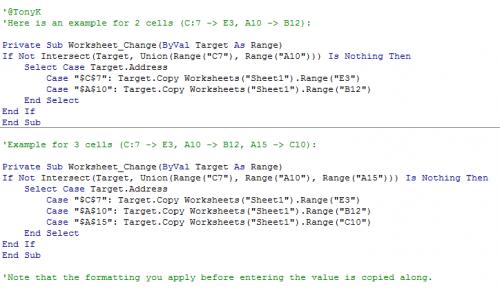
Figure 1.
2021-03-16 05:58:26
Willy Vanhaelen
@TonyK
Here is an example for 2 cells (C:7 -> E3, A10 -> B12):
Private Sub Worksheet_Change(ByVal Target As Range)
If Not Intersect(Target, Union(Range("C7"), Range("A10"))) Is Nothing Then
Select Case Target.Address
Case "$C$7": Target.Copy Worksheets("Sheet1").Range("E3")
Case "$A$10": Target.Copy Worksheets("Sheet1").Range("B12")
End Select
End If
End Sub
Example for 3 cells (C:7 -> E3, A10 -> B12, A15 -> C10):
Private Sub Worksheet_Change(ByVal Target As Range)
If Not Intersect(Target, Union(Range("C7"), Range("A10"),Range("A15"))) Is Nothing Then
Select Case Target.Address
Case "$C$7": Target.Copy Worksheets("Sheet1").Range("E3")
Case "$A$10": Target.Copy Worksheets("Sheet1").Range("B12")
Case "$A$15": Target.Copy Worksheets("Sheet1").Range("C10")
End Select
End If
End Sub
Note that the formatting you apply before entering the value is copied along.
2021-03-15 07:51:00
TonyK
Hi Can you tell me how I can apply the follwoing code so that I can apply the same code to several cells in teh worksheet?
Private Sub Worksheet_Change(ByVal Target As Range)
If Not Intersect(Target, Range("C7")) Is Nothing Then
Range("C7").Copy (Worksheets("Sheet1").Range("E3"))
End If
End Sub
Thanks
Got a version of Excel that uses the ribbon interface (Excel 2007 or later)? This site is for you! If you use an earlier version of Excel, visit our ExcelTips site focusing on the menu interface.
FREE SERVICE: Get tips like this every week in ExcelTips, a free productivity newsletter. Enter your address and click "Subscribe."
Copyright © 2026 Sharon Parq Associates, Inc.
 Please Note:
This article is written for users of the following Microsoft Excel versions: 2007, 2010, 2013, 2016, 2019, and 2021. If you are using an earlier version (Excel 2003 or earlier), this tip may not work for you. For a version of this tip written specifically for earlier versions of Excel, click here:
Please Note:
This article is written for users of the following Microsoft Excel versions: 2007, 2010, 2013, 2016, 2019, and 2021. If you are using an earlier version (Excel 2003 or earlier), this tip may not work for you. For a version of this tip written specifically for earlier versions of Excel, click here:
Comments