Please Note: This article is written for users of the following Microsoft Excel versions: 2007, 2010, 2013, 2016, 2019, 2021, 2024, and Excel in Microsoft 365. If you are using an earlier version (Excel 2003 or earlier), this tip may not work for you. For a version of this tip written specifically for earlier versions of Excel, click here: Protecting an Entire Workbook.
Written by Allen Wyatt (last updated January 18, 2025)
This tip applies to Excel 2007, 2010, 2013, 2016, 2019, 2021, 2024, and Excel in Microsoft 365
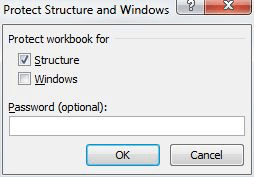
Excel provides a way that you can protect an entire workbook. To stop the user from taking actions such as renaming a worksheet or inserting new worksheets, you must use workbook-level protection. To protect your workbook, display the Review tab of the ribbon and click the Protect Workbook tool in the Protect group. (In Excel 2007, 2010, and 2013 it is the Changes group.) Excel displays the Protect Structure and Windows dialog box. (See Figure 1.)

Figure 1. The Protect Structure and Windows dialog box.
The two check boxes in the dialog box allow you to indicate exactly what should be protected in the workbook. The choices are as follows:
At the bottom or in the middle of the dialog box (depending on which version of Excel you are using) you can specify a password to use for this level of protection. When you click the OK button, Excel asks you to repeat any password you specified. If you did not provide a password, then Excel simply protects your workbook directly.
If you later want to remove the protection applied to a workbook, you do so by following the same steps you used to protect it: Display the Review tab of the ribbon and again click the Protect Workbook tool. If you used a password to protect the workbook, Excel displays the Unprotect Workbook dialog box. At this point, all you need to do is enter the correct password and the workbook is unprotected.
You should note that protecting a workbook without protecting the worksheets it contains doesn't offer much protection. (Protecting worksheets is covered in other issues of ExcelTips.) The reason is that even though a user cannot delete a worksheet in a protected workbook, they can delete the information the worksheet contains. In other words, workbook protection does not protect the contents of your workbook at any level "lower" than individual worksheets.
ExcelTips is your source for cost-effective Microsoft Excel training. This tip (8530) applies to Microsoft Excel 2007, 2010, 2013, 2016, 2019, 2021, 2024, and Excel in Microsoft 365. You can find a version of this tip for the older menu interface of Excel here: Protecting an Entire Workbook.

Best-Selling VBA Tutorial for Beginners Take your Excel knowledge to the next level. With a little background in VBA programming, you can go well beyond basic spreadsheets and functions. Use macros to reduce errors, save time, and integrate with other Microsoft applications. Fully updated for the latest version of Office 365. Check out Microsoft 365 Excel VBA Programming For Dummies today!
When you develop a workbook for others to use, you may want to make sure that those users cannot change the order in ...
Discover MoreNeed to protect the data in your workbook so that others can't get at it? Here are some ideas on how you can approach the ...
Discover MoreIf you cannot add a worksheet to your workbook, it could be because the workbook is protected. This tip shows how to ...
Discover MoreFREE SERVICE: Get tips like this every week in ExcelTips, a free productivity newsletter. Enter your address and click "Subscribe."
There are currently no comments for this tip. (Be the first to leave your comment—just use the simple form above!)
Got a version of Excel that uses the ribbon interface (Excel 2007 or later)? This site is for you! If you use an earlier version of Excel, visit our ExcelTips site focusing on the menu interface.
FREE SERVICE: Get tips like this every week in ExcelTips, a free productivity newsletter. Enter your address and click "Subscribe."
Copyright © 2026 Sharon Parq Associates, Inc.
Comments