Please Note: This article is written for users of the following Microsoft Excel versions: 2007, 2010, 2013, 2016, 2019, 2021, 2024, and Excel in Microsoft 365. If you are using an earlier version (Excel 2003 or earlier), this tip may not work for you. For a version of this tip written specifically for earlier versions of Excel, click here: Forcing Editing to Be Done in a Cell.
Rodolfo knows that he can configure Excel to allow editing in both the Formula bar and the cell itself, but he wants to configure it so that editing can be done only in the cell, not in the Formula bar.
There is no way to do this in Excel. The closest you can come is to make sure that cell editing is enabled (so that editing can be done in either the Formula bar or the cell) and then hiding the Formula bar. You can hide the Formula bar by these steps:
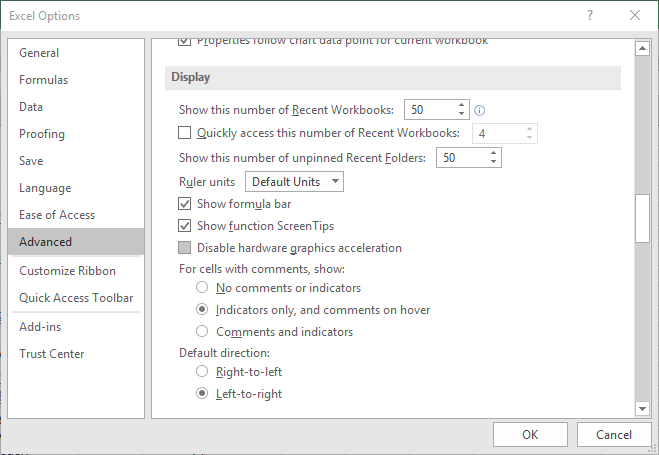
Figure 1. The Advanced options in the Excel Options dialog box.
If you prefer, you can also programmatically turn off the Formula bar for a specific worksheet. You can do this by using the following two macros, which should be assigned to the code for the specific worksheet you want to affect. (You can display the proper code window by right-clicking the worksheet's tab and selecting View Code from the resulting Context menu.)
Private Sub Worksheet_Activate()
    Application.DisplayFormulaBar = False
End Sub
Private Sub Worksheet_Deactivate()
    Application.DisplayFormulaBar = True
End Sub
The first macro turns off the Formula bar when the worksheet is activated, and the second turns it back on when the worksheet is deactivated (when another worksheet is selected).
Note:
ExcelTips is your source for cost-effective Microsoft Excel training. This tip (9095) applies to Microsoft Excel 2007, 2010, 2013, 2016, 2019, 2021, 2024, and Excel in Microsoft 365. You can find a version of this tip for the older menu interface of Excel here: Forcing Editing to Be Done in a Cell.

Create Custom Apps with VBA! Discover how to extend the capabilities of Office 365 applications with VBA programming. Written in clear terms and understandable language, the book includes systematic tutorials and contains both intermediate and advanced content for experienced VB developers. Designed to be comprehensive, the book addresses not just one Office application, but the entire Office suite. Check out Mastering VBA for Microsoft Office 365 today!
When you cut and paste rows using Ctrl+X and Ctrl+V, Excel leaves empty the rows where the cut information was previously ...
Discover MoreIt's easy to select non-contiguous ranges using the mouse but may seem more daunting if you are simply using the ...
Discover MoreDo you need to flag duplicate values in your data? This tip shows three different ways you can do the flagging you need.
Discover MoreFREE SERVICE: Get tips like this every week in ExcelTips, a free productivity newsletter. Enter your address and click "Subscribe."
2025-05-17 14:47:32
J. Woolley
My Excel Toolbox includes the ToggleFormulaBar macro (Ctrl+T F B) to turn the formula bar off or on. The macro supports Undo (Ctrl+Z). Here is an abbreviated version:
Public Sub ToggleFormulaBar()
Const myName As String = "ToggleFormulaBar"
With Application
.DisplayFormulaBar = (Not .DisplayFormulaBar)
.OnUndo myName, (ThisWorkbook.Name + "!" + myName)
End With
End Sub
Similar macros include ToggleRibbon, ToggleStatusBar, ToggleScrollBars, and ToggleFullScreen. ToggleEditInCell will disable or enable editing within cells. All of these macros support Ctrl+T keyboard shortcuts and Ctrl+Z Undo.
See https://sites.google.com/view/MyExcelToolbox
Got a version of Excel that uses the ribbon interface (Excel 2007 or later)? This site is for you! If you use an earlier version of Excel, visit our ExcelTips site focusing on the menu interface.
FREE SERVICE: Get tips like this every week in ExcelTips, a free productivity newsletter. Enter your address and click "Subscribe."
Copyright © 2026 Sharon Parq Associates, Inc.
 Please Note:
This article is written for users of the following Microsoft Excel versions: 2007, 2010, 2013, 2016, 2019, 2021, 2024, and Excel in Microsoft 365. If you are using an earlier version (Excel 2003 or earlier), this tip may not work for you. For a version of this tip written specifically for earlier versions of Excel, click here:
Please Note:
This article is written for users of the following Microsoft Excel versions: 2007, 2010, 2013, 2016, 2019, 2021, 2024, and Excel in Microsoft 365. If you are using an earlier version (Excel 2003 or earlier), this tip may not work for you. For a version of this tip written specifically for earlier versions of Excel, click here:
Comments