Please Note: This article is written for users of the following Microsoft Excel versions: 2007, 2010, 2013, 2016, 2019, 2021, and Excel in Microsoft 365. If you are using an earlier version (Excel 2003 or earlier), this tip may not work for you. For a version of this tip written specifically for earlier versions of Excel, click here: Making All Occurrences Bold.
Tom rightly notes that in Word you can use Find and Replace to make all occurrences of a word bold. (Search for the word, replace it with the same word with bold formatting turned on.) He wonders how he can do the same thing in Excel.
Making such changes in Excel is actually quite easy and is done virtually the same way as you do in Word. Follow these steps:
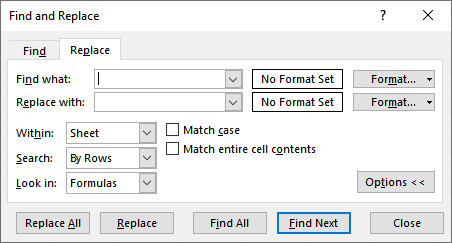
Figure 1. The expanded Replace tab of the Find and Replace dialog box.
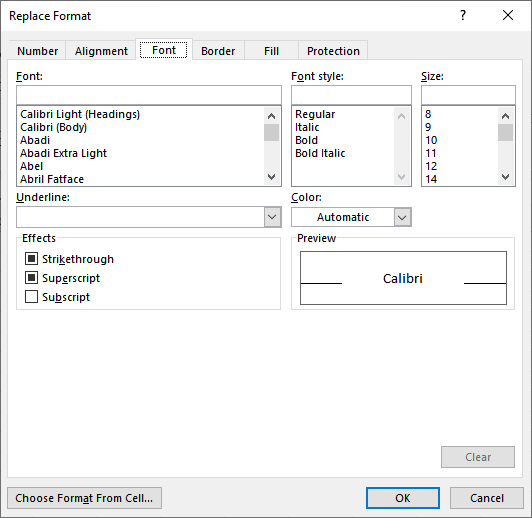
Figure 2. The Font tab of the Replace Format dialog box.
While this appears quite easy, you need to remember that these steps change the formatting of entire cells, not just words within a cell. Thus, if you were searching and replacing the word "brown," then any cell that contained the word "brown" would be made bold—the entire cell, not just the word.
If you want to only affect words within the cell, then these steps won't work. Instead you'll need to resort to a macro to do the bolding. Basically, you'll need a macro that looks through a worksheet and determines what can be changed. (You cannot make individual words or digits in formulas or numeric values bold; you can only make changes to the word-level formatting for text constants.)
Once the macro finds cells it can process, it needs to search through the cells for the desired word, and then make that text bold. The following macro implements this very strategy:
Sub FindAndBold()
    Dim sFind As String
    Dim rCell As Range
    Dim rng As Range
    Dim lCount As Long
    Dim iLen As Integer
    Dim iFind As Integer
    Dim iStart As Integer

    On Error Resume Next
    Set rng = ActiveSheet.UsedRange. _
      SpecialCells(xlCellTypeConstants, xlTextValues)
    On Error GoTo ErrHandler
    If rng Is Nothing Then
        MsgBox "There are no cells with text"
        GoTo ExitHandler
    End If

    sFind = InputBox( _
      Prompt:="What do you want to BOLD?", _
      Title:="Text to Bold")
    If sFind = "" Then
        MsgBox "No text was listed"
        GoTo ExitHandler
    End If

    iLen = Len(sFind)
    lCount = 0

    For Each rCell In rng
        With rCell
            iFind = InStr(.Value, sFind)
            Do While iFind > 0
                .Characters(iFind, iLen).Font.Bold = True
                lCount = lCount + 1
                iStart = iFind + iLen
                iFind = InStr(iStart, .Value, sFind)
            Loop
        End With
    Next

    If lCount = 0 Then
        MsgBox "There were no occurrences of" & _
          vbCrLf & "' " & sFind & " '" & _
          vbCrLf & "to bold."
    ElseIf lCount = 1 Then
        MsgBox "One occurrence of" & _
          vbCrLf & "' " & sFind & " '" & _
          vbCrLf & "was made bold."
    Else
        MsgBox lCount & " occurrences of" & _
          vbCrLf & "' " & sFind & " '" & _
          vbCrLf & "were made bold."
    End If

ExitHandler:
    Set rCell = Nothing
    Set rng = Nothing
    Exit Sub

ErrHandler:
    MsgBox Err.Description
    Resume ExitHandler
End Sub
The macro first sets the search range to those cells that contain text constants. It then prompts the user for a word that needs to be changed. Once entered, the macro then starts looking through all the cells in the range. Each cell is checked to see if it contains the target word. If so, then the .Bold property for those characters is set and the macro continues searching.
The macro also keeps track of how many changes were made, displaying the total changes at the end of its work.
Note:
ExcelTips is your source for cost-effective Microsoft Excel training. This tip (12105) applies to Microsoft Excel 2007, 2010, 2013, 2016, 2019, 2021, and Excel in Microsoft 365. You can find a version of this tip for the older menu interface of Excel here: Making All Occurrences Bold.

Best-Selling VBA Tutorial for Beginners Take your Excel knowledge to the next level. With a little background in VBA programming, you can go well beyond basic spreadsheets and functions. Use macros to reduce errors, save time, and integrate with other Microsoft applications. Fully updated for the latest version of Office 365. Check out Microsoft 365 Excel VBA Programming For Dummies today!
Want to use Excel's Find feature to locate cells based on what those cells display? It's easy if you know how to adjust ...
Discover MoreUsing Find and Replace is something quite routine in Excel, as it easily allows you to find and replace information in ...
Discover MoreWhen you use Find and Replace, Excel normally looks through all the cells in a worksheet. You may want to limit the ...
Discover MoreFREE SERVICE: Get tips like this every week in ExcelTips, a free productivity newsletter. Enter your address and click "Subscribe."
There are currently no comments for this tip. (Be the first to leave your comment—just use the simple form above!)
Got a version of Excel that uses the ribbon interface (Excel 2007 or later)? This site is for you! If you use an earlier version of Excel, visit our ExcelTips site focusing on the menu interface.
FREE SERVICE: Get tips like this every week in ExcelTips, a free productivity newsletter. Enter your address and click "Subscribe."
Copyright © 2026 Sharon Parq Associates, Inc.
 Please Note:
This article is written for users of the following Microsoft Excel versions: 2007, 2010, 2013, 2016, 2019, 2021, and Excel in Microsoft 365. If you are using an earlier version (Excel 2003 or earlier), this tip may not work for you. For a version of this tip written specifically for earlier versions of Excel, click here:
Please Note:
This article is written for users of the following Microsoft Excel versions: 2007, 2010, 2013, 2016, 2019, 2021, and Excel in Microsoft 365. If you are using an earlier version (Excel 2003 or earlier), this tip may not work for you. For a version of this tip written specifically for earlier versions of Excel, click here:
Comments