Written by Allen Wyatt (last updated February 18, 2023)
This tip applies to Excel 2007, 2010, 2013, 2016, 2019, 2021, and Excel in Microsoft 365
Chris notes that Excel supports both Normal and Page Layout views. He wonders if there is a way to disable Page Layout view so the user of a workbook cannot select it.
Excel makes these two views (Normal and Page Layout) available from the View tab of the ribbon. One might think that the solution is to simply modify the user interface so that the Page Layout tool is no longer available on the ribbon. This, unfortunately, is easier said than done.
If you are using Excel 2007, the user interface is notoriously hard to change. It requires writing XML code and making sure that the code is executed every time the workbook is opened. If you like notoriously hard things, you can find a bit about how to start at this page:
http://msdn.microsoft.com/en-us/library/aa338202.aspx
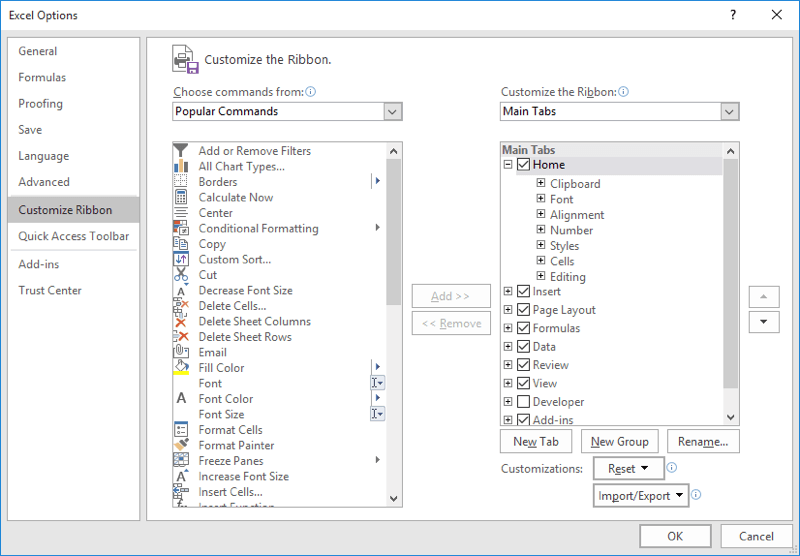
If you are using Excel 2010 or a later version, then modifying the user interface is a bit easier. You can do it by following these steps:

Figure 1. The Excel Options dialog box.
That's it. Now, if you go look at the View tab, you'll notice that the user can no longer switch to Page Layout view. In fact, the user cannot pick any view other than whatever view you happen to be in at the current time. This change affects only the current machine, for all workbooks, and cannot be tied to any particular workbook. (The reason is that while you can modify the ribbons a bit in Excel 2010, you cannot modify them in macros. It's a big pain and you need to go back to writing XML code like in Excel 2007.)
Perhaps a better solution is to create a small macro that will make sure that the worksheet is always being displayed in Normal view. This is easy to do; just right-click on a worksheet tab and choose View Code from the resulting Context menu. In the code window, enter the following:
Private Sub Worksheet_SelectionChange(ByVal Target As Range)
    ActiveWindow.View = xlNormalView
End Sub
This code causes Excel to switch to Normal view every time someone changes what is selected on the screen. Someone could use the tools on the View tab of the ribbon to switch to Page Layout view, but as soon as they select a different cell the macro kicks in and switches back to Normal view.
Note:
ExcelTips is your source for cost-effective Microsoft Excel training. This tip (12139) applies to Microsoft Excel 2007, 2010, 2013, 2016, 2019, 2021, and Excel in Microsoft 365.

Excel Smarts for Beginners! Featuring the friendly and trusted For Dummies style, this popular guide shows beginners how to get up and running with Excel while also helping more experienced users get comfortable with the newest features. Check out Excel 2019 For Dummies today!
You can configure Excel to specify what happens when you press Enter in a cell. This is normally done on a global basis, ...
Discover MoreGridlines are very helpful in seeing where cells are located on the screen. You are not limited to black gridlines; ...
Discover MoreVirtually everyone depends on Excel to automatically recalculate a workbook as edits are made. If it isn't done ...
Discover MoreFREE SERVICE: Get tips like this every week in ExcelTips, a free productivity newsletter. Enter your address and click "Subscribe."
There are currently no comments for this tip. (Be the first to leave your comment—just use the simple form above!)
Got a version of Excel that uses the ribbon interface (Excel 2007 or later)? This site is for you! If you use an earlier version of Excel, visit our ExcelTips site focusing on the menu interface.
FREE SERVICE: Get tips like this every week in ExcelTips, a free productivity newsletter. Enter your address and click "Subscribe."
Copyright © 2026 Sharon Parq Associates, Inc.
Comments