Please Note: This article is written for users of the following Microsoft Excel versions: 2007, 2010, 2013, 2016, 2019, 2021, and Excel in Microsoft 365. If you are using an earlier version (Excel 2003 or earlier), this tip may not work for you. For a version of this tip written specifically for earlier versions of Excel, click here: Two-Level Axis Labels.
Excel is great at creating charts. With some types of data, you may have a need for two-level axis labels for your chart. For instance, you may want something similar to the following along the X-axis for your chart:
  Pro | Team | Reg | Pro | Team | Reg ...
    Eastern US     |   Western US ...
Setting up such an arrangement in an Excel worksheet is easy, but getting the same result in a chart may not be as obvious.
Go ahead and set up your worksheet to reflect the column titles the way you want them. These column titles will end up as your X-axis labels. You could set them up as follows:
  |   A   |   B   |   C   |   D   |   E   |   F   |   G   |
1 |       |       Eastern US      |       Western US      |
2 |       |  Pro  |  Team |  Reg  |  Pro  |  Team |  Reg  |
With your table completed, you are ready to create the chart. Just select your data table, including all the headings in the first two rows, then create your table. Excel automatically recognizes that you have two rows being used for the X-axis labels, and formats the chart correctly. Since the X-axis labels appear beneath the chart data, the order of the label rows is reversed—exactly as mentioned at the first of this tip. (See Figure 1.)
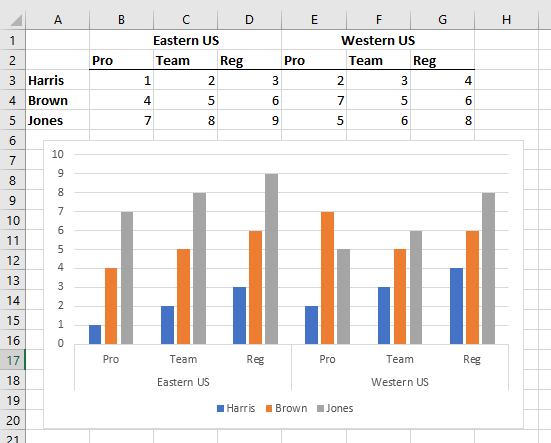
Figure 1. Two-level axis labels are created automatically by Excel.
ExcelTips is your source for cost-effective Microsoft Excel training. This tip (1188) applies to Microsoft Excel 2007, 2010, 2013, 2016, 2019, 2021, and Excel in Microsoft 365. You can find a version of this tip for the older menu interface of Excel here: Two-Level Axis Labels.

Solve Real Business Problems Master business modeling and analysis techniques with Excel and transform data into bottom-line results. This hands-on, scenario-focused guide shows you how to use the latest Excel tools to integrate data from multiple tables. Check out Microsoft Excel Data Analysis and Business Modeling today!
When formatting a chart, you select elements and then change the properties of those elements until everything looks just ...
Discover MoreWhen creating a chart, your axis labels may be wider than desired. One way to deal with them is to change the angle at ...
Discover MoreWouldn't it be great to have your huge charts print out on multiple pieces of paper that you could then piece together? ...
Discover MoreFREE SERVICE: Get tips like this every week in ExcelTips, a free productivity newsletter. Enter your address and click "Subscribe."
2022-12-15 21:59:10
moohat
thank you very much, it helps me to arrange my chart as my boss expected..
Got a version of Excel that uses the ribbon interface (Excel 2007 or later)? This site is for you! If you use an earlier version of Excel, visit our ExcelTips site focusing on the menu interface.
FREE SERVICE: Get tips like this every week in ExcelTips, a free productivity newsletter. Enter your address and click "Subscribe."
Copyright © 2026 Sharon Parq Associates, Inc.
 Please Note:
This article is written for users of the following Microsoft Excel versions: 2007, 2010, 2013, 2016, 2019, 2021, and Excel in Microsoft 365. If you are using an earlier version (Excel 2003 or earlier), this tip may not work for you. For a version of this tip written specifically for earlier versions of Excel, click here:
Please Note:
This article is written for users of the following Microsoft Excel versions: 2007, 2010, 2013, 2016, 2019, 2021, and Excel in Microsoft 365. If you are using an earlier version (Excel 2003 or earlier), this tip may not work for you. For a version of this tip written specifically for earlier versions of Excel, click here:
Comments