Please Note: This article is written for users of the following Microsoft Excel versions: 2007, 2010, 2013, 2016, 2019, and 2021. If you are using an earlier version (Excel 2003 or earlier), this tip may not work for you. For a version of this tip written specifically for earlier versions of Excel, click here: Taking a Picture.
Written by Allen Wyatt (last updated October 10, 2020)
This tip applies to Excel 2007, 2010, 2013, 2016, 2019, and 2021
Excel provides a nifty little tool that allows you to create a picture from a range of cells, from a chart, or from another object in your worksheet. Follow these steps if you are using Excel 2010 or a later version of the program:
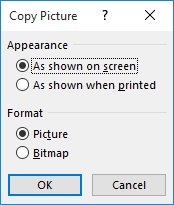
Figure 1. The Copy Picture dialog box.
If you are using Excel 2007, the steps are very slightly different:
The result is that you now have a graphic in the Clipboard—either a metapicture or a bitmap, depending on your choice in the bottom portion of the dialog box—that you can paste anywhere. Paste it in another workbook, paste it in an e-mail, paste it in a graphics program, or paste it in a Word document. You can paste it just about anywhere because it is no longer an Excel object, but an actual graphic.
You should know that if you choose "As Shown On Screen" in the Copy Picture dialog box, that doesn't mean that Excel copies the picture exactly as shown. The copied picture will always be at a 100% zoom magnification, regardless of what zoom setting you are using. Thus, if you are viewing your worksheet at 150% zoom, take a picture of some cells, and then paste the picture back into the workbook, it will look smaller than the rest of your workbook because of how the picture is captured.
ExcelTips is your source for cost-effective Microsoft Excel training. This tip (6240) applies to Microsoft Excel 2007, 2010, 2013, 2016, 2019, and 2021. You can find a version of this tip for the older menu interface of Excel here: Taking a Picture.

Dive Deep into Macros! Make Excel do things you thought were impossible, discover techniques you won't find anywhere else, and create powerful automated reports. Bill Jelen and Tracy Syrstad help you instantly visualize information to make it actionable. You�ll find step-by-step instructions, real-world case studies, and 50 workbooks packed with examples and solutions. Check out Microsoft Excel 2019 VBA and Macros today!
A common way of representing data is to use a Venn diagram. Unfortunately, Excel doesn't have a precise way of creating ...
Discover MoreThe graphics you place in a worksheet can do more than just look pretty. You can also assign macros to a graphic, which ...
Discover MoreAdding a graphic to a worksheet is easy. Getting that graphic to just the right size may take a little bit of trial and ...
Discover MoreFREE SERVICE: Get tips like this every week in ExcelTips, a free productivity newsletter. Enter your address and click "Subscribe."
2020-10-12 11:48:22
Nick from London
Ed
The camera tool lets you display a dynamic window showing cells from anywhere within the Workbook . When the cells change value the information in the window changes.
The copy to picture is like the snipping tool but within Excel. It creates a snapshot that can be pasted into another program, say a how to guide or report.
2020-10-11 19:35:55
Ed Marshall
How is this different from the Camera tool, which I have added to my QAT? If it is different, what are the advantages/disadvantages of each? (PS. I love your columns!)
2020-10-10 15:40:01
Allan
You can do the same thing easier with the Snipping Tool, except 'As shown when printed' or 'Bitmap'.
The above doesn't say what format the saved image is. I presume jpg.
2020-10-10 14:31:26
Shirley Hogan
THANK YOU for this website and my daily email of Excel Tips. I started my career in accounting back in the 60s using a ten key adding machine and manual typewriter. In the 80s when Lotus 123 came along, I thought it couldn't get any better. When Microsoft and Excel came alone, I resisted it for a long time, finally giving in to the suggestions of the controller as they became louder and more frequent - and he told our DP manager not to install Lotus on new computers for the people that worked for me. I've been retired for twenty years now but Excel is still a regular part of my life as I indulge in my hobbies of photography, writing, and genealogy. I am, finally, on the 2010 version. I read your email daily and love finding new , to me, and easier, better ways to do things. THANK YOU.
Got a version of Excel that uses the ribbon interface (Excel 2007 or later)? This site is for you! If you use an earlier version of Excel, visit our ExcelTips site focusing on the menu interface.
FREE SERVICE: Get tips like this every week in ExcelTips, a free productivity newsletter. Enter your address and click "Subscribe."
Copyright © 2026 Sharon Parq Associates, Inc.
 Please Note:
This article is written for users of the following Microsoft Excel versions: 2007, 2010, 2013, 2016, 2019, and 2021. If you are using an earlier version (Excel 2003 or earlier), this tip may not work for you. For a version of this tip written specifically for earlier versions of Excel, click here:
Please Note:
This article is written for users of the following Microsoft Excel versions: 2007, 2010, 2013, 2016, 2019, and 2021. If you are using an earlier version (Excel 2003 or earlier), this tip may not work for you. For a version of this tip written specifically for earlier versions of Excel, click here:
Comments