Please Note: This article is written for users of the following Microsoft Excel versions: 2007, 2010, 2013, 2016, 2019, 2021, and Excel in Microsoft 365. If you are using an earlier version (Excel 2003 or earlier), this tip may not work for you. For a version of this tip written specifically for earlier versions of Excel, click here: Setting Row Height.
Excel normally sets the height of rows within your worksheet to reflect the size of the largest font used on the row. You can, however, adjust the height of the row to any size desired. For instance, you might want to add additional space before a row. Rather than insert a blank row, you can increase the height of the row so it has blank space before it.
The easiest method for adjusting row height is to use the mouse. All you need to do is move the mouse pointer into the row header area (the gray area at the left of the row). When you move the pointer so it is over a dividing line between rows, it changes shape to a double-headed arrow. When the mouse pointer is this shape, you can click on the left mouse button, hold it down, and drag the border to a new position. When you release the mouse button, the row is resized to the new height.
You can also adjust row height in this manner:
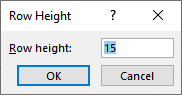
Figure 1. The Row Height dialog box.
The value shown in the dialog box (step 5) represents the current height of the selected row, in points. A point is equal to approximately 1/72 inch; it is the measurement unit used for fonts.
A third way to change the row height is a mash-up of the two presented already. Move the mouse pointer into the row header area (the gray area at the left of the row). Right-click and you'll see a Context menu appear. From the Context menu choose the Row Height option, and Excel displays the Row Height dialog box previously discussed.
ExcelTips is your source for cost-effective Microsoft Excel training. This tip (6293) applies to Microsoft Excel 2007, 2010, 2013, 2016, 2019, 2021, and Excel in Microsoft 365. You can find a version of this tip for the older menu interface of Excel here: Setting Row Height.

Dive Deep into Macros! Make Excel do things you thought were impossible, discover techniques you won't find anywhere else, and create powerful automated reports. Bill Jelen and Tracy Syrstad help you instantly visualize information to make it actionable. You�ll find step-by-step instructions, real-world case studies, and 50 workbooks packed with examples and solutions. Check out Microsoft Excel 2019 VBA and Macros today!
Want to set the width and height of a row and column by specifying a number of inches? It's not quite as straightforward ...
Discover MoreNeed to hide a large number of rows? It's easy to do if you combine a few keyboard shortcuts. Here are several techniques ...
Discover MoreWant Excel to automatically adjust the height of a worksheet row when it wraps text within the cell? It's easy to do, ...
Discover MoreFREE SERVICE: Get tips like this every week in ExcelTips, a free productivity newsletter. Enter your address and click "Subscribe."
There are currently no comments for this tip. (Be the first to leave your comment—just use the simple form above!)
Got a version of Excel that uses the ribbon interface (Excel 2007 or later)? This site is for you! If you use an earlier version of Excel, visit our ExcelTips site focusing on the menu interface.
FREE SERVICE: Get tips like this every week in ExcelTips, a free productivity newsletter. Enter your address and click "Subscribe."
Copyright © 2026 Sharon Parq Associates, Inc.
 Please Note:
This article is written for users of the following Microsoft Excel versions: 2007, 2010, 2013, 2016, 2019, 2021, and Excel in Microsoft 365. If you are using an earlier version (Excel 2003 or earlier), this tip may not work for you. For a version of this tip written specifically for earlier versions of Excel, click here:
Please Note:
This article is written for users of the following Microsoft Excel versions: 2007, 2010, 2013, 2016, 2019, 2021, and Excel in Microsoft 365. If you are using an earlier version (Excel 2003 or earlier), this tip may not work for you. For a version of this tip written specifically for earlier versions of Excel, click here:
Comments