Please Note: This article is written for users of the following Microsoft Excel versions: 2007, 2010, 2013, 2016, 2019, 2021, and Excel in Microsoft 365. If you are using an earlier version (Excel 2003 or earlier), this tip may not work for you. For a version of this tip written specifically for earlier versions of Excel, click here: Moving and Copying Cells.
Moving and copying cells is a very common procedure when you are developing or editing your worksheets. Excel refers to moving by a different term, however. It is called cutting, which implies that you cut the information from one place and put it in another. Copying differs from cutting in that copying does not disturb the original cells; cutting clears them.
Whether you are cutting or copying, these operations involve the use of the Clipboard, a temporary storage area that is built into Windows. To cut or copy information, you must first select the cells you want to affect. Then do one of the following:
Once you have done one of these, you can use the Paste or Paste Special commands to place your information elsewhere. Pasting functions the same as in other Windows programs; it places the contents of the Clipboard at the current cursor location. In the case of Excel, the information is placed in your worksheet beginning with the currently selected cell. You can paste the Clipboard contents by pressing Ctrl+V, right-clicking a cell and choosing Paste from the Context menu, or by clicking the Paste tool on the Home tab of the ribbon.
Within Excel there is another pasting option available. This option, called Paste Special, is rather unique. It allows you to specify how Excel should paste the information in the Clipboard. When you choose it, you will see the Paste Special dialog box. The settings in the dialog box control which portion of the information in the Clipboard you want pasted, as well as what operations you want taken on the information being pasted. (See Figure 1.)
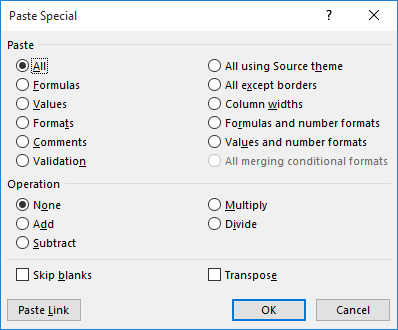
Figure 1. The Paste Special dialog box.
To display the dialog box, display the Home tab of the ribbon, click the down-arrow under the Paste tool, then choose Paste Special.
ExcelTips is your source for cost-effective Microsoft Excel training. This tip (7362) applies to Microsoft Excel 2007, 2010, 2013, 2016, 2019, 2021, and Excel in Microsoft 365. You can find a version of this tip for the older menu interface of Excel here: Moving and Copying Cells.

Best-Selling VBA Tutorial for Beginners Take your Excel knowledge to the next level. With a little background in VBA programming, you can go well beyond basic spreadsheets and functions. Use macros to reduce errors, save time, and integrate with other Microsoft applications. Fully updated for the latest version of Office 365. Check out Microsoft 365 Excel VBA Programming For Dummies today!
Do you need to use symbols frequently in your Excel data? The common way to insert them is by using the Symbol dialog ...
Discover MoreHow you add special characters to Excel can differ from how you add them in other Office programs, such as Word. This tip ...
Discover MoreIf a word contains a special character within it, Excel actually thinks the single word is two words. This tip examines ...
Discover MoreFREE SERVICE: Get tips like this every week in ExcelTips, a free productivity newsletter. Enter your address and click "Subscribe."
There are currently no comments for this tip. (Be the first to leave your comment—just use the simple form above!)
Got a version of Excel that uses the ribbon interface (Excel 2007 or later)? This site is for you! If you use an earlier version of Excel, visit our ExcelTips site focusing on the menu interface.
FREE SERVICE: Get tips like this every week in ExcelTips, a free productivity newsletter. Enter your address and click "Subscribe."
Copyright © 2026 Sharon Parq Associates, Inc.
 Please Note:
This article is written for users of the following Microsoft Excel versions: 2007, 2010, 2013, 2016, 2019, 2021, and Excel in Microsoft 365. If you are using an earlier version (Excel 2003 or earlier), this tip may not work for you. For a version of this tip written specifically for earlier versions of Excel, click here:
Please Note:
This article is written for users of the following Microsoft Excel versions: 2007, 2010, 2013, 2016, 2019, 2021, and Excel in Microsoft 365. If you are using an earlier version (Excel 2003 or earlier), this tip may not work for you. For a version of this tip written specifically for earlier versions of Excel, click here:
Comments