
David is having occasional problems opening workbooks in Excel 2016 and Excel 2019. For instance, he may open a macro-enabled workbook and discover all macros within the file have disappeared. If he saves, closes, and re-opens the workbook in these versions the macros still do not reappear. However, if he opens the same workbook in Excel 2010 the macros are available with all working as intended. If he saves the file in Excel 2010, closes it, and then reopens it in Excel 2016 or Excel 2019, the macros will have reappeared. David wonders why this is happening.
Based on the description that David provides, this simply should not happen. A key to what is going on may be in how David opens the workbook in various versions of Excel. Let's say that you have three computers, all connected to a network drive. Each computer is running a different version of Excel (2010, 2016, and 2019). The Excel 2010 system seems to open the workbooks just fine, with the macros present. The other two do not.
This sounds like it could be a problem related to security settings on the Excel 2016 and Excel 2019 systems. It could very well be that the settings on the systems using the later versions are set to disable macros without notification, while the settings on the Excel 2010 system are set more permissively, to allow the macros. You can check and change the settings in this manner:
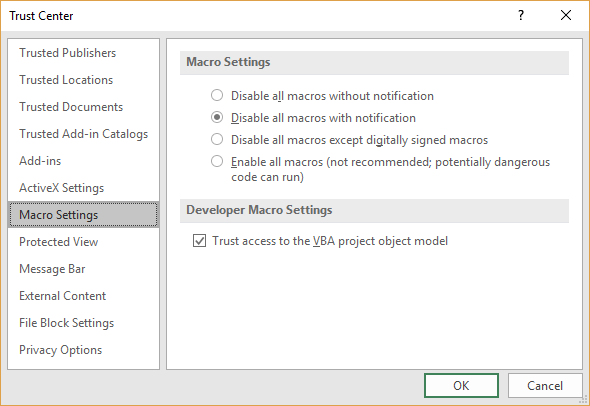
Figure 1. The Macro Settings in the Trust Center dialog box.
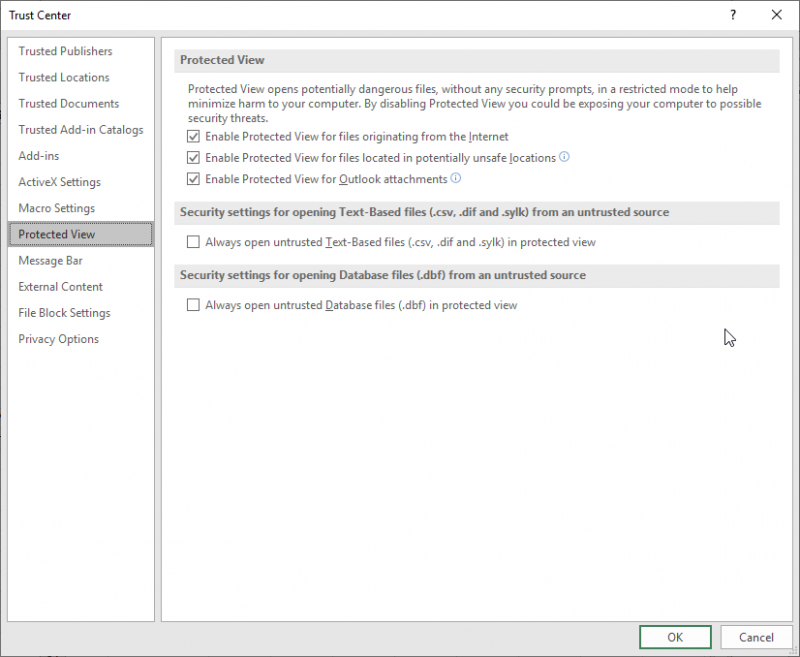
Figure 2. The Protected View options in the Trust Center dialog box.
Now you can try opening the workbook, and you should be able to access the macros just fine, though you will be asked if you want to enable them when you first open a macro-enabled workbook.
If the Excel versions are not on separate systems—if they are all installed on the same, single system—then it could be that they are somehow conflicting with each other. In that case, it would be helpful to find a different system on which just Excel 2016 is installed and see if the workbook, complete with working macros, will open on that system. If it does, then the solution that will give the most satisfactory results will be to uninstall Excel (all versions) from the problem system and reinstall just a single version of your choosing.
Note:
ExcelTips is your source for cost-effective Microsoft Excel training. This tip (8107) applies to Microsoft Excel 2007, 2010, 2013, 2016, 2019, 2021, and Excel in Microsoft 365.

Professional Development Guidance! Four world-class developers offer start-to-finish guidance for building powerful, robust, and secure applications with Excel. The authors show how to consistently make the right design decisions and make the most of Excel's powerful features. Check out Professional Excel Development today!
If you keep on-going data in a worksheet, some of your data�"over time�"may need to be deleted. If you have an ...
Discover MoreChemical formulas use a notation that shows the elements and the number of atoms of that element that comprise each ...
Discover MoreDo you need to create a number of words or phrases where you only alter a few letters in each one? If the alterations ...
Discover MoreFREE SERVICE: Get tips like this every week in ExcelTips, a free productivity newsletter. Enter your address and click "Subscribe."
2026-07-30 07:34:40
jamies
Maybe deal with the Windows file handling annoyance
use file explorer to get at the file (saved from the browser or download location
And if it was opened in an Excel session for you - use SaveAs and click in the folder entry shown as the location - that being highlighted, you can copy it, - and escape from the SaveAs
paste it into the File Explorer folder.
Right click on the file entry =
If, at the bottom of the panel you see a selection box to [Unblock] with a comment
"This file came from another computer and might be blocked to help protect this computer"
tick the box and select [Apply]
That is a general marking set by windows on most downloaded, or attachment files
(Actually there is a "Stream" addon attached to the file entry.
Google for
"File streams"
There is an option to see them using the "Dir" action in a (DOS) command stream session.
or copy the file to a non NTFS formatted USB or SD device, and then from that to the main storage
needs NTFS for the milliseconds on a file timestamp, or user level security, or streams, or hard links or attached folders
2022-03-19 11:32:10
J. Woolley
Re. the Trust Center, you might also consider the following:
1. If your trusted files are in a limited number of folders (including subfolders):
1.a. Pick File > Options > Trust Center > Trust Center Settings… > Trusted Locations.
1.b. If the trusted folder is not already listed, click Add new location…, then add it.
1.c. When you Add (or Modify) a location, you can include a description and specify whether subfolders are also trusted.
2. If your file is in a Trusted Location, it does not need a Certificate. But if you want to add a Certificate to an Excel file, click Alt+F11 to open the Visual Basic Editor (VBE), then pick Tools > Digital Signature....
3. When your file has a Certificate, you can confirm that as a Trusted Publisher:
3.a. Open the file, pick File > Options > Trust Center > Trust Center Settings… > Trusted Publishers.
3.b. Select the applicable Certificate, then click OK.
Got a version of Excel that uses the ribbon interface (Excel 2007 or later)? This site is for you! If you use an earlier version of Excel, visit our ExcelTips site focusing on the menu interface.
FREE SERVICE: Get tips like this every week in ExcelTips, a free productivity newsletter. Enter your address and click "Subscribe."
Copyright © 2026 Sharon Parq Associates, Inc.

Comments