Please Note: This article is written for users of the following Microsoft Excel versions: 2007, 2010, 2013, 2016, 2019, and 2021. If you are using an earlier version (Excel 2003 or earlier), this tip may not work for you. For a version of this tip written specifically for earlier versions of Excel, click here: Entering Data as Thousands.
Written by Allen Wyatt (last updated October 25, 2023)
This tip applies to Excel 2007, 2010, 2013, 2016, 2019, and 2021
Richard would like to type a value into a cell and have Excel assume that the value is thousands. For instance, he would like to enter "3" into a cell and have Excel treat the value as 3,000; if he enters "14" into the cell, then Excel should treat it as 14,000.
There are several different ways that this can be handled, depending on how you want the data treated once it is entered. One approach is to change the formatting of the cell into which the values are being entered. You could, for instance, use the following custom format for the cell:
#,##0",000"
Whenever you enter a value in the cell, Excel follows the value with ",000". Thus, enter 27 in the cell and Excel displays 27,000.
The drawback to this approach is that the underlying number is still considered the smaller value. If you later try to add 1 to the cell contents, you don't get 27,001, you get 28,000. You also won't be able to enter decimal values. This means that if you enter 1.23, you don't get 1,230; you instead get 1,000 because the value is treated as an integer before displaying.
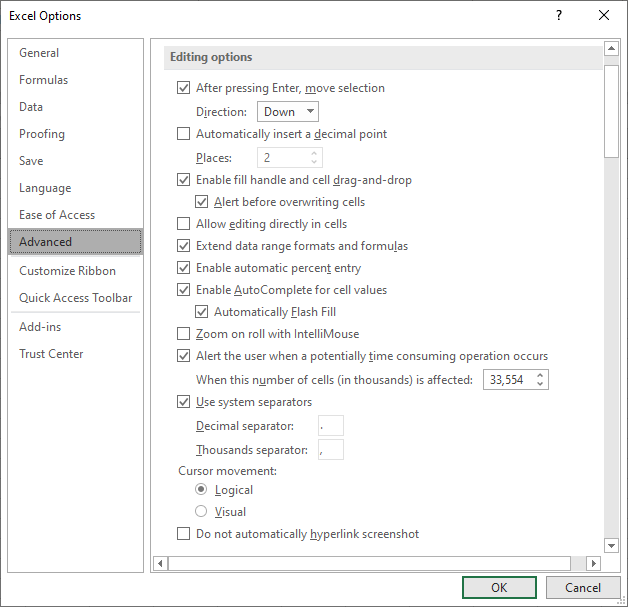
A better approach is, perhaps, to change a configuration setting in Excel itself. Follow these steps:

Figure 1. The Advanced options of the Excel Options dialog box.
Now, whenever you enter any information into a cell, Excel automatically multiplies the value by 1,000, provided you don't include a decimal point in what you are entering. This means that if you enter the value 3, Excel actually enters 3,000 into the cell. If you instead enter 1.23, then Excel enters 1.23; it doesn't multiply by 1,000.
If you choose this approach, remember that it is not only data entry on the current worksheet that is affected. This setting affects all data entry on all worksheets from this time forward. If this is not what you want, then you'll need to remember to turn off the setting (clear the check box) when you want to return to normal data entry.
You could, as well, use a macro approach to the problem. For instance, if you are entering only numeric data into the worksheet, you could create a macro that will multiply the contents of a cell by 1,000 every time the cell changes. Right-click the worksheet tab and choose View Code from the resulting Context menu. Then enter the following macro into the code window:
Private Sub Worksheet_Change(ByVal Target As Range)
    Application.EnableEvents = False
    Target = Target * 1000
    Application.EnableEvents = True
End Sub
Perhaps the best solution, though, is to keep things simple. Have a column where you input your values as you want. Then, in another column, use a formula to modify whatever values you entered. For example, you could enter 1.23 into cell A1. In cell B1, then, you could multiply this value by 1,000. The value in cell B1 could then be used within other formulas, elsewhere in your workbook.
Note:
ExcelTips is your source for cost-effective Microsoft Excel training. This tip (9697) applies to Microsoft Excel 2007, 2010, 2013, 2016, 2019, and 2021. You can find a version of this tip for the older menu interface of Excel here: Entering Data as Thousands.

Best-Selling VBA Tutorial for Beginners Take your Excel knowledge to the next level. With a little background in VBA programming, you can go well beyond basic spreadsheets and functions. Use macros to reduce errors, save time, and integrate with other Microsoft applications. Fully updated for the latest version of Office 365. Check out Microsoft 365 Excel VBA Programming For Dummies today!
Excel allows you to edit your cell contents in two places. What if you want to limit where editing occurs, so it can only ...
Discover MoreCopying information from one program (such as Word) to another (such as Excel) is a common occurrence. If you want to ...
Discover MoreWant a quick way to add non-unique values into a column? You probably know you can do this by starting to simply type in ...
Discover MoreFREE SERVICE: Get tips like this every week in ExcelTips, a free productivity newsletter. Enter your address and click "Subscribe."
There are currently no comments for this tip. (Be the first to leave your comment—just use the simple form above!)
Got a version of Excel that uses the ribbon interface (Excel 2007 or later)? This site is for you! If you use an earlier version of Excel, visit our ExcelTips site focusing on the menu interface.
FREE SERVICE: Get tips like this every week in ExcelTips, a free productivity newsletter. Enter your address and click "Subscribe."
Copyright © 2026 Sharon Parq Associates, Inc.
Comments