When Ryno clicks the Print tool on the Home tab of the ribbon, Excel dutifully prints the active worksheet. However, he prefers to have it print his selected cells. He wonders if there is a way to have Excel print just the selected cells, by default.
In reality, Excel doesn't include a Print tool on the Home tab of the ribbon. Normally you'll need to click the File tab of the ribbon and choose Print or, in Excel 2007, click the Office button and then choose Print. I suspect that what Ryno is seeing is the Quick Print tool, which is actually part of the Quick Access Toolbar. You can control the display of this tool by clicking the down-arrow at the right side of the QAT. (If you hover the mouse pointer over this you'll see the words "Customize Quick Access Toolbar" appear.) Excel displays some options. (See Figure 1.)
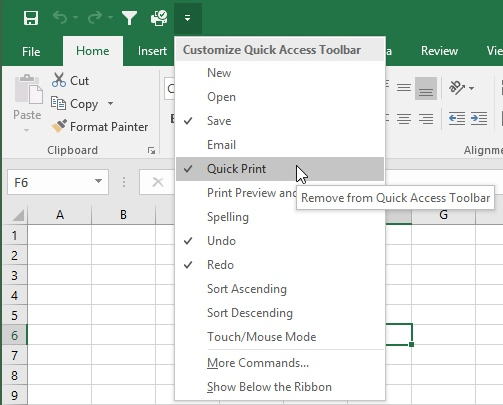
Figure 1. Customizing the Quick Access Toolbar.
Note the option titled Quick Print. If this is selected, then there is a tool on the QAT that you can use to print.
Interestingly enough, the Quick Print tool pretty much ignores the settings you may have previously used to print. For instance, I used Ctrl+P to display the print settings and specified that only the selected cells should be printed. When I printed, that is what I got. However, when I then clicked the Quick Print tool, the entire worksheet printed. When I again pressed Ctrl+P, the settings there still showed that I wanted to print only the selected cells, even though Quick Print had just gotten through printing the entire worksheet.
It appears that this tool is designed to only print the entire current worksheet; it ignores any other print settings you may have previously made in your Excel session. And therein lies the apparent genesis of Ryno's request—he would like the Quick Print tool to print the selected cells, by default.
There is only one way we've been able to find to directly modify how the Quick Print tool works. This involves setting a print area for the worksheet. You can do this by following these steps:
Now, whenever you print in this worksheet—even when you are using the Quick Print tool—Excel limits what is printed to the specified print area.
If you truly want a tool that will print whatever you have selected at the time that you use it, you'll need to create a macro. The macro doesn't need to be complex; here's a quick example:
Sub MyPrintSelection
    Selection.PrintOut Copies:=1, Collate:=True
End Sub
If you assign this macro to the Quick Access Toolbar, you'll have an easy-to-use tool that prints whatever is selected. You could even associate a shortcut key with the macro so that you could print the selection by invoking the shortcut.
ExcelTips is your source for cost-effective Microsoft Excel training. This tip (188) applies to Microsoft Excel 2007, 2010, 2013, 2016, 2019, 2021, and Excel in Microsoft 365.

Professional Development Guidance! Four world-class developers offer start-to-finish guidance for building powerful, robust, and secure applications with Excel. The authors show how to consistently make the right design decisions and make the most of Excel's powerful features. Check out Professional Excel Development today!
Getting a chart looking its best on a black-and-white printer can be a challenge. This tip examines different ways you ...
Discover MoreIt is helpful to be able to print out worksheets when you need to share them with others. It is even more helpful if you ...
Discover MoreExcel can print your worksheets in either black and white or color. If you want to print everything in black and white ...
Discover MoreFREE SERVICE: Get tips like this every week in ExcelTips, a free productivity newsletter. Enter your address and click "Subscribe."
There are currently no comments for this tip. (Be the first to leave your comment—just use the simple form above!)
Got a version of Excel that uses the ribbon interface (Excel 2007 or later)? This site is for you! If you use an earlier version of Excel, visit our ExcelTips site focusing on the menu interface.
FREE SERVICE: Get tips like this every week in ExcelTips, a free productivity newsletter. Enter your address and click "Subscribe."
Copyright © 2026 Sharon Parq Associates, Inc.
Comments