Please Note: This article is written for users of the following Microsoft Excel versions: 2007, 2010, 2013, 2016, 2019, and 2021. If you are using an earlier version (Excel 2003 or earlier), this tip may not work for you. For a version of this tip written specifically for earlier versions of Excel, click here: Sorting with Graphics.
You already know that Excel allows you to place graphics in your worksheets. You may not know, however, that Excel allows you to sort graphics along with the regular data in your tables. For instance, you could create an inventory table that has the requisite part numbers, descriptions, and quantities. You could also include a column that shows a small picture of each inventory item. When you later sort the table, the pictures sort right along with the rest of the data in the table.
If you can't seem to make the graphics sort along with the other data in the table, keep these pointers in mind:
If your graphics still won't sort, the properties of the graphic may have been changed to prohibit sorting. Follow these steps if you are using Excel 2007:
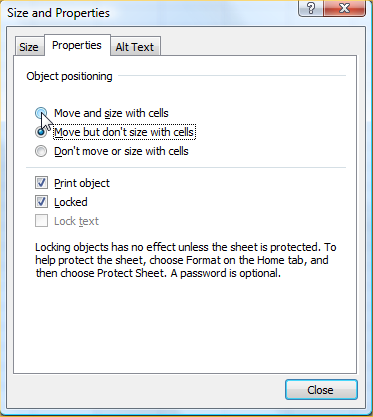
Figure 1. The Properties tab of the Size and Properties dialog box.
The steps are different for users of Excel 2010:
If you are using Excel 2013 or a later version, the steps are different still:
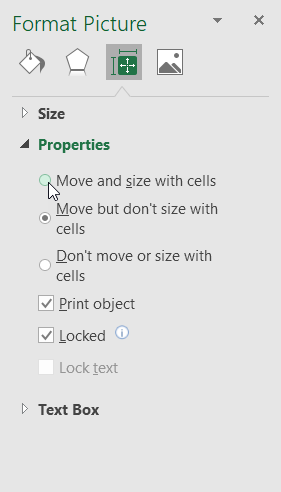
Figure 2. The Properties settings in the Format Picture task pane.
ExcelTips is your source for cost-effective Microsoft Excel training. This tip (6139) applies to Microsoft Excel 2007, 2010, 2013, 2016, 2019, and 2021. You can find a version of this tip for the older menu interface of Excel here: Sorting with Graphics.

Create Custom Apps with VBA! Discover how to extend the capabilities of Office 365 applications with VBA programming. Written in clear terms and understandable language, the book includes systematic tutorials and contains both intermediate and advanced content for experienced VB developers. Designed to be comprehensive, the book addresses not just one Office application, but the entire Office suite. Check out Mastering VBA for Microsoft Office 365 today!
Information in a cell can be entered using line feeds, which results in multiple lines of data in the same cell. If you ...
Discover MoreSorting information in a worksheet can be confusing when Excel applies sorting rules of which you are unaware. This is ...
Discover MoreWant to ignore some characters at the beginning of each cell when sorting? The easiest way is to simply create other ...
Discover MoreFREE SERVICE: Get tips like this every week in ExcelTips, a free productivity newsletter. Enter your address and click "Subscribe."
2021-02-12 00:20:52
Darryl Gebien
How can you remove blanks from a single column that contains both multiple images and blanks?
Thanks!
Got a version of Excel that uses the ribbon interface (Excel 2007 or later)? This site is for you! If you use an earlier version of Excel, visit our ExcelTips site focusing on the menu interface.
FREE SERVICE: Get tips like this every week in ExcelTips, a free productivity newsletter. Enter your address and click "Subscribe."
Copyright © 2026 Sharon Parq Associates, Inc.
 Please Note:
This article is written for users of the following Microsoft Excel versions: 2007, 2010, 2013, 2016, 2019, and 2021. If you are using an earlier version (Excel 2003 or earlier), this tip may not work for you. For a version of this tip written specifically for earlier versions of Excel, click here:
Please Note:
This article is written for users of the following Microsoft Excel versions: 2007, 2010, 2013, 2016, 2019, and 2021. If you are using an earlier version (Excel 2003 or earlier), this tip may not work for you. For a version of this tip written specifically for earlier versions of Excel, click here:
Comments