Please Note: This article is written for users of the following Microsoft Excel versions: 2007, 2010, 2013, 2016, 2019, and 2021. If you are using an earlier version (Excel 2003 or earlier), this tip may not work for you. For a version of this tip written specifically for earlier versions of Excel, click here: Specifying Your Target Monitor.
If you are developing Web pages in Excel, it is a good idea to have in mind who the user is. The user, obviously, is the person who will view your Web page. However, there are certain assumptions that must be made about the user, and those assumptions will affect how you put your Web page together.
One of the prime considerations is what resolution of monitor the user will be using. This affects the presentation of graphics and text on their page. For instance, a graphic that shows up nicely centered on your screen at a high resolution may not give the desired impact if the user is working at a lower resolution.
You can instruct Excel to make certain assumptions about the user's monitor resolution as you are developing Web pages. You set the target resolution by following these steps:
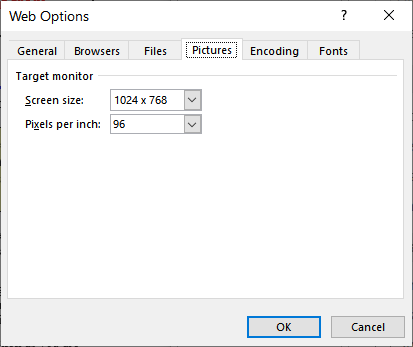
Figure 1. The Pictures tab of the Web Options dialog box.
ExcelTips is your source for cost-effective Microsoft Excel training. This tip (6222) applies to Microsoft Excel 2007, 2010, 2013, 2016, 2019, and 2021. You can find a version of this tip for the older menu interface of Excel here: Specifying Your Target Monitor.

Solve Real Business Problems Master business modeling and analysis techniques with Excel and transform data into bottom-line results. This hands-on, scenario-focused guide shows you how to use the latest Excel tools to integrate data from multiple tables. Check out Microsoft Excel Data Analysis and Business Modeling today!
When you copy information from a Web page and paste it into a worksheet, you can end up with more than you bargained for. ...
Discover MoreIf you use Excel's Web Query tools to grab data from a website, you may run into some problems if the site isn't ...
Discover MoreWhen you send a macro-enabled workbook to someone, that person may have problems opening and using it. This tip looks at ...
Discover MoreFREE SERVICE: Get tips like this every week in ExcelTips, a free productivity newsletter. Enter your address and click "Subscribe."
There are currently no comments for this tip. (Be the first to leave your comment—just use the simple form above!)
Got a version of Excel that uses the ribbon interface (Excel 2007 or later)? This site is for you! If you use an earlier version of Excel, visit our ExcelTips site focusing on the menu interface.
FREE SERVICE: Get tips like this every week in ExcelTips, a free productivity newsletter. Enter your address and click "Subscribe."
Copyright © 2026 Sharon Parq Associates, Inc.
 Please Note:
This article is written for users of the following Microsoft Excel versions: 2007, 2010, 2013, 2016, 2019, and 2021. If you are using an earlier version (Excel 2003 or earlier), this tip may not work for you. For a version of this tip written specifically for earlier versions of Excel, click here:
Please Note:
This article is written for users of the following Microsoft Excel versions: 2007, 2010, 2013, 2016, 2019, and 2021. If you are using an earlier version (Excel 2003 or earlier), this tip may not work for you. For a version of this tip written specifically for earlier versions of Excel, click here:
Comments