Please Note: This article is written for users of the following Microsoft Excel versions: 2007, 2010, 2013, 2016, 2019, and 2021. If you are using an earlier version (Excel 2003 or earlier), this tip may not work for you. For a version of this tip written specifically for earlier versions of Excel, click here: AutoFilling from a Custom List.
A great timesaver when entering data is to use Excel's AutoFill feature. To use the feature, enter enough cells that Excel can figure out how you want to fill the remaining cells in a series. For instance, enter 1 and 2 into two cells, or 5 and 10 into two others, or Monday and Tuesday. Select the two cells and then click and drag the Fill handle at the bottom-right corner of the selection border.
As cool as AutoFill is, an even cooler timesaving feature is to define your own series of values that AutoFill can use. Follow these steps:
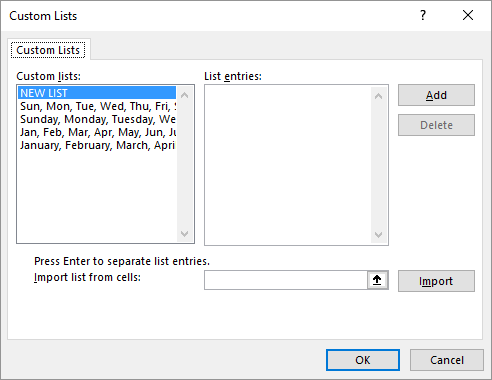
Figure 1. The Custom Lists dialog box.
You can now use the custom list for the AutoFill feature. Simply type whatever entry from the custom list you want to start with, select the cell, and then drag the Fill handle. Excel fills the selected cells with the items from your custom list, in order.
ExcelTips is your source for cost-effective Microsoft Excel training. This tip (6241) applies to Microsoft Excel 2007, 2010, 2013, 2016, 2019, and 2021. You can find a version of this tip for the older menu interface of Excel here: AutoFilling from a Custom List.

Excel Smarts for Beginners! Featuring the friendly and trusted For Dummies style, this popular guide shows beginners how to get up and running with Excel while also helping more experienced users get comfortable with the newest features. Check out Excel 2019 For Dummies today!
Want to fill a long column with predictive data? It's easy to do by using AutoFill and a double-click of the mouse.
Discover MoreNeed to fill a range of cells with the days of the week? Excel makes it easy to do so using AutoFill.
Discover MoreThe AutoFill feature can be used for more than just incrementing information into cells. This tip explains how to access ...
Discover MoreFREE SERVICE: Get tips like this every week in ExcelTips, a free productivity newsletter. Enter your address and click "Subscribe."
2021-07-10 17:59:09
Rod Grealish
You can use a custom list for sorting. For instance, if you have an unsorted list of choir members with their voice (Soprano, Alto, Tenor, Bass) then create a Custom List of voices in the order Soprano, Alto, Tenor, Bass . Sort the choir members on their voice and the Sopranos will be sorted first, followed by the Altos, then the Tenors and finally the Basses.
Got a version of Excel that uses the ribbon interface (Excel 2007 or later)? This site is for you! If you use an earlier version of Excel, visit our ExcelTips site focusing on the menu interface.
FREE SERVICE: Get tips like this every week in ExcelTips, a free productivity newsletter. Enter your address and click "Subscribe."
Copyright © 2026 Sharon Parq Associates, Inc.
 Please Note:
This article is written for users of the following Microsoft Excel versions: 2007, 2010, 2013, 2016, 2019, and 2021. If you are using an earlier version (Excel 2003 or earlier), this tip may not work for you. For a version of this tip written specifically for earlier versions of Excel, click here:
Please Note:
This article is written for users of the following Microsoft Excel versions: 2007, 2010, 2013, 2016, 2019, and 2021. If you are using an earlier version (Excel 2003 or earlier), this tip may not work for you. For a version of this tip written specifically for earlier versions of Excel, click here:
Comments