Please Note: This article is written for users of the following Microsoft Excel versions: 2007, 2010, 2013, 2016, 2019, 2021, and Excel in Microsoft 365. If you are using an earlier version (Excel 2003 or earlier), this tip may not work for you. For a version of this tip written specifically for earlier versions of Excel, click here: Moving and Copying Graphics Objects.
To move an object, click on one of the lines that make up the object. You should see handles (small boxes in Excel 2007, Excel 2010, or Excel 2013; small circles in Excel 2016 and later versions) appear around the edges of the object. When the handles appear, point to one of the lines in the object—do not point to the handles. Click and hold down the mouse button and move the mouse. The object is dragged along with the mouse pointer. When you release the mouse button, the object stays at the new position.
When you want to copy a graphics object, select the object as already described. Then, press Ctrl+C to copy the object to the Clipboard. You can then press Ctrl+V to paste the object in the worksheet. You can then move the newly pasted object to where you want it to appear.
ExcelTips is your source for cost-effective Microsoft Excel training. This tip (7733) applies to Microsoft Excel 2007, 2010, 2013, 2016, 2019, 2021, and Excel in Microsoft 365. You can find a version of this tip for the older menu interface of Excel here: Moving and Copying Graphics Objects.

Create Custom Apps with VBA! Discover how to extend the capabilities of Office 365 applications with VBA programming. Written in clear terms and understandable language, the book includes systematic tutorials and contains both intermediate and advanced content for experienced VB developers. Designed to be comprehensive, the book addresses not just one Office application, but the entire Office suite. Check out Mastering VBA for Microsoft Office 365 today!
A picture is worth a thousand words, but getting the picture, particularly a screen shot, into a workbook may seem ...
Discover MoreExcel is great at printing numbers on a piece of paper, but terrible at printing watermarks. This is apparently by ...
Discover MoreNeed to change a shape you previously added to your worksheet? It's easy to do using the graphics tools provided by ...
Discover MoreFREE SERVICE: Get tips like this every week in ExcelTips, a free productivity newsletter. Enter your address and click "Subscribe."
2023-04-22 21:37:36
Tomek
I have recently discovered that Excel (my version is 365 Family, Win10) does not quite keep the aspect ratio of graphics when printed. This applies specifically to pictures that are objects in the regular worksheet. I observed that the vertical size is printed correctly, but the horizontal size is expanded to about 112%. So a square becomes a rectangle, a circle - an ellipse. Often the change is not easily noticed, but when you have diagonal lines that are perpendicular on the screen, and in the original picture, on the printout they are no longer perpendicular.
Interestingly, pie charts are not deformed, but pictures and inserted shapes are. Which allows me to demonstrate the issue here. I have created a pie chart in the worksheet, and superimposed over it a red circle of the same size. What I see on the screen is shown in Screenshot 1 (see Figure 1 below) , and what the print preview shows (and what actually prints) is shown in Screenshot 2 (see Figure 2 below) . It shouldn't be like this!!!!
Did anybody else notice this?
Just in case someone asks, no, it is not the printer issue, original pictures and shapes in other files print without distortion. The same objects copied and pasted into a Word document also print without distortion.
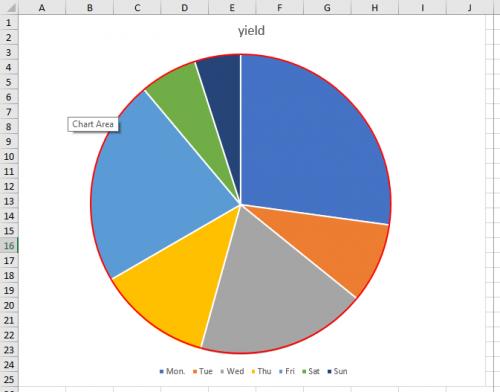
Figure 1.
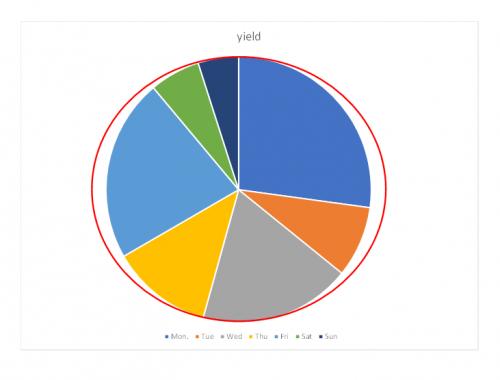
Figure 2.
Got a version of Excel that uses the ribbon interface (Excel 2007 or later)? This site is for you! If you use an earlier version of Excel, visit our ExcelTips site focusing on the menu interface.
FREE SERVICE: Get tips like this every week in ExcelTips, a free productivity newsletter. Enter your address and click "Subscribe."
Copyright © 2026 Sharon Parq Associates, Inc.
 Please Note:
This article is written for users of the following Microsoft Excel versions: 2007, 2010, 2013, 2016, 2019, 2021, and Excel in Microsoft 365. If you are using an earlier version (Excel 2003 or earlier), this tip may not work for you. For a version of this tip written specifically for earlier versions of Excel, click here:
Please Note:
This article is written for users of the following Microsoft Excel versions: 2007, 2010, 2013, 2016, 2019, 2021, and Excel in Microsoft 365. If you are using an earlier version (Excel 2003 or earlier), this tip may not work for you. For a version of this tip written specifically for earlier versions of Excel, click here:
Comments