Please Note: This article is written for users of the following Microsoft Excel versions: 2007, 2010, 2013, 2016, 2019, 2021, and Excel in Microsoft 365. If you are using an earlier version (Excel 2003 or earlier), this tip may not work for you. For a version of this tip written specifically for earlier versions of Excel, click here: Opening a Workbook as Read-Only.
There may be times when you want to open a workbook as read-only. This means you will not be able to save any changes to the workbook you are loading. You can use the Save As option from the File menu in order to save the workbook using a different filename, however. Opening a workbook as read-only is self-insurance so you don't inadvertently mess up your file. To open a workbook as read-only, follow these steps:
ExcelTips is your source for cost-effective Microsoft Excel training. This tip (7929) applies to Microsoft Excel 2007, 2010, 2013, 2016, 2019, 2021, and Excel in Microsoft 365. You can find a version of this tip for the older menu interface of Excel here: Opening a Workbook as Read-Only.

Professional Development Guidance! Four world-class developers offer start-to-finish guidance for building powerful, robust, and secure applications with Excel. The authors show how to consistently make the right design decisions and make the most of Excel's powerful features. Check out Professional Excel Development today!
Have you ever been working with data in Excel and experienced a "freeze" where the program stops responding? This can be ...
Discover MoreEach time you start Excel, you may want to have the program load one or more workbooks automatically. Excel provides two ...
Discover MoreAll good things must come to an end at some point. When you are done sharing your workbook with others, this is how you ...
Discover MoreFREE SERVICE: Get tips like this every week in ExcelTips, a free productivity newsletter. Enter your address and click "Subscribe."
2025-09-12 02:26:58
Jigar
Hello Allen,
In the Excel File Open menu - it shows the list of recent files.
If I want to open one of these "recent" files in Read Only mode, then how do I do it?
2024-04-13 17:28:01
PFL
Once again I have to concur with Sally. Duly humbled here.
@Tomek
Your comments are so insightful. Thanks
2024-04-11 08:19:43
Sally Serbus
Ahhh! The light bulb turned on. I was looking at the 'green' Open button - not the Open button next to the Cancel.
Thanks so much for your patience.
2024-04-10 23:51:56
Tomek
@ PFL and Sally and Allen:
I had no problem executing the steps that Allen provided in my Excel in MS365 Family 32 bit under Win10 Pro. I also checked MS365 Family 64 bit, under Win 11 Home: it works the same.
The only time I couldn't follow those steps, was when I was working in the on-line version of Excel within a browser, but that version has significantly reduced functionality.
2024-04-10 16:40:00
PFL
I concur with Sally
The steps that Allen provides do not work in the MS 365 Excel that I have.
2024-04-10 11:34:44
Allen
Sally, I don't think you are understanding the instructions.
At the end of step 1, you need to be in the Open dialog box within Excel. If you are using the version of Excel provided with Microsoft 365, you get to this dialog box by clicking on File and then on Open. This displays a dialog box that looks like this. (see Figure 1 below)
Within that dialog box, click Browse (lower left area of the dialog box), as described in step 1. This displays the actual Open dialog box, which looks like this. (see Figure 2 below)
It is within this dialog box (the Open dialog box) that you use the controls to locate the workbook you want to open as Read Only. Once you've located it (step 2), you click on it once. Then (step 3) you click the down-arrow next to the Open button. You can see this down-arrow next to the Open button in Figure 2, below.
I hope that helps clarify any confusion. This tip does not use the File Explorer at all; you do all of your work within Excel.
-Allen
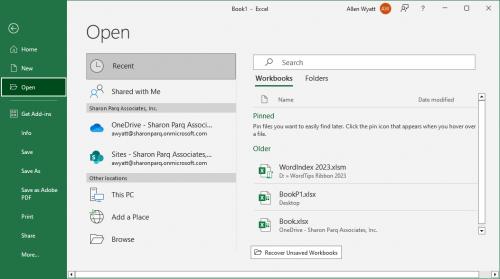
Figure 1. After clicking File | Open.

Figure 2. The Open dialog box.
2024-04-10 09:19:55
Sally Serbus
Here are the steps used:
a) start Excel
b) click on Open (under Home and New) - as described in step 1
c) if the file is listed, a single click immediately opens the file
d) if the file is not listed, click on Browse - as described in step 2
e) a File Explorer window opens
Thoughts?
2024-04-09 08:31:24
Allen
OK, I understand now, Sally. You are not doing step 1. You mention using the File Explorer, and all of these steps are done within Excel, not within the File Explorer.
-Allen
2024-04-09 08:22:11
Sally Serbus
I did step 2 - browsed and clicked once on the file name. I click on Browse and File Explorer window opens. I then find the file and click once (not opening the file). Nothing changes by the original Open button.
I'm using Office 16
2024-04-08 09:28:48
Allen
Did you do step 2, Sally? I don't think the down-arrow appears if you don't click on a workbook file.
-Allen
2024-04-08 09:16:20
Sally Serbus
I don't see a down arrow to the right of the Open button that is in step 3.
2024-04-06 14:20:15
Chris Lefsrud
I have generally just applied workbook protection to the file, with or without a password. Whenever the file is opened, the user is presented with a dialog regarding opening as read-only or editable.
HCL
Got a version of Excel that uses the ribbon interface (Excel 2007 or later)? This site is for you! If you use an earlier version of Excel, visit our ExcelTips site focusing on the menu interface.
FREE SERVICE: Get tips like this every week in ExcelTips, a free productivity newsletter. Enter your address and click "Subscribe."
Copyright © 2026 Sharon Parq Associates, Inc.
 Please Note:
This article is written for users of the following Microsoft Excel versions: 2007, 2010, 2013, 2016, 2019, 2021, and Excel in Microsoft 365. If you are using an earlier version (Excel 2003 or earlier), this tip may not work for you. For a version of this tip written specifically for earlier versions of Excel, click here:
Please Note:
This article is written for users of the following Microsoft Excel versions: 2007, 2010, 2013, 2016, 2019, 2021, and Excel in Microsoft 365. If you are using an earlier version (Excel 2003 or earlier), this tip may not work for you. For a version of this tip written specifically for earlier versions of Excel, click here:
Comments