Please Note: This article is written for users of the following Microsoft Excel versions: 2007, 2010, 2013, 2016, 2019, 2021, and Excel in Microsoft 365. If you are using an earlier version (Excel 2003 or earlier), this tip may not work for you. For a version of this tip written specifically for earlier versions of Excel, click here: Pop-Up Comments for Graphics.
Written by Allen Wyatt (last updated May 27, 2023)
This tip applies to Excel 2007, 2010, 2013, 2016, 2019, 2021, and Excel in Microsoft 365
Shane knows how to add comments to cells so that when you hover the mouse over the cell you can see the comment. He would like to do the same thing with graphics—have a comment or pop-up box appear when a person hovers the mouse over a graphic placed in a worksheet. While Shane could adjust cell size to match the graphic and then attach the comment to the cell, the size of the graphics he is using really don't make that practical. He wonders if there is a way to have pop-up comments appear when someone moves the mouse over a graphic in a worksheet.
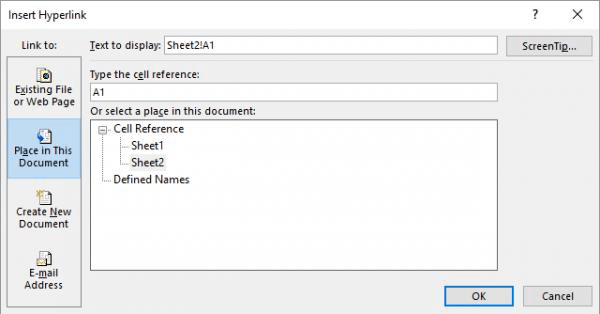
There is no way to do this using the Comments feature of Excel, but there are some workarounds. The first involves using hyperlinks. Just follow these steps:

Figure 1. The Insert Hyperlink dialog box.
The result is that when someone hovers the mouse pointer over the graphic, a small note appears—usually below the graphic—that contains the ScreenTip text. It isn't quite as noticeable as a regular Excel Comment, but it does provide a little assistance.
If you want something a bit harder to miss, then a macro might be helpful. There are a number of different ways you could approach a macro-based solution, but perhaps the easiest is to simply create a macro such as the following:
Sub MyMacro()
    MsgBox "This is my comment"
End Sub
Back in your worksheet, right-click on the graphic and choose Assign Macro from the resulting Context menu. Excel shows you a list of all the macros available to you; you should pick the short one you just created (in the example above it is "MyMacro").
Now, when you click on the graphic, you see a message box that contains whatever text you specified in your macro. It isn't quite as automatic as only requiring the person to scroll over the graphic, but it does provide a handy way to convey a lot of information to the user.
Note:
ExcelTips is your source for cost-effective Microsoft Excel training. This tip (11397) applies to Microsoft Excel 2007, 2010, 2013, 2016, 2019, 2021, and Excel in Microsoft 365. You can find a version of this tip for the older menu interface of Excel here: Pop-Up Comments for Graphics.

Program Successfully in Excel! This guide will provide you with all the information you need to automate any task in Excel and save time and effort. Learn how to extend Excel's functionality with VBA to create solutions not possible with the standard features. Includes latest information for Excel 2024 and Microsoft 365. Check out Mastering Excel VBA Programming today!
If you use Excel to keep a graphic with each row of data you amass, you may wonder if there is a way to easily delete the ...
Discover MoreWant your shapes to really "pop" off the page? Add a drop shadow to them, as described in this tip.
Discover MoreIf you have a group of merged cells into which you want a user to enter information, you may want some sort of ...
Discover MoreFREE SERVICE: Get tips like this every week in ExcelTips, a free productivity newsletter. Enter your address and click "Subscribe."
2023-05-30 11:41:35
J. Woolley
My most recent comment was originally "suspected as spam" but subsequently unblocked by Allen. Unfortunately, that process ignores all paragraph endings and combines everything into a single paragraph. A new paragraph should start wherever you see 4 consecutive space characters.
2023-05-30 11:14:29
J. Woolley
If you prefer the Tip's macro-based solution MyMacro, consider one of the following procedures included in My Excel Toolbox: Popup "This is my comment", vbSystemModal, , TimeOutPopup's first 3 arguments and its returned result are similar to MsgBox. It runs in a separate process using VBScript; therefore, vbSystemModal (4096) is recommended to keep it on top. If optional TimeOut is zero (default), then Popup must be dismissed by the user (like MsgBox); otherwise, it will disappear after TimeOut seconds. Notify "This is my comment", , , TimeOutNotify runs in a separate process using VBScript to display a Notification BalloonTip above the Windows System Tray and in its Action Center. As with Popup, if optional TimeOut is zero (default), the message must be dismissed by the user. MsgBoxCustom "This is my comment", , , , , Range("E10")MsgBoxCustom displays a standard MsgBox with custom position and/or button labels. Its first 5 arguments and returned result are the same as MsgBox. The optional 6th argument (position) can be a worksheet's cell or absolute screen coordinates. MsgBoxModeless "This is my comment", , , , "NextMacro", , Range("E10")MsgBoxModeless displays a persistent modeless MsgBox as a UserForm with a single button. All argument's are optional except the first. The button's label (2nd argument) and font (4th argument) can be customized. The 5th argument specifies a macro to run after the button is clicked. The 6th argument is a ToolTip for the button. As with MsgBoxCustom, the last argument (position) can be a worksheet's cell or absolute screen coordinates. See https://sites.google.com/view/MyExcelToolbox/
2023-05-29 14:31:08
J. Woolley
Re. my previous comment (in case you noticed), TextBox1 has False AutoSize and True SelectionMargin in Figure 1 but True AutoSize and False SelectionMargin in Figure 2. The latter is recommended.
2023-05-28 12:44:10
J. Woolley
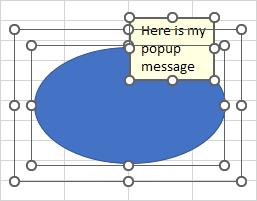
Here's one way to add a popup message when the mouse is over an arbitrary shape in a worksheet (but not a chart sheet). In this example (see Figure 1 below) the shape is a blue oval.
1. Surround the shape with two concentric ActiveX Label controls Label1 (smaller) and Label2 with transparent BackStyle, null BorderStyle, and null Caption.
2. Add ActiveX TextBox control TextBox1 with ToolTip BackColor, opaque BackStyle, single BorderStyle, True AutoSize, True MultiLine, True WordWrap, False SelectionMargin, and appropriate Text.
3. The z-order of these shapes must be Label1 (front), then Label2, then TextBox1, then blue oval (back).
4. Add the following event procedures to the Sheet document module applicable to the worksheet containing these controls:
Private Sub Label1_MouseMove(ByVal Button As Integer, _
ByVal Shift As Integer, ByVal X As Single, ByVal Y As Single)
TextBox1.Visible = True
End Sub
Private Sub Label2_MouseMove(ByVal Button As Integer, _
ByVal Shift As Integer, ByVal X As Single, ByVal Y As Single)
TextBox1.Visible = False
End Sub
Private Sub Worksheet_Deactivate()
TextBox1.Visible = False
End Sub
5. If desired, add the following event procedure to the ThisWorkbook document module, but replace Sheet1 with the Sheet containing TextBox1:
Private Sub Workbook_Activate()
Sheet1.TextBox1.Visible = False
End Sub
Now the popup message will appear (see Figure 2 below) and disappear when the mouse passes over the blue oval shape.

Figure 1.

Figure 2.
Got a version of Excel that uses the ribbon interface (Excel 2007 or later)? This site is for you! If you use an earlier version of Excel, visit our ExcelTips site focusing on the menu interface.
FREE SERVICE: Get tips like this every week in ExcelTips, a free productivity newsletter. Enter your address and click "Subscribe."
Copyright © 2026 Sharon Parq Associates, Inc.
Comments