Images Pile Up when Filtering

Written by Allen Wyatt (last updated March 18, 2024)
This tip applies to Excel 2007, 2010, 2013, 2016, 2019, and 2021


1

Adam gets a weekly safety report in Excel. One of the columns has photos of things to be fixed inserted into the cells while another column has the name of the responsible person. If Adam filters based on person, he does get a filtered list, but all the photos get piled up one on top of the other. In other words, the result for the photos column is not filtered; the unwanted photos do not collapse with the row when it collapses.

You should be able to fix this easily enough by simply modifying the attributes of your graphics. The steps you follow depend on the version of Excel you are using. If you are using Excel 2007 or Excel 2010, follow these steps:

  1. Select the image (or images) whose properties you need to change. You can select multiple images by clicking on one of the images and then holding down the Ctrl key as you click on each successive image.
  2. Right-click the image (or images) you selected. Excel displays a Context menu.
  3. Choose Size and Properties from the Context menu. Excel displays either the Size and Properties dialog box (Excel 2007) or Format Picture dialog box (Excel 2010).
  4. Make sure the Properties tab is displayed. (See Figure 1.)
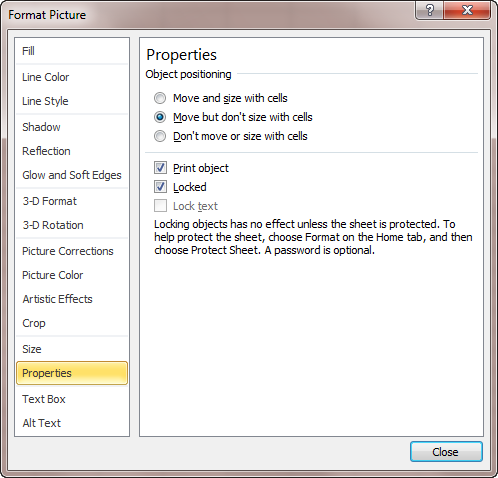
  5. Figure 1. The Properties tab of the Format Picture dialog box.

  6. Make sure the Move and Size with Cells check box is selected.
  7. Click OK.

If you are using Excel 2013 or a later version of the program, use the following steps instead:

  1. Select the image (or images) whose properties you need to change. You can select multiple images by clicking on one of the images and then holding down the Ctrl key as you click on each successive image.
  2. Right-click the image (or images) you selected. Excel displays a Context menu.
  3. Choose Size and Properties from the Context Menu. Excel displays the Format Picture task pane at the right side of the screen.
  4. Make sure Properties task option is expanded. (If it isn't—if you can't see anything under the Properties option—click the small triangle to the left of the Properties option.) (See Figure 2.)
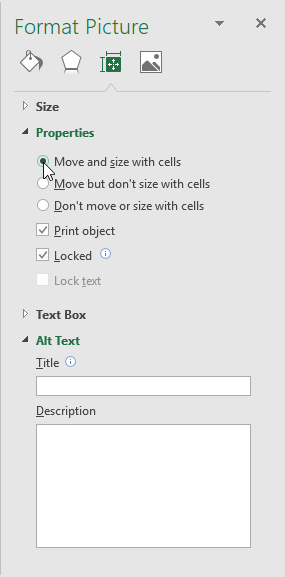
  5. Figure 2. The Properties option of the Format Picture task pane.

  6. Make sure the Move and Size with Cells radio button is selected.
  7. Close the Format Picture task pane.

That should do it; the pictures should now not pile up when you filter.

If your report is quite large, you might consider using a macro to change the attribute of the images. The following macro will step through each picture in the active worksheet and turn on the attribute:

Sub MoveAndSizePics()
    Dim s As Picture

    On Error Resume Next
    For Each s In ActiveSheet.Pictures
        s.Placement = xlMoveAndSize
    Next s
End Sub

Note:

If you would like to know how to use the macros described on this page (or on any other page on the ExcelTips sites), I've prepared a special page that includes helpful information. Click here to open that special page in a new browser tab.

ExcelTips is your source for cost-effective Microsoft Excel training. This tip (13680) applies to Microsoft Excel 2007, 2010, 2013, 2016, 2019, and 2021.

Author Bio

Allen Wyatt

With more than 50 non-fiction books and numerous magazine articles to his credit, Allen Wyatt is an internationally recognized author. He is president of Sharon Parq Associates, a computer and publishing services company. ...

MORE FROM ALLEN

Changing the Size of a Drawing Object

Documents are often made up of more than just text. If you have drawing objects in your document, you will doubtless need ...

Discover More

Printing Summary Information

Word automatically maintains a number of properties for each document you create. As part of those properties you can ...

Discover More

Summing When the First Character Matches a Value

Summing data is a common need in Excel. Summing lots of data based on a condition that needs to be met can be a bit more ...

Discover More

Best-Selling VBA Tutorial for Beginners Take your Excel knowledge to the next level. With a little background in VBA programming, you can go well beyond basic spreadsheets and functions. Use macros to reduce errors, save time, and integrate with other Microsoft applications. Fully updated for the latest version of Office 365. Check out Microsoft 365 Excel VBA Programming For Dummies today!

More ExcelTips (ribbon)

Automatically Displaying Thumbnails of a Graphic File

If you want to include a large number of images in your worksheet, you may also want a way to automatically add those ...

Discover More

Deleting Graphics when Deleting a Row

If you use Excel to keep a graphic with each row of data you amass, you may wonder if there is a way to easily delete the ...

Discover More

Non-Tiled Background Pictures

Background pictures are repeated over and over again (tiled) by Excel. If you want them to not be tiled, you may be out ...

Discover More
Subscribe

FREE SERVICE: Get tips like this every week in ExcelTips, a free productivity newsletter. Enter your address and click "Subscribe."

View most recent newsletter.

Comments

If you would like to add an image to your comment (not an avatar, but an image to help in making the point of your comment), include the characters [{fig}] (all 7 characters, in the sequence shown) in your comment text. You’ll be prompted to upload your image when you submit the comment. Maximum image size is 6Mpixels. Images larger than 600px wide or 1000px tall will be reduced. Up to three images may be included in a comment. All images are subject to review. Commenting privileges may be curtailed if inappropriate images are posted.

What is 9 + 8?

2019-09-28 14:45:24

Ronmio

If you want to change the properties of all the images, instead of using a macro, you can simply use Find & Select ► Go To Special ► Objects. That will select all the objects (including text boxes, etc.) on that worksheet and then you can right click on any one of them so you can select Size & Properties ► Properties ► Move and size with cells.

If you want to select a bunch of adjacent images/objects instead of all of them, use Find & Select ► Select Objects then use the cursor to drag across all the desired objects. When doing this, you may find it helpful to zoom way out (use a small Zoom % like 10%) so all the objects are visible (although tiny).

With either method, you can subsequently add, or eliminate, individual objects by using Ctrl-click.


This Site

Got a version of Excel that uses the ribbon interface (Excel 2007 or later)? This site is for you! If you use an earlier version of Excel, visit our ExcelTips site focusing on the menu interface.

Newest Tips
Subscribe

FREE SERVICE: Get tips like this every week in ExcelTips, a free productivity newsletter. Enter your address and click "Subscribe."

(Your e-mail address is not shared with anyone, ever.)

View the most recent newsletter.