Please Note: This article is written for users of the following Microsoft Excel versions: 2007, 2010, 2013, 2016, 2019, and 2021. If you are using an earlier version (Excel 2003 or earlier), this tip may not work for you. For a version of this tip written specifically for earlier versions of Excel, click here: Updating Links in Copied Files.
Written by Allen Wyatt (last updated August 22, 2024)
This tip applies to Excel 2007, 2010, 2013, 2016, 2019, and 2021
Let's say you have two workbooks that you use for tracking sales in the current month, 2020JuneA.xls and 2020JuneB.xls, and that 2020JuneA.xls contains links to data in 2020JuneB.xls. When it comes time to copy the workbooks for the new month, you may be wondering about the best way to update all the links in the first workbook so they point to the second workbook for the new month.
To prepare workbooks for the new month, most people will open a Windows folder and copy the workbook files within Windows, not even in Excel. This, however, is the way to guarantee that you do the most work in updating the files. A simpler way is to bypass Windows and do the saving in Excel. Follow these general steps:
As part of saving out 2020JulyB.xls (step 2), Excel automatically updates all the links in 2020JuneA.xls so that they point to the new file name. When you then save 2020JulyA.xls (step 3), you complete the cycle and end up with the new workbooks for the new month, with the past month's files still secure on disk.
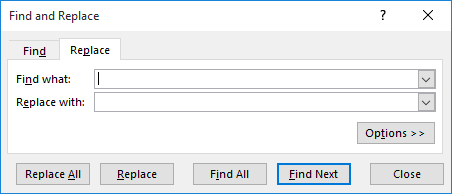
If saving the files under new names in Excel is not possible for some reason (perhaps someone else already made a copy of the workbook for the new month and made changes in the file) then you will need to resort to doing some manual editing of the links. Fortunately you can use the Find and Replace features of Excel to help in this task:

Figure 1. The Replace tab of the Find and Replace dialog box.
Excel goes through the entire worksheet—including the links—and makes changes to the appropriate text.
Another approach is to deal with your monthly files as a whole. In other words, don't have the filenames reflect the month, but put all the workbooks for the month in a single folder that is named after the month. Under this scenario, you could have a June folder, and then make a copy of the whole folder and name it July. You would then have duplicate copies of the workbooks in separate folders. You could work with them independently, as long as you don't try to open the same workbook from both months at the same time. (Excel won't allow you to open multiple workbooks with the same name.)
If you want to make your linking strategy more flexible, you can always use the INDIRECT function. For instance, suppose that your link is something like this:
=[2020JuneB.xls]Sheet1!B3
You could put the name of the source file (2020JuneB.xls) in a cell in the current worksheet (D5, for example) and replace the above expression with one like this:
=INDIRECT("'[" & D5 & "']Sheet1!B3")
Changing the contents of cell D5 to a different filename will make that file the new source of data. There are a couple of "gottchas," however. First of all, you need to manually open the file that is the target of the link; Excel won't do it for you as it would with a regular link. Also, workbook filenames that contain spaces will trip up the INDIRECT formula. If you think you might have spaces in your filenames, you should change the formula to this:
=INDIRECT("['" & D5 & "]Sheet1'!B3")
ExcelTips is your source for cost-effective Microsoft Excel training. This tip (11027) applies to Microsoft Excel 2007, 2010, 2013, 2016, 2019, and 2021. You can find a version of this tip for the older menu interface of Excel here: Updating Links in Copied Files.

Program Successfully in Excel! John Walkenbach's name is synonymous with excellence in deciphering complex technical topics. With this comprehensive guide, "Mr. Spreadsheet" shows how to maximize your Excel experience using professional spreadsheet application development tips from his own personal bookshelf. Check out Excel 2013 Power Programming with VBA today!
Need to get rid of the links in your workbook but save the values that were retrieved by those links? It could be easy or ...
Discover MoreExcel allows you to easily link information from one workbook to another. If you want to get rid of links that may be ...
Discover MoreIf you have linked information in your worksheets, you may want a way you can easily change the targets to which those ...
Discover MoreFREE SERVICE: Get tips like this every week in ExcelTips, a free productivity newsletter. Enter your address and click "Subscribe."
There are currently no comments for this tip. (Be the first to leave your comment—just use the simple form above!)
Got a version of Excel that uses the ribbon interface (Excel 2007 or later)? This site is for you! If you use an earlier version of Excel, visit our ExcelTips site focusing on the menu interface.
FREE SERVICE: Get tips like this every week in ExcelTips, a free productivity newsletter. Enter your address and click "Subscribe."
Copyright © 2025 Sharon Parq Associates, Inc.
Comments