Please Note: This article is written for users of the following Microsoft Excel versions: 2007, 2010, 2013, 2016, 2019, 2021, and Excel in Microsoft 365. If you are using an earlier version (Excel 2003 or earlier), this tip may not work for you. For a version of this tip written specifically for earlier versions of Excel, click here: Setting Cell Width and Height Using the Keyboard.
Written by Allen Wyatt (last updated October 29, 2022)
This tip applies to Excel 2007, 2010, 2013, 2016, 2019, 2021, and Excel in Microsoft 365
Sawan wonders if there is a way to adjust the height and width of a cell by using the keyboard, without using the mouse. (Some people are really averse to using the mouse.) The answer is yes, there is a way. The problem, however, is that it isn't a terribly intuitive way.
Here's how you set the row height:
The only difference in these steps when you want to specify the column width is that you should press W in step 4.
Here's a different method of changing the row height:
A similar sequence will work for setting the column width:
ExcelTips is your source for cost-effective Microsoft Excel training. This tip (6242) applies to Microsoft Excel 2007, 2010, 2013, 2016, 2019, 2021, and Excel in Microsoft 365. You can find a version of this tip for the older menu interface of Excel here: Setting Cell Width and Height Using the Keyboard.

Excel Smarts for Beginners! Featuring the friendly and trusted For Dummies style, this popular guide shows beginners how to get up and running with Excel while also helping more experienced users get comfortable with the newest features. Check out Excel 2019 For Dummies today!
Have you ever seen a worksheet in which some zero values have a negative sign in front of them? There's a reason for ...
Discover MoreThe Format Painter is great for copying formatting from one cell to another. If you don't want to grab the mouse to use ...
Discover MoreWant a quick way to add some underlines to your cell values? It's easy using the shortcuts provided in this tip.
Discover MoreFREE SERVICE: Get tips like this every week in ExcelTips, a free productivity newsletter. Enter your address and click "Subscribe."
2022-11-28 12:13:22
J. Woolley
@Larry Schwartz
In your comment dated 2022-11-02 you said, "If I click on the bottom border of the row number, Excel now shows both inches and pixels." I wondered why you referred to inches because in Normal view Excel shows the height in points and pixels. Now I realize you were in Page Layout view instead of Normal view. In Page Layout view the Row Height and Column Width dialogs display and accept inches; in Normal view it is points.
It was my understanding that Excel normally assumes 96 pixels/inch, but your comment described "144 pixels to the inch." I'm curious what computer you are using. If you run the DisplayScreenMetrics macro described in my comment dated 2022-11-03, does it report 144 Windows Dots/inch? Does your screen display 144 Pixels/inch?
2022-11-07 09:13:57
J. Woolley
@Larry Schwartz
After reading the Description section at https://sites.google.com/view/MyExcelToolbox, please leave a comment at https://sites.google.com/view/MyExcelToolbox/Comment explaining your difficulty and I will try to help.
2022-11-06 16:04:13
Larry Schwartz
Contributor Wolley's Excel Tool Box has lots of stuff. HGowever, from the web site, I can't figure out how to access his work. Opening Google Sheets gives me nothing. A newbee's guide would be helpful.
2022-11-06 15:06:31
J. Woolley
My Excel Toolbox includes the SetColumnWidthPixels and SetRowHeightPixels macros, which are improved versions of the macros described in my last comment.
See https://sites.google.com/view/MyExcelToolbox/
2022-11-06 05:01:40
Barry
Wow! That is fantastic - thank you. Once again the kindness of strangers shines bright.
Barry
2022-11-05 17:45:27
J. Woolley
@Barry
If you must, these macros will set column width and row height in Excel pixels (rounded to the nearest integer):
Sub ColWidthPixels()
Dim R As Range, X As Double
Dim W As Integer, msg As String
Const myName = "ColWidthPixels", PxPerPt = 96 / 72
Set R = Selection.Columns(1)
W = R.Width * PxPerPt
msg = "Enter column width in pixels:"
W = Application.InputBox(msg, myName, W, Type:=1)
If W <= 0 Then Exit Sub
X = R.ColumnWidth / R.Width
Selection.ColumnWidth = X * W / PxPerPt
'repeat (this is necessary)
X = R.ColumnWidth / R.Width
Selection.ColumnWidth = X * W / PxPerPt
'repeat again (for good measure)
X = R.ColumnWidth / R.Width
Selection.ColumnWidth = X * W / PxPerPt
End Sub
Sub RowHeightPixels()
Dim H As Integer, msg As String
Const myName = "RowHeightPixels", PxPerPt = 96 / 72
H = Selection.Rows(1).RowHeight * PxPerPt
msg = "Enter row height in pixels:"
H = Application.InputBox(msg, myName, H, Type:=1)
If H <= 0 Then Exit Sub
Selection.RowHeight = H / PxPerPt
End Sub
These macros will work with any selection on the active worksheet, but merged cells might be a problem.
2022-11-04 15:34:19
J. Woolley
@Barry
1. In my last comment, "Windows makes column width confusing." should have been "Excel makes column width confusing." In fact, the entire comment would be better if each instance of the word Windows were replaced with Excel.
2. I believe I explained how to set by pixel; see "... to add 1 Windows pixel." (Replace Windows with Excel.)
3. Many systems will have 96 screen pixels/inch; in this case, an Excel pixel is the same as a screen pixel. If you review Figure 1 from my last comment, my system has 88.2 screen pixels/inch, so I must Zoom by 88.2/96 = 92% to make Excel's pixel match my screen's pixel. Use the DisplayScreenMetrics macro to compare with your system.
See https://sites.google.com/view/MyExcelToolbox/
2022-11-04 06:13:11
Barry
Am I right to assume from J. Woolley's comment that there is no way to set column width and row height by pixel because; if I have understood correctly; pixels are different things in different 'systems'?
2022-11-03 13:44:38
J. Woolley
@Larry Schwartz
The Row Height dialog displays and accepts a value in points. There are 72 points/inch. Windows assumes 96 dots/inch and refers to each dot as a pixel, so there are 96/72 = 4/3 Windows pixels/point. A Windows pixel is not necessarily the same as your display screen's pixel.
If you make the row height 15 points, it will be 20 Windows pixels. Add 0.75 point to add 1 Windows pixel. Add 1.5 points to add 2 Windows pixels.
Windows makes column width confusing. The Column Width dialog displays and accepts the number of Normal style zero (0) characters that will fit in the cell. Suppose you enter 15 in the Column Width dialog. Now if you left-click that column's border in the header it will indicate something like
Width: 15.00 (110 pixels)
(This example assumes Normal style uses 11 point Calibri Regular font.) For this case, the width of a Normal style zero (0) character is 110/15 = 7.33 Windows pixels or 5.5 points. Add 0.14 character to add 1 Windows pixel. Add 0.27 character to add 2 Windows pixels.
On my system, one 11 point Calibri Regular font zero (0) character is 5.5 points wide and 11 points high. When entered in a cell with AutoFit, the cell is 14 Windows pixels (10.5 points) wide and 20 Windows pixels (15 points) high.
My Excel Toolbox includes the DisplayScreenMetrics macro (see Figure 1 below) . It computes the Zoom factor necessary for displaying Excel's Page Layout in actual size.
See https://sites.google.com/view/MyExcelToolbox/
See https://excelribbon.tips.net/T008768_Changing_Width_and_Height_to_Inches.html
See https://learn.microsoft.com/en-us/office/troubleshoot/excel/determine-column-widths
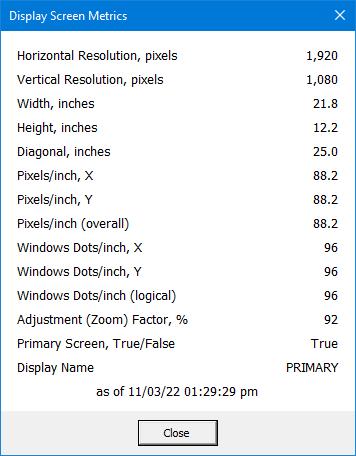
Figure 1.
2022-11-02 15:46:04
J. Woolley
Here's another way to avoid the mouse, but it involves adding some macros:
Sub ColWidthDialog()
Application.Dialogs(xlDialogColumnWidth).Show
End Sub
Sub RowHeightDialog()
Application.Dialogs(xlDialogRowHeight).Show
End Sub
Sub MyMacros()
Dim Macros(), n, msg, last
Macros = Array("ColWidthDialog", "RowHeightDialog")
For n = 0 To UBound(Macros)
msg = msg & (n + 1) & ": " & Macros(n) & vbNewLine
last = last + 1
Next n
msg = msg & vbNewLine & "Enter a number to run that macro:"
n = Application.InputBox(msg, "MyMacros", 1, Type:=1)
If n > 0 And n <= last Then Run Macros(n - 1)
End Sub
Use Developer > Macros to open the Macro dialog, then pick MyMacros (see Figure 1 below) . Click the Options... button to open the Macro Options dialog, then type lower-case r to make the shortcut key Ctrl+r (see Figure 2 below) . Now you can press Ctrl+r to start MyMacros, then type a number to open the Column Width dialog or the Row Height dialog (see Figure 3 below) .
Notice it is easy to add additional macros to the Macros list in MyMacros.
Finally, My Excel Toolbox includes the AdjustColumnWidths macro to adjust the width of selected columns by a fixed increment or a proportional multiplier. The AdjustRowHeights macro will adjust the height of selected rows in the same way. Both macros support Undo (Ctrl+Z).
See https://sites.google.com/view/MyExcelToolbox/
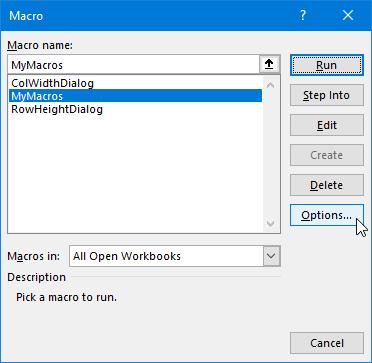
Figure 1.
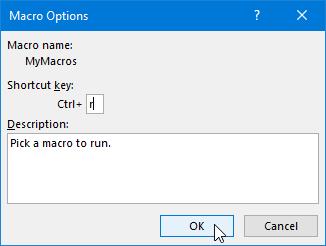
Figure 2.
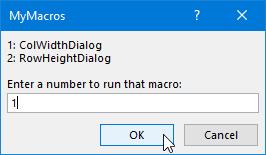
Figure 3.
2022-11-02 15:01:27
Referring to my note about setting cell height and width by keyboard using pixels, I'm now using Office 2021. If I click on the bottom border of the row number, Excel now shows both inches and pixels. So, I could make my change in inches, however, I often want to make a 1 or 2 pixel height change so inches is too gross a measurement.
Using Shift+F10, I tried a number followed by " p" and by " pixels", but neither is accepted. In Excel, a 73 pixel row is shown as .51". From the net, I tried UnitConverters.Net which converted 73 pixels to .7604". Next I tried Pixelto.net and pixelsconverter.com show the same result, .7604". These seem to be based on a 96 pixel inch. The Excel ratio is 144 pixels to the inch. Somewhere in mypast I think that it was 72 pixels to the inch.
While adjusting row height with the cursor is difficult, Alan's way of using Shift+F10 allows precision control without messing with the mouse. So, my problem is solved.
2022-10-31 13:21:15
Larry Schwartz
Still okking for an answer about setting cell height and width by keyboard using pixels. I notice that someone named Barry asked the same question.
2022-10-29 12:16:32
Barry
Hi
On the subject of cell height and width settings...
Is there a way to set the default so that you can type in the cell size in number of pixels (as displayed when you double-click on the division line between two rows/columns).
Regards
Barry
Got a version of Excel that uses the ribbon interface (Excel 2007 or later)? This site is for you! If you use an earlier version of Excel, visit our ExcelTips site focusing on the menu interface.
FREE SERVICE: Get tips like this every week in ExcelTips, a free productivity newsletter. Enter your address and click "Subscribe."
Copyright © 2026 Sharon Parq Associates, Inc.
 Please Note:
This article is written for users of the following Microsoft Excel versions: 2007, 2010, 2013, 2016, 2019, 2021, and Excel in Microsoft 365. If you are using an earlier version (Excel 2003 or earlier), this tip may not work for you. For a version of this tip written specifically for earlier versions of Excel, click here:
Please Note:
This article is written for users of the following Microsoft Excel versions: 2007, 2010, 2013, 2016, 2019, 2021, and Excel in Microsoft 365. If you are using an earlier version (Excel 2003 or earlier), this tip may not work for you. For a version of this tip written specifically for earlier versions of Excel, click here:
Comments