Please Note: This article is written for users of the following Microsoft Excel versions: 2007, 2010, 2013, 2016, 2019, and 2021. If you are using an earlier version (Excel 2003 or earlier), this tip may not work for you. For a version of this tip written specifically for earlier versions of Excel, click here: Turning Headers On and Off.
Written by Allen Wyatt (last updated October 9, 2025)
This tip applies to Excel 2007, 2010, 2013, 2016, 2019, and 2021
You already know that the headers in a worksheet come in handy. This is the gray area, at the left and top of a worksheet, which indicates the row and column label used by Excel. You click in the header area if you want to select either a row or header. You also know that you can adjust the height or width or rows or columns by using the row and column header area.
Even though this area is very useful, there may be times when you do not want it displayed. For instance, if you are using Excel to create an on-screen form, then the header areas may be distracting to the intended users of the form.
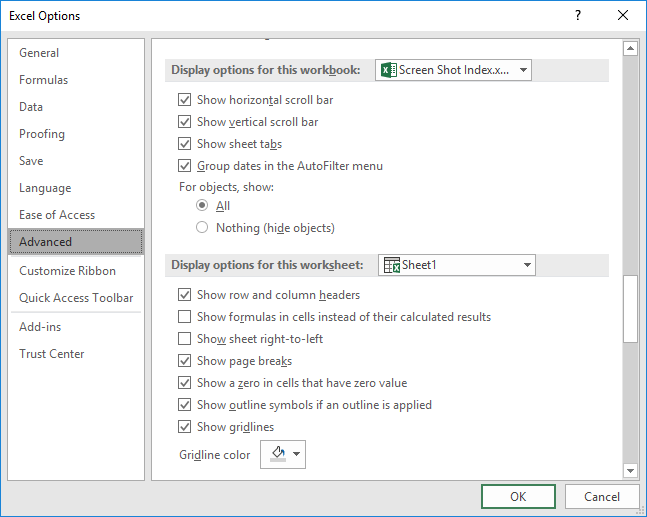
To control whether headers are turned on or off, follow these steps:

Figure 1. The Advanced options of the Excel Options dialog box.
As with other tasks in Excel, there are additional methods that accomplish the same result as shown above. These methods use various tabs of the ribbon. One method is to display the Page Layout tab of the ribbon, then clear the View checkbox under Headings in the Sheet Options group. Another method is to display the View tab of the ribbon and clear the Headings checkbox in the Show group.
Notice that Excel does not allow you to control the display of row and column headers individually—they are either both on or both off.
ExcelTips is your source for cost-effective Microsoft Excel training. This tip (6255) applies to Microsoft Excel 2007, 2010, 2013, 2016, 2019, and 2021. You can find a version of this tip for the older menu interface of Excel here: Turning Headers On and Off.

Solve Real Business Problems Master business modeling and analysis techniques with Excel and transform data into bottom-line results. This hands-on, scenario-focused guide shows you how to use the latest Excel tools to integrate data from multiple tables. Check out Microsoft Excel Data Analysis and Business Modeling today!
Tired of the same old boring Excel look? You can add some life to your worksheets by introducing some animation. Here's ...
Discover MoreExcel includes some animation capability that is enabled by default. If the animation is bothersome to you, then you'll ...
Discover MoreExcel allows you to display your workbooks using a couple of different views. If you want to disable one of the views, it ...
Discover MoreFREE SERVICE: Get tips like this every week in ExcelTips, a free productivity newsletter. Enter your address and click "Subscribe."
2025-10-09 09:42:50
Brian
Isn't it easier just to click the View tab on the ribbon then untick the Headings option in the Show group?
Got a version of Excel that uses the ribbon interface (Excel 2007 or later)? This site is for you! If you use an earlier version of Excel, visit our ExcelTips site focusing on the menu interface.
FREE SERVICE: Get tips like this every week in ExcelTips, a free productivity newsletter. Enter your address and click "Subscribe."
Copyright © 2026 Sharon Parq Associates, Inc.
Comments