Please Note: This article is written for users of the following Microsoft Excel versions: 2007, 2010, 2013, 2016, 2019, and 2021. If you are using an earlier version (Excel 2003 or earlier), this tip may not work for you. For a version of this tip written specifically for earlier versions of Excel, click here: Setting Vertical Alignment.
Written by Allen Wyatt (last updated July 10, 2021)
This tip applies to Excel 2007, 2010, 2013, 2016, 2019, and 2021
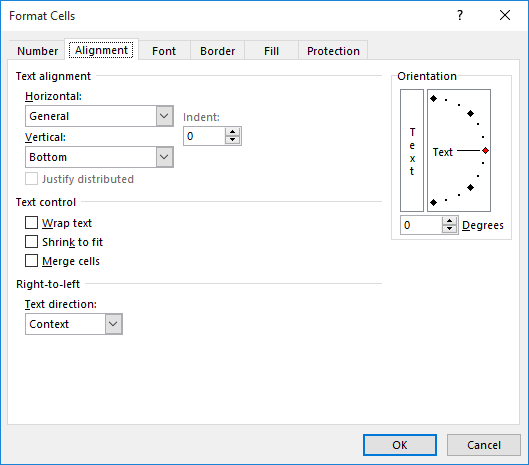
Excel provides several different ways you can align information from top to bottom (vertically) within a cell. You set the alignment by first selecting the cells you want to format and then displaying the Alignment tab of the Format Cells dialog box. (To display the dialog box, display the Home tab of the ribbon and click the small icon at the bottom-right of the Alignment group.) (See Figure 1.)

Figure 1. The Alignment tab of the Format Cells dialog box.
On the Alignment tab, use the Vertical drop-down list to make your selection. There are five different alignment options available:
ExcelTips is your source for cost-effective Microsoft Excel training. This tip (6261) applies to Microsoft Excel 2007, 2010, 2013, 2016, 2019, and 2021. You can find a version of this tip for the older menu interface of Excel here: Setting Vertical Alignment.

Professional Development Guidance! Four world-class developers offer start-to-finish guidance for building powerful, robust, and secure applications with Excel. The authors show how to consistently make the right design decisions and make the most of Excel's powerful features. Check out Professional Excel Development today!
Moving your custom formats into a formatting category other than "custom" isn't something you can do in Excel. Here's ...
Discover MoreInformation in a worksheet needs to be displayed using fonts. If you understand the two different types of fonts ...
Discover MoreHate to take your hands off the keyboard? Here are a couple of ways you can reject the mouse and still adjust the height ...
Discover MoreFREE SERVICE: Get tips like this every week in ExcelTips, a free productivity newsletter. Enter your address and click "Subscribe."
There are currently no comments for this tip. (Be the first to leave your comment—just use the simple form above!)
Got a version of Excel that uses the ribbon interface (Excel 2007 or later)? This site is for you! If you use an earlier version of Excel, visit our ExcelTips site focusing on the menu interface.
FREE SERVICE: Get tips like this every week in ExcelTips, a free productivity newsletter. Enter your address and click "Subscribe."
Copyright © 2026 Sharon Parq Associates, Inc.
Comments